
Subscribe to Our Youtube Channel
Related Manuals for HOMEDEPOT XWG-095


Summary of Contents for HOMEDEPOT XWG-095
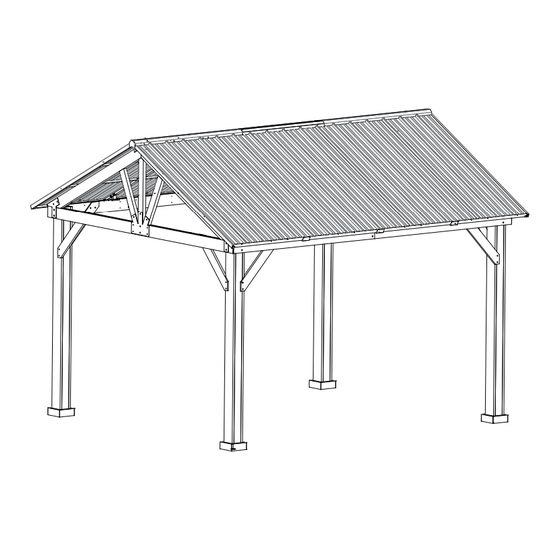
- Page 1 XWG-095 INSTRUCTION MANUAL 11 FT x 13 FT Wood Framed Gazebo The gazebo comes with 4 boxes. Sometimes they may be delivered on different day, please wait 2-3 more days or contact us for help.
- Page 2 Note: The gazebo needs to be installed in cooperation with five people. The following tools are not included and needed for assembly: Pistol Drill Tape Measure Hammer Screw Driver 2 m Adjustable Ladder 5 people Warning 1. A 5 person assembly is required for this gazebo. 2.
- Page 3 Attention: 1.Please fix all the screws first,do not lock off,after assemblling is fully completed,lock all at once finally. 2.Please check the manual carefully and make sure you have received all the parts. 3.If there is any missing,please let us know the letter of the parts you need. 4.If there is any damage,please send clear photos to us,we will check and offer you best solution soon.
- Page 4 2 PCS 2 PCS 1 PC 2 PCS Parts List (Box B) 10 PCS 4 PCS Parts List (Box C) 2 PCS 4 PCS 2 PCS 2 PCS 2 PCS 4 PCS 8 PCS 140 PCS 72 PCS 12 PCS 72 PCS 108 PCS 16 PCS...
- Page 5 8 PCS 84 PCS 24 PCS 8 PCS 8 PCS 8 PCS 2 PCS 14 PCS 14 PCS 2 PCS 1 PCS 2 PCS 2 PCS Parts List (Box D) 2 PCS 2 PCS 2 PCS 2 PCS 4 PCS 4 PCS 4 PCS 2 PCS...
- Page 6 <1> STEP2 STEP1 08 4x B 4x C 4x M5x30...
- Page 7 <2> M8x25...
- Page 8 <3> STEP2 STEP1 Attention: Please make sure that the two sides are corresponded when assemble. M8x25 M5x40 CC 8x...
- Page 9 <4> 01 2x 02 2x M8x25...
- Page 10 <5> Attention: Pay attention to the side of Beam (01) and Beam (02) when join them with Beam (05) and Beam (07). M5x40 CC 64x...
- Page 11 <6> STEP1 STEP2 Attention: 1.Pay attention to each side of Post (08). 2.Flat installation please. NN 12x LL 4x M10X80 M10X205 OO 4x AA 4x...
- Page 12 <7> STEP2 STEP1 STEP3 NN 12x LL 4x M10X205 M10X80 OO 4x AA 4x...
- Page 13 <8> d1=d2 10 4x 11 4x Attention: Install from the top to bottom when join Arc support 1 (10) and Arc support 2 (11). M8X35 M8x35...
- Page 14 <9> Attention: 1. Join Steel pin (S) on the Triangular Support Beam(13) first. 2. Join Triangular Support Beam(13) with Triangular Middle Support Beam(14) and Triangular Frame Slanting Beam(15 ) by using a wooden hammer. 13 4x STEP3 STEP2 STEP1 14 2x 15 4x STEP4 S 12x...
- Page 15 <10> M8x50...
- Page 16 <11> STEP2 STEP1 F1 1x F2 1x Attention: Assemble Big Roof Beam 2(F2) and Big Roof Beam 1(F1) with Connector(G1) one by one. G1 1x M6x15...
- Page 17 <12> M6x15...
- Page 18 <13> STEP2 STEP1 H 6x M6X55 JJ 12x M6x15...
- Page 19 <14> J1 3x STEP1 STEP2 P 1x M6x15...
- Page 20 <15> STEP2 STEP1 N 8x M6x15...
- Page 21 <16> STEP2 STEP3 STEP1 M1 2x M2 2x N 8x M6x15...
- Page 22 <17> L1 2x STEP4 STEP2 STEP1 STEP3 Attention: Please make sure that join Big Roof Lower Tube (L1) with the Big Roof Side(M1). M6x15...
- Page 23 <18> STEP2 STEP1 M5x30...
- Page 24 <19> STEP3 STEP2 STEP1 P1 4x P2 2x Attention: Please assemble the pannel with a 2 m adjustable ladder. R1 1x M6x35...
- Page 25 <20> STEP3 STEP2 STEP1 P1 2x R2 1x Attention: Please assemble the pannel with a 2 m adjustable ladder. M6x35...
- Page 26 <21> STEP2 STEP3 STEP1 P1 4x P2 2x Attention: Please assemble the pannel with a 2 m adjustable ladder. R1 1x M6x35...
- Page 27 <22> Q 6x M6x15...
- Page 28 <23> U 4x M6x15...
- Page 29 <24> Ø8X180...
Need help?
Do you have a question about the XWG-095 and is the answer not in the manual?
Questions and answers