Advertisement
Quick Links
BS8468-1 lung demand valve (LDV)
With CBRN special instructions for breathing apparatus
1
Safety-related information
–
Before using this product, carefully read these instructions for use and
those of the associated products.
–
Strictly follow the instructions for use. The user must fully understand
and strictly observe the instructions. Use the product only for the
purposes specified in the intended use section (see section 3.2).
–
Do not dispose of the instructions for use. Ensure that they are
retained and appropriately used by the product user.
–
Only trained and competent users are permitted to use this product.
–
Comply with all local and national rules and regulations associated
with this product.
–
Only specialist, trained personnel are permitted to check, repair and
maintain the product as described in these instructions for use. Further
maintenance work that is not detailed in these instructions for use must
only be carried out by Dräger or qualified personnel. Dräger
recommend a Dräger service contract for all maintenance activities.
–
Only use genuine Dräger spare parts and accessories when
performing maintenance work, or the proper functioning of the product
may be impaired.
–
Do not use a faulty or incomplete product. Do not modify the product.
–
Notify Dräger in the event of any component fault or failure.
2
Conventions in this document
2.1
Definitions of alert icons
The following alert icons are used in this document to provide and highlight
areas of the associated text that require a greater awareness by the user.
A definition of the meaning of each icon is as follows:
WARNING
Indicates a potentially hazardous situation which, if not avoided, could
result in death or serious injury.
CAUTION
Indicates a potentially hazardous situation which, if not avoided, could
result in physical injury. It may also be used to alert against unsafe
practices.
NOTICE
Indicates a situation which, if not avoided, could result in damage to the
product or the environment.
2.2
Typographical conventions
► A triangle is used in safety statements to indicate possible ways of
avoiding the hazard.
An information symbol is used for notes and additional useful
information.
1. Numbered paragraphs indicate that the information is sequential.
–
Dashed paragraphs indicate that the information is non-sequential.
2.3
Trademarks
The following website lists the countries in which the Dräger trademarks
are registered: www.draeger.com/trademarks.
®
Molykote
is a registered trademark of DDP Specialty Electronic Materials
US 9, LLC.
The trademarks listed are only registered in certain countries and not
necessarily in the country in which this document is published.
3
Description
3.1
Feature description
The Dräger BS8468-1 positive pressure lung demand valve (LDV) controls
the breathing air supplied into the mask of a breathing apparatus wearer.
The lung demand valve connects the medium-pressure supply from the
breathing apparatus to the mask, and a sealed and balanced piston unit
inside the valve controls the quantity of air flow through the valve in
response to the breathing demand of the wearer.
The positive-pressure valve maintains a greater pressure than
atmospheric inside the mask. Although the pressure drops as the wearer
inhales, the pressure inside the mask remains above atmospheric.
3.2
Intended use
When the product is used with an approved breathing apparatus, face
mask and cylinder, it provides a wearer with respiratory protection for
working in contaminated or oxygen-deficient conditions, including CBRN
(Chemical, Biological, Radiological and Nuclear) scenarios.
To ensure approved protection in CBRN scenarios, the Dräger BS8468-1
lung demand valve must only be used in the approved breathing apparatus
configurations specified in the BS8468-1 configuration matrix that
corresponds to the breathing apparatus. Contact Dräger for details.
WARNING
Using unapproved equipment combinations is unsafe.
► Only use the lung demand valve with approved Dräger face masks in
CBRN environments.
► Contact Dräger for a list of the equipment combinations that are
approved for CBRN use in the breathing apparatus.
3.3
Approvals
The European standards, guidelines, and directives according to which
this product is approved are specified in the declaration of conformity (see
the declaration of conformity or www.draeger.com/product-certificates).
The BS8468-1 lung demand valve is approved for use with Dräger Self-
Contained Breathing Apparatus (SCBA) protection equipment meeting the
requirements of BS8468-1, EN137:2006 Type 2 and EN136:1998 Class 3.
Only a Dräger face mask complying with EN136:1998 Class 3 and marked
with BS8468-1 must be used in conjunction with the approved
configurations for respiratory protection in CBRN scenarios.
To ensure complete protection in CBRN scenarios, Dräger advise that
users should consider a personal protective ensemble conforming to
BS8467.
Specific kits are available of BS8468-1 conforming lung demand valves
and face masks to be used with Dräger breathing apparatus. Contact
Dräger for details.
3.4
Explanation of type-identifying marking and
symbols
NOTICE
The device may be damaged, or approvals invalidated, by engraving it, or
by applying chemical marking or paint.
► Do not use marker pens or apply paint, and do not scratch or engrave
the device.
► Dräger recommend using adhesive labels to add personal marking to
the device.
Refer to the relevant authority for explanation of approval body symbols
and marking on the equipment. Examples of other marking on component
parts of the breathing apparatus are:
BRXX-1234
–
Dräger serial number
P
–
Positive-pressure
09/09
–
Month and year of manufacture
3356812 or R21034
–
Dräger part number
–
Barcode of serial number
4
Use
WARNING
Only trained and competent users (those who have attended a relevant
training course) are permitted to prepare and use this product.
► Ensure that any accessories, ancillary equipment, and other
protective clothing items do not interfere with the breathing apparatus
and do not create a safety hazard.
4.1
Prerequisites
WARNING
If there is not a good seal between the mask and the face of the wearer,
the mask may leak inward or outward during use.
► Select and test the face mask from the available sizes.
Ensure that you have selected and are using the correct size face mask.
–
The face mask is available in 3 sizes. The size is marked on the left
side of the mask.
–
S – small
–
M – medium
–
L – large
–
The nose cup is available in 3 sizes. The size is marked on the front of
the nose cup, and is visible through the visor.
–
1 – small
–
2 – medium
–
3 – large
4.2
Preparation for use
4.2.1
Fitting the fabric head harness (optional)
The face mask is supplied as standard with a five point adjustable rubber
head harness fitted. If it is required to use the five point adjustable fabric
head harness, fit the harness as follows:
1. Remove the 5-point adjustable rubber head harness by pushing
forward each of the five plastic buckle attachments (Fig 1, Item 1) until
the buckle clicks out of place from the stud. Lift and remove each
buckle from the stud.
1
1
2116
2. Attach the 5-point adjustable fabric head harness to the mask.
3. Position the non-adjustable buckle to the top forehead attachment
(centre) of the face mask. Ensure that the head harness is positioned
so that the finished side of the harness will be seen when the mask has
been donned (Fig 2, Item 1).
2
1
4710
4. Place the larger keyhole circle on the buckle over the studs and pull
the buckle back until the smaller keyhole circle of the buckle clicks and
locks onto the stud. Repeat this procedure with each of the remaining
buckles.
When correctly assembled, the pull tabs on the adjustable straps will be
located away from the head when worn (Fig 2).
Instructions for use
4.2.2
Pre-use inspection
Carry out a full visual inspection of the equipment as detailed in the
breathing apparatus instructions for use and section 5.3.
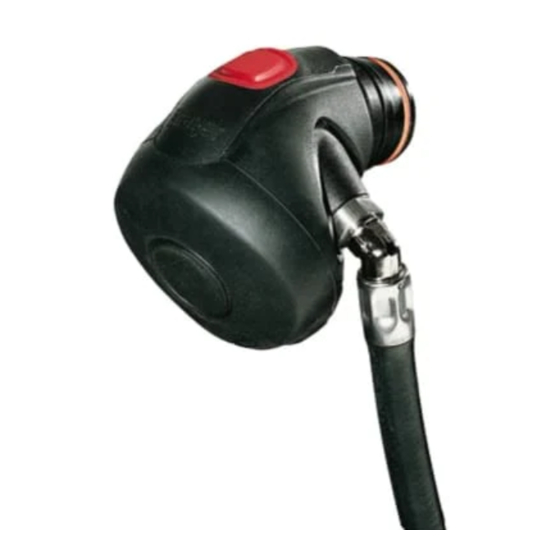
Ensure the retaining groove of the connector (Fig 3, Item 3) and the mask
port are clean and free from foreign material. Inspect the connector O-ring
for damage and dirt, and ensure that lubricant is present on the surface of
the O-ring.
3
1
2
For an ESA type lung demand valve, check the release buttons on the side
of the lung demand valve. Briefly press both buttons and ensure that they
depress and then return without restriction.
Clean parts as necessary (see section 5.2), and ensure that any damaged
or faulty parts are replaced before use. Check the O-ring on the lung
demand valve. As a guide, lubricant should be felt on the fingers but not
seen. If relubrication is required, lightly apply Molykote
lubricants are not tested and may damage the equipment).
4.2.3
Connecting the LDV
1. Disconnect and then reconnect the male coupling of the lung demand
valve hose. To connect, press the male coupling into the female
coupling until an audible click is heard. If there is any difficulty
disconnecting or connecting, see the troubleshooting information in
the breathing apparatus instructions for use.
2. Press the reset button (Fig 3, Item 1) to switch off the positive
pressure.
3. Open the cylinder valve (counterclockwise) slowly, but fully, to
pressurise the system.
–
After storage at temperatures below 0 °C leakage may be observed
when the cylinder valve is initially opened due to ice formation.
–
If leakage is observed from the lung demand valve, press the front
button (Fig 3, Item 2) to allow a rush of air to pass through the lung
demand valve and then quickly press the reset button (Fig 3,
Item 1) to switch off the positive pressure. Resume normal
operation.
–
If leakage still occurs, remove the breathing apparatus from
service and report the fault to trained service personnel or contact
Dräger.
4. Carry out all functional testing as described in the breathing apparatus
instructions for use.
5. Align and push the lung demand valve into the face mask port until it
clicks into position (Fig 4). Check the attachment by gently attempting
to pull the coupling apart.
4
4.2.4
Putting on the face mask
WARNING
Correct fit of the face mask can only be achieved if the complete mask seal
contacts the skin.
► Do not allow head hair styles (buns, pony-tails, hairpieces, etc.) to
affect the fit of the face mask.
► Do not allow head hair, facial hair (including beard stubble and
sideburns), earrings, other facial piercings, and normal spectacles to
interfere with the face mask seal.
See also the face mask selection information (section 4.1).
1. Inspect the face mask: ensure that head harness is securely attached,
the nose cup is correctly located and secure, and that all parts are in
good condition.
2. If fitted, move the spectacle frame to the preferred position.
3. Fully extend the straps of the head harness (Fig 5).
5
4709
4. Place the carrying strap over the head and locate the face mask on the
chest. (Dräger recommend using the carrying strap to position the
mask in this way to prevent damage and dirt ingress until the mask is
put on.)
5. If fitted, clip the communication system push-to-talk (PTT) button to a
suitable chest location.
6. Spread the head harness and place the chin into the face mask.
7. Pull the head harness over the head and centre the fabric panel (Fig 2,
Item 1), ensuring the straps are flat and not twisted.
8. Ensure that nothing is interfering with the face seal (hair, head
harness, carrying strap, etc.). Also ensure that the full face seal is
touching and following the contours of the face.
3
2739
®
111 (other
2867/2863
3356838 (A3-D-P) 1 / 3
Advertisement

Related Manuals for Dräger BS8468-1


Summary of Contents for Dräger BS8468-1
- Page 1 Also ensure that the full face seal is locks onto the stud. Repeat this procedure with each of the remaining The BS8468-1 lung demand valve is approved for use with Dräger Self- touching and following the contours of the face.
- Page 2 BS8468-1 lung demand valve (LDV) Instructions for use With CBRN special instructions for breathing apparatus 9. Tighten the neck straps (Fig 6, View A) and then the temple 4. Hold the body of the mask and pull and lift to remove the mask.
- Page 3 BS8468-1 lung demand valve (LDV) Instructions for use With CBRN special instructions for breathing apparatus Visual inspection Check that the lung demand valve is clean and undamaged. Pay particular attention to levers, diaphragm, spring, hoses and connectors. Typical signs of damage that may affect the operation of the lung demand valve include impact, abrasion, cutting and discolouration.
Need help?
Do you have a question about the BS8468-1 and is the answer not in the manual?
Questions and answers