
Related Manuals for LINDR CWP


Summary of Contents for LINDR CWP
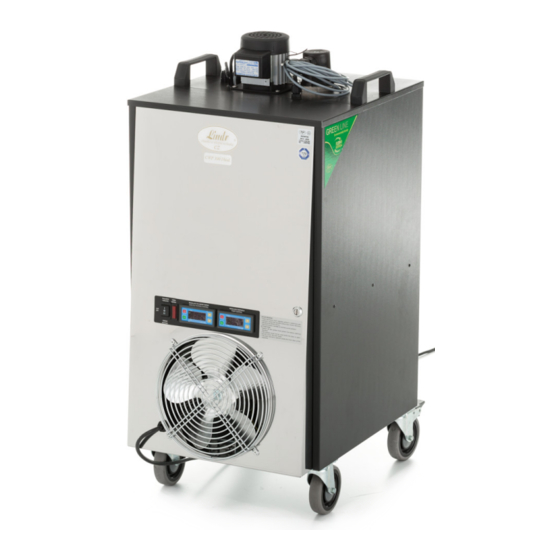
- Page 1 INSTRUCTION MANUAL DISPENSE EQUIPMENT FOR WINE MAKERS LINDR ENGLISH Number 008-2020 REV00 Valid 2020-09-01 MODEL CWP 300 V GREEN LINE...
- Page 2 Sadová 132 503 15 Nechanice, Czech Republic mob.: + 420 775 715 494 tel. : +420 495 447 239 e-mail: info@lindr.cz web: www.lindr.cz, www.lindr.eu SYMBOLS AND MARKINGS USED IN THE MANUAL: WARNING: NOTE: Not following instructions may cause injury or This symbol indicates information and damage the device.
-
Page 3: Table Of Contents
Contents: Introduction ......Description of the cooler ......Machine plate . -
Page 4: Introduction
It can be also used to ferment unsupervised children. must. CWP 300 V GREEN LINE is fitted with a drain valve for easy draining of water from the WARNING: Before connecting to main... -
Page 5: Installation And Placement
WARNING: When unplugging the device • Ensure sufficient free space for air circulation from the socket, grab the plug and pull it out. and heat dissipation. Do not under any circumstances pull at the • Ensure sufficient supply of fresh air. cable;... -
Page 6: Electrical Connection
6. ELECTRICAL CONNECTION: product in a way that is counter to the instructi- on manual or the product‘s design as defined Connect the device to a power socket in ac- by the manufacturer. Materials replaced du- cordance with specifications on the machine ring the validity period of the warranty are our plate of the device. - Page 7 figure figure figure...
-
Page 8: Controls, Temperature And Adjustment
10. CONTROLS, TEMPERATURE AND ADJUSTMENT: figure 1. Cooling/heating mode switch: Used for mode setting • 0 position = off • I position = cooling (Cooling ModeI: It is recommended to set a lower temperature on the cooling thermostat (no.3.) than on the pump control the mostat (no.4.)) •... -
Page 9: Filling The Tank And Interconnecting With Exchanger
11. FILLING THE TANK AND INTERCONNECTING WITH EXCHANGER : • Fill the plastic tank up to the MAX mark. • Interconnect the appliance with the heat exchanger using speed fittings (heat exchanger not included). figure figure Pour the liquid here WARNING: After connecting the heat exchanger and starting the pump, the water level in the tank may drop, so check the level again or top up the water. - Page 10 13. WIRE DIAGRAM: 13.1 Connection with cooling coil: 10 a figure 13.2 Connection with board exchanger: 10 B figure...
-
Page 11: Dixell Xr20Cx Thermostat
14. Dixell XR20CX THERMOSTAT: 11 a figure Displaying Set Temperature: 1. Short-press the SET button. The display will show the set value. 2. To return the display to the current temperature, again short-press the SET button or wait Changing Set Temperature: 1. -
Page 12: Cleaning The Condenser
16. CLEANING THE CONDENSER: The condenser must be cleaned with compressed air 1x a month. Alternatively, clean with a brush. 12 A figure 12 B 12 C figure figure WARNING: The condenser must only be cleaned by professional personnel and at least 1x a month by brushing or by compressed air. -
Page 13: Inspection Before Every Use
17. INSPECTION BEFORE EVERY USE: 1. Visual check. 2. Lead-in cable check. 3. Condenser cleanliness check (in case of excess pollution of the condenser, clean more frequently than 1x a month). 4. Inspection of water level. WARNING: Do not use the device if defects or malfunctions are found. 18. -
Page 14: Table Of Malfunctions
21. TABLE OF MALFUNCTIONS: Malfunction Cause Removal The device is too noisy. The device is in contact Move the object that is touching the with a foreign object. device so that it is not in contact with the cooler. There is a sunken foreign Remove the object from the fan com- object in the fan com- partment. -
Page 15: Spare Parts
22. SPARE PARTS: When ordering spare parts, always provide the following: • product type • production year • product‘s serial number 23. TECHNICAL DATA: Name CWP 300 V Green Line Power (Hp) Power 2000 Maximum output (l/hour) Continuous output...
Need help?
Do you have a question about the CWP and is the answer not in the manual?
Questions and answers