Table of Contents
Advertisement
Quick Links
Fusion3Dro mod.2022
Table Saw
Operating Instructions
Producer:
Laguna Tools Inc
744 Refuge Way, Suite 200
Grand Prairie, Texas 75050
USA
Phone: +1 800-234-1976
Website: www.lagunatools.com
Distributor:
IGM nástroje a stroje s.r.o.
Ke Kopanině 560, 252 67, Tuchoměřice
Czech Republic, EU
Phone: +420 220 950 910
PDF ONLINE
E-mail: sales@igmtools.com
www.igmtools.info
Website: www.igmtools.com
2022-05-16
151-Fusion3Dro LAGUNA Table Saw Manual EN v1.3 A4ob
Advertisement
Table of Contents

Related Manuals for IGM LAGUNA Fusion3Dro


Summary of Contents for IGM LAGUNA Fusion3Dro
- Page 1 Laguna Tools Inc 744 Refuge Way, Suite 200 Grand Prairie, Texas 75050 Phone: +1 800-234-1976 Website: www.lagunatools.com Distributor: IGM nástroje a stroje s.r.o. Ke Kopanině 560, 252 67, Tuchoměřice Czech Republic, EU Phone: +420 220 950 910 PDF ONLINE E-mail: sales@igmtools.com www.igmtools.info...
- Page 2 www.igmtools.com...
- Page 3 www.igmtools.com...
-
Page 4: Table Of Contents
1663 mm x 1652 mm x 1081 mm Shipping Dimensions (LxWxH) 1.1 Warranty 2. About this manual 1130 mm x 1100 mm x 1190 mm IGM Tools & Machinery strives to always Weight (No Accessories) 157 Kg deliver high-quality machinery. The warranty is 3. Fusion 3 Specifications... -
Page 5: Main Features
machine : not exceed 50% at 35°C. moving parts. Loose clothes, jewellery or long hair can be caught in moving parts. • Intended use also involves compliance with our specified operating, maintenance and repair • If devices are provided for the connection of conditions and the safety information contained dust extraction and collection facilities, ensure in the operating instructions. -
Page 6: Guarding Related Warnings
• Disconnect the plug from the power source A guard that is loose, damaged, or is not misalignment, binding and kickback. and/or remove the battery pack, if detachable, functioning correctly must be repaired or • Never reach around or over a rotating saw from the power tool before making any replaced. -
Page 7: Electrical
CE norms, standards and regulations • Remove tools, wood scraps, etc. From The operating conditions for noise for safe use. Laguna Tools or IGM is in no the table before the table saw is turned measurement comply with Annex A of ISO way responsible for injury or death that occurs on. -
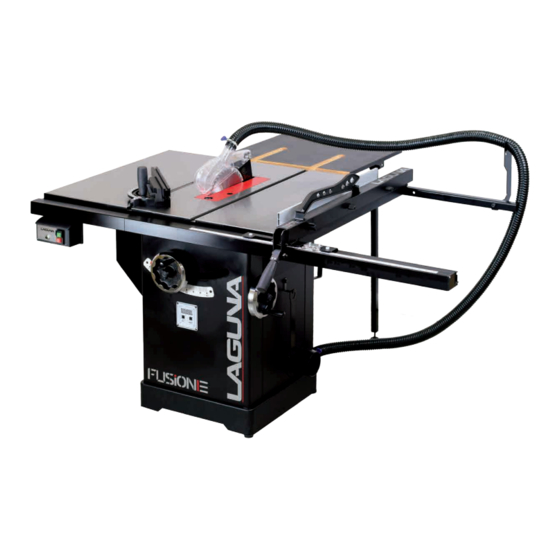
Page 8: Machine Overview
5.1 Controls to the right. Start/Stop/Fuse CAUTION: DO NOT ADJUST TILT WHEEL Dusk mask should be worn. WHEN LOCKED. Fence clamp lock Eye protection should be worn. Ear protection should be worn. Disconnect from power supply before servicing Pic. 9 1. -
Page 9: Inventory
Receiving your tablesaw away the oil with a waste rag. Blade Guard Use Caution: An oily rag can be a serious fire hazard. Discard in an appropriate manner. Tech Tip: To help keep your table top clean and to prevent or clean any rust, we recommend waxing your tabletop with an appropriate wax rubbing compound. -
Page 10: Installing/Removing The Throat Plate
pieces. STOP BEFORE TIGHTENING. and nuts to the short rear fence guide and the back left of the table. STOP BEFORE TIGHTENING: Keep bolts loose until entire rail assembly is in place to properly level rail. 6.5 Installing/removing the throat plate 1. -
Page 11: Installing/Removing The Blade
5. Engage blade lock (red component). WARNING: MAKE SURE SAW IS 6. Remove the arbor nut and flange with arbor UNPLUGGED. wrench. With the throat plate removed, and the cam lock 7. Remove or install blade. mechanism in the open position (pulled up), CAUTION: Make sure the teeth of the blade are insert the blade guard insert into the slot. -
Page 12: Adjustments
Check the IGM website for these tools. or adjusted. The fence must be zeroed for accurate cuts when using the scale. -
Page 13: Arbor And Tilt Adjustments
Better Loosen Table Bolts 3. Take relative measurement A dial indicator on a mitre gauge. Locate and loosen right side table to cabinet bolt (above the tool holder). Place the extension wing on the supports and Best place into position. Loosen Table Bolts 4. -
Page 14: Accessory Adjustments
3. Remove tool storage cover 4. Tighten or loosen with weight of motor. removing the table top. The belt can easily be changed without removing the table top. Use Caution: DO NOT OVERTIGHTEN BELT! The weight of the motor is adequate to put Accessing the Belt enough tension on the belt. -
Page 15: Push Block And Push Stick
Warning: Always turn on the dust collector As Adjustments are made, the blade before starting the saw and stop the saw before attachments will translate, not rotate, by design. turning off the dust collector. This ensures that the workpiece will not get held up. -
Page 16: Ripping Small Workpieces
Bevel ripping is performed the same as ripping the alignment of the guard and splitter and Daily Check: but with the saw blade set to an angle not verify that there is clearance with the saw blade. • Loose mounting bolts perpendicular with the table surface. - Page 17 10. Trouble-Shooting Machine will not start or continues to trip the breaker. Possible Causes Possible Solution 1. Start capacitor at fault. 1. Test/replace if faulty. 2. Motor connection wired wrong. 2. Correct motor wiring connections. 3. Wiring at fault. 3. Check/fix broken, disconnected, or corroded wires. 4.
- Page 18 Wiring Diagram: Fusion F3Dro 230V www.igmtools.com -18-...
- Page 19 Fence assembly Mitre gauge, blade guard www.igmtools.com -19-...
- Page 20 Motor and trunnion www.igmtools.com -20-...
- Page 21 Cabinet www.igmtools.com -21-...
- Page 22 051469-000 Worm Gear Plate 182 175166-904 Fixed Plate 011004-103 Spring Pin 6*25 175012-156 Pointer IGM nástroje a stroje s.r.o., Ke Kopanině 560, Tuchoměřice, 252 67, Czech Republic, E.U. +420 220 950 910, www.igmtools.com © 2022 IGM nástroje a stroje s.r.o.
Need help?
Do you have a question about the LAGUNA Fusion3Dro and is the answer not in the manual?
Questions and answers