
Related Manuals for IGBT MIG-200M


Summary of Contents for IGBT MIG-200M
- Page 1 IGBT Inverter Welder USER’S MANUAL Model: MIG-200M FOR YOUR SAFETY Read and understand this manual before use. Keep this manual for future reference...
-
Page 2: Table Of Contents
TABLE OF CONTENTS 1. SAFETY........................2 2. GENERAL DESCRIPTION..............……………...3 3. MAIN PARAMETERS................……………...5 4. PANEL INSTRUCTION...................6 5. INSTALLATION......................8 6. OPERATION......................11 7. CAUTION......................13 8. MAINTENANCE....................14 9. DAILY CHECK......................15 10. TROUBLE SHOOTING..................17 11. DIAGRAM......................19 DECLARATION OF CONFORMITY Hereby we declare that these machines are produced based on relative Chinese and international standards and they conform to the international safety standard IEC60974-1. -
Page 3: Safety
1. SAFETY Welding is dangerous, and may cause damage to you and others, so take good protection when welding. For details, please refer to the operator safety guidelines in conformity with the accident prevention requirements of the manufacturer. Professional training is needed before operating the machine. ⚫... -
Page 4: General Description
2. GENERAL DESCRIPTION MIG-200M Welder is an inverter based MIG welder with LCD display. Adopting MCU controller, together with TFT-LCD, it makes the setting much easier for the user. This multi-process welder has 4 functions: Flux cored arc welding, MIG welding, TIG, and MMA;... - Page 5 2.1 Flow Diagram: 2.2 Schematic Diagram:...
-
Page 6: Main Parameters
3. MAIN PARAMETERS 3.1 Technical parameters table: MODEL MIG-200M Input voltage (V) 1ph 230V, 50Hz Welding mode MIG/FLUX Input current (A) Input power(KVA) No-load voltage(V) Welding current(A) 30~200 20~175 20~175 range (A) Welding voltage(V) 15.5~24 21~27 10.8~17 Rated duty cycle Welding wire dia.(mm) -
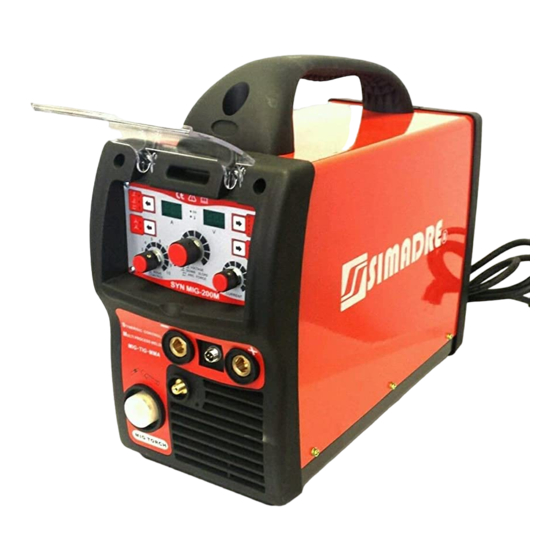
Page 7: Panel Instruction
4. PANEL INSTRUCTION 4.1 Front Panel: 1. Adjusting knob: wire speed setting (MIG mode); welding current setting (MMA/TIG mode). 2. Adjusting knob: welding voltage setting (MIG mode); output on/off control (MMA/TIG mode). 3. LCD: welding technics and parameters display. 4. Home button: return to the main menu, where the user can choose welding technics type or display setting. - Page 8 4.2 Rear Panel: Gas inlet: to connect the gas hoses. Power switch: Power ON/OFF Fan: cooling down the fan during the work. 4.3 Internal Panel: Selector switch: to choose torch type for welding. Wire spool holder: to adopt the welding wire.
-
Page 9: Installation
5. INSTALLATION 5.1 Power cord connection: Connect the machine to the 1phase 220V AC Power supply with leakage protection switch. 5.2 Output cables connection: 5.2.1 Under MIG with solid wire: welding cable connector connects “+” , earth clamp connects “-” , torch connect to “... - Page 10 5.3 Filler Wire 5.3.1 Threading the filler wire 1. Open the reel housing by pressing on the opening button and install the wire reel in such a way that it rotates counter clockwise. You can use either a 5 kg (diameter 200 mm) or l kg (100 mm) wire reel in the machine.
- Page 11 5.3.2 Changing the feed roll groove The feed roll groove is factory set for welding filler wires of 0.8-1.0 mm diameter. The feed roll groove must be changed if you use 0.6 mm thick filler wire. 1. Open the feed roll from the pressure control lever. 2.
-
Page 12: Operation
6. OPERATION 6.1 Operation steps: Please power on the welder, open the gas bottle valve, and adjust the gas pressure to suitable scale. If not using the spool gun, please select the torch type at “ ” position on the internal panel. - Page 13 The welding expert system will preset the welding parameters according to the selected wire size and material thickness. The user can manually fine adjust it as well. To adjust the welding current, please use the left adjusting knob; and to adjust the welding voltage, please use the right adjusting knob.
-
Page 14: Caution
Settings The brightness of the display can be adjusted within the settings option. The user interface software settings can be reset to the original factory settings. Please note that all the saved data will be reset to factory setting. Information regarding the software revision of the user interface and the software revision of the inverter board is present in the information section. -
Page 15: Maintenance
2. Safety Tips Protection circuit is installed in this machine. If the input voltage or the output current is too high or machine inside temperature over heating inside, the machine will stop automatically. However, excessive use (e.g. too high voltage) of machine may also damage machine, so please note: 2.1 Ventilation High current passes when welding is carried out, thus natural ventilation cannot satisfy the machine's cooling requirement. -
Page 16: Daily Check
and the enclosure). Only when there are no abnormal phenomena anymore, then the machine can be used. (5) Check periodically whether the insulation covers of all cables is in good condition. If there is any dilapidation, rewrap it or replace it. (6) Put the machine into the original packing in dry location if it is not to be used for a long time. - Page 17 4. Reattach the welding gun's parts, tighten the contact tip and contact tip's adapter to spanner tightness. Changing the wire guide If the wire guide is too worn or totally clogged, change it to a new one according to the following instructions: 1.
-
Page 18: Troubleshooting
10. TROUBLESHOOTING The following operation requires sufficient professional knowledge on electric aspect and comprehensive safety knowledge. Operators should be holders of valid qualification certificates which can prove their skills and knowledge. Make sure the input cable of the machine is cut off from the electricity utility before uncovering the welding machine. - Page 19 • Please check if the output cable connection is loosen. • Please check if the torch is in good condition. • Please check if the wire roller size is correct. • Please check if the electrode size is correct. • Error codes on the LCD.
-
Page 20: Diagram
11. DIAGRAM... - Page 21 Item Item Welding Polarity Cable Wire Spool Holder Torch Connector Flange Quick Connector Earthing Screw Front Panel Solenoid Valve Knobs Rear Panel Power Switch Reactor Power Cord Main Circuit Board Door Horizontal Installation Plate Door Locker Cover Bottom Base Handle Rubber Stand Plastic Hinge Wire Feeder...
Need help?
Do you have a question about the MIG-200M and is the answer not in the manual?
Questions and answers