Advertisement
Quick Links
Advertisement

Related Manuals for GU Electronic AD-4G-151223


Summary of Contents for GU Electronic AD-4G-151223
- Page 1 Audi-4G-HIGHEND - MODEL : AD-4G-151223 - DATE : 2020.02.09...
- Page 2 1. Main Spec 2. Block Diagram 3. Dimension 4. External Appearance 5. Connector Pin Assignment 6. Product Composition 7. DIP S/W Setting 8. Mode Change 9. Touch Control 10. OSD(On Screen Display) Control 11. Install Manual 12. Q & A GU Electronic...
- Page 3 - Input Power : 8VDC ~ 24VDC - Consumption Power : 12Watt, Max 4. Switch Input mode - Possible to select CAR model while switching mode by DIP S/W - By button on the Commander in the car via CAN GU Electronic...
-
Page 4: Block Diagram
2. Block Diagram 2. Block Diagram INTERFACE COMMAND EEPROM SYSTEM RECEIVER LVDS LVDS LVDS LVDS RELAY NAVIGATION LVDS Scaler SYSTEM (PIP) CVBS1 CVBS2 COMPOSITE FRONT CAMERA COMPOSITE REAR CAMERA REAR CAMERA POWER TFT-LCD LVDS GU Electronic... - Page 5 3. Dimension 156mm * 93mm * 26mm 156 mm 26mm 93mm * This can change under manufacturer’s circumstance GU Electronic...
-
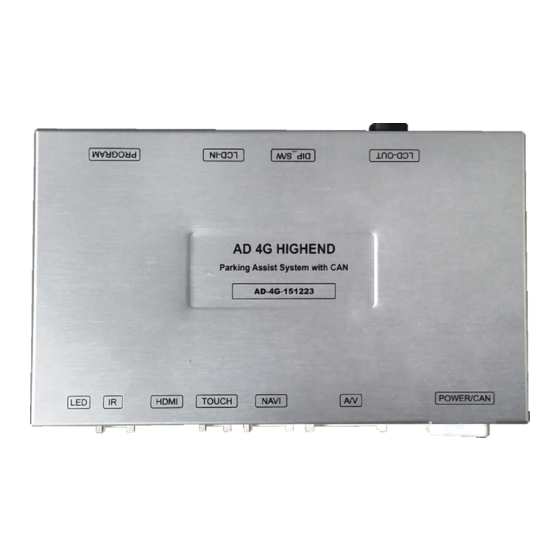
Page 6: External Appearance
4. External Appearance PROGRAM LCD-IN DIP S/W LCD-OUT TOUCH Digital NAVI POWER/CAN GU Electronic... - Page 7 4. External Appearance PROGRAM LCD-OUT DIP S/W LCD-IN TOUCH Digital NAVI POWER/CAN GU Electronic...
-
Page 8: Connector Pin Assignment
⑤ GND (Black) ④ REAR_DET (Brown) ⑥ DVB-T IR (Green) ⑤ CAN-B-LOW (Green) ⑦ DVD IR (Orange) ⑥ CAN-B-HIGH (Orange) ⑦ CAN-OUT-LOW (White) ⑧ CAN-OUT-HIGH (Violet) ⑨ CAN-IN-LOW (Blue) ⑩ CAN-IN-HIGH (Red) ⑪ MMI (Yellow) ⑫ GND (Black) GU Electronic... -
Page 9: Product Composition
6. Product Composition Interface 1 EA A/V Cable (24pin) 1 EA Power Cable 1 EA OSD Board 1 EA RGB NAVI Cable(7pin) 1 EA Touch convertor Cable(KD-900) 1 EA LVDS Cable 1 EA GU Electronic... - Page 10 6. Product Composition * CarPlay Set Sales(option) – KPLAY AUX Cable 1 EA Interface 1 EA Power Cable 1 EA HDMI Cable 1 EA Bluetooth / Wifi Antenna 2EA Microphone 1 EA GU Electronic...
- Page 11 6. Product Composition * CarPlay(NV17) Set Sales(option) AUX Cable 1 EA CarPlay Main 1 EA Power Cable 1 EA HDMI Cable 1 EA Microphone 1 EA GU Electronic...
-
Page 12: Dip S/W Setting
Audi_A3_5.8” Audi_A3_7.0” ON : Not Used DVB-T(AV1) OFF : Used ON : Not Used DVD(AV2) OFF : Used Audi_A4/Q7_7.0” Audi_A6_8.0” Audi_TT_12.0” Audi_Q2_2017year_7.0” CAR type SEL Right Picture Volkswagen_Golf_5.8” Volkswagen_Polo_6.5” Porsche PCM4.0 2016_7.0” Bentley_Mulsanne_2017year_8.0” Volkswagen_Golf_6.5” Bentley_Mulsanne_2018year_8.0” Volkswagen_Golf_8.0” Bentley_Bentayga_2018year_8.0” Volkswagen_Tiguan_8.0” GU Electronic... -
Page 13: Mode Change
Mode Change StreeingWheel for Audi A3/A6/A7/Q7/TT • To use the Streeing button You must select the "MODE" or "NAV" button in the menu. • Select "OFF" when not in use. Mode Change MMI Button for Audi A3/A6/A7/Q7/TT mode change(1 second) Return OEM dispaly GU Electronic... - Page 14 Mode Change StreeingWheel for Volkswagen Golf7/Polo • To use the Streeing button You must select the “MUTE" or “DOWN" button in the menu. • Select "OFF" when not in use. Mode Change Button for Volkswagen Golf7/Polo mode change(1 second) Return OEM dispaly GU Electronic...
- Page 15 8. Mode Change Mode Change Button for Volkswagen Golf7/Polo mode change(1 second) Return OEM dispaly 3 second OEM dispaly • Turn the button to show the oem screen for 3 seconds GU Electronic...
- Page 16 “DOWN" button in the menu. • Select "OFF" when not in use. Mode Change Button for Volkswagen Tiguan mode change(1 second) Return OEM dispaly • To use the Deck button You must select the “Menu“ or “Setup” button in the menu. GU Electronic...
- Page 17 • Select "OFF" when not in use. mode change(1 second) • To use the Streeing button You must select the “ON" in the menu. • Select "OFF" when not in use. DVB-T channel up/down in the DVB-T mode. GU Electronic...
- Page 18 8. Mode Change Mode Change Button for Porsche PCM4.0 mode change(1 second) Return OEM dispaly 3 second OEM dispaly • Turn the button to show the oem screen for 3 seconds GU Electronic...
- Page 19 8. Mode Change Mode Change for Bentley Mulsanne 2017 mode change(1 second) Return OEM dispaly GU Electronic...
- Page 20 8. Mode Change Mode Change for Bentley Bentayga mode change(1 second) Return OEM dispaly 3 second OEM dispaly • Turn the button to show the oem screen for 3 seconds GU Electronic...
- Page 21 ① PUSH : Selection ② Moving toward the left ③ Moving toward the right ④ Moving toward the left ⑤ Moving toward the right ⑥ Moving up ⑦ Moving down ⑧ Return ⑨ Siri ⑩ Track Down ⑪ Track Up GU Electronic...
-
Page 22: Touch Control
Touch control - Calibration Press and hold for more than 11 seconds on NAVI, DVB-T, DVD screen. (Note that it only works the first time after switching screens) + Touch according to the shape coordinates. OSD menu -> Utility -> Calibration GU Electronic... - Page 23 9. Touch Control DVB-T/DVD Control DVB-T Press Icon GU Electronic...
- Page 24 Press to display when there is no OSD screen. When OSD screen is on, press it to EXIT or OFF. Item Selection, Value Selection Item up Increase selected value DOWN Item down Decrease selected value Mode State First Menu Second Menu Third Menu GU Electronic...
- Page 25 NAVI-RGB Setting the Connected NAVI Model ELT_DVBT20 DVB-T(DMB) Setting the Connected DVB-T Model ELT_980XU Slim Config Setting the Connected DVD Model AVM VIDEO RearCam Setting the Connected RearCam Model Reset Execute Reset to default value of Config menu GU Electronic...
- Page 26 In the OEM, NAVI, AV2, FRONT, AV Out and REAR modes, the output of AV OUT is set to AV2. USER In the OEM, NAVI, FRONT, and REAR modes, output the output of AV OUT to the final screen. GU Electronic...
- Page 27 DVD device control UI output function UI DVD Disable feature Video(CVBS) Input Hardware Port - Front Camera Disable feature Turn the button to show the oem screen for 3 seconds ScrChg-Wheel Disable feature Reset Execute Option Menu all Reset GU Electronic...
- Page 28 10. OSD(On Screen Display) Control Rear Detect control Car Audio Box Button Gear GU Electronic...
- Page 29 10. OSD(On Screen Display) Control OSD Option -> FrontCam-RcvOpt Front Camera Auto Mode 0 second = FrontCam-RcvOpt menu OFF 1~30 second = FrontCam-RcvOpt menu ON & time control NAVI NAVI REAR FRONT AV1(DVB-T) AV1(DVB-T) AV2(DVD) AV2(DVD) Select time of display 1~30 second GU Electronic...
- Page 30 Adjust the value of contrast Saturation Adjust the value of Saturation Image Adjust the value of Hue Sharpness Adjust the value of Sharpness Reset Excute Option Menu all Reset << Brightness >> << Contrast >> << Saturation >> GU Electronic...
- Page 31 Output screen horizontal Horizontal movement Output screen vertical Vertical movement Scale X Up Reduce / increase output screen width Screen Scale X Down Scale Y Up Reduce / Increase Output Screen Height Scale Y Down Reset Screen menu all reset GU Electronic...
- Page 32 Full Do not show OPS Grid Type SPLIT Show OPS Parking Warnings Lang Set warning text language Moving a parking line Horizontal horizontally Vertical Moving a parking line vertically Transparency Parking line transparency Reset Parking menu all reset GU Electronic...
- Page 33 10. OSD(On Screen Display) Control OSD Parking – OPS Display On / Off OPS ON Screen OPS OFF Screen OSD Parking – Guide line On / Off Parking Line ON Screen Parking Line OFF Screen GU Electronic...
- Page 34 10. OSD(On Screen Display) Control OSD Parking – OPS Display On / Off GU Electronic...
- Page 35 10. OSD(On Screen Display) Control OSD Parking – Change warning language GU Electronic...
- Page 36 Keypad in Horizontal / Vertical menu ※ Pressing this Horizontal / Vertical menu, The OSD screen automatically disappears. Please adjust from the parking line Screen. MENU DOWN Press “UP” button Press “MENU” button Press “SEL” button Press “DOWN” button GU Electronic...
- Page 37 Third Menu Description Horizontal value OSD Menu Horizontal Shift value Vertical OSD menu vertical Shift OSD Menu Display Time (in value Display Time seconds) value Transparency OSD menu transparency Language OSD menu display language Reset Execute Initialize OSD settings GU Electronic...
- Page 38 3. Before using IR learning function, select All-Clear to delete existing stored data. 4. Press the remote control button to be used in each ICON once in New Code, press once again in Cfm Code to confirm it is the same and save it. GU Electronic...
- Page 39 (Check for future upgrades) Last Source : FDSYOOKRX-180209 Software Version Software Month Software Year Special Version National : CN=CHINA, KR=KOREA, JP=JAPAN, US=United States Hardware Version PIP model : S3=Sync3, PP=PIP, LV=LVDS Motor model : FD=FORD, BM=BMW, BE=BENZ, MA=MASERATI, LX:LEXUS GU Electronic...
- Page 40 11. Install Manual 1. Installation Navigation Connection DVD-IR DVBT-IR *KD-900 navigation SYNC Analog RGB BLUE GREEN Resistive Touch KD-900 GU Electronic...
- Page 41 11. Install Manual 2. Installation DVB-T Remote Control Connection ① or ② 선택1 DVD IR DVB-T IR SYNC BLUE GREEN 선택2 DVB-T-IR GU Electronic...
- Page 42 11. Install Manual 3. Installation DVD Remote Control Connection DVD IR DVB-T IR SYNC BLUE GREEN DHA-S690 DVD-IR GU Electronic...
- Page 43 10. GND (Black) 11. MMI (Yellow) 10. CAN-H (Red) 9. CAN-L (Blue) 8. CAN-H (Violet) 7. CAN-L (White) 6. CAN-H (Orange) +12V 5. CAN-L (Green) 4. REAR Detect (Brown) 3. REAR Power (Red) 2. N.C 1. ACC (Red) GU Electronic...
- Page 44 11. Install Manual 5. Installation LVDS connection Must be gray Do not use blue, green Rear Camera REAR_PWR REAR_DET CAN-B-L CAN-B-H CAN-OUT-L CAN-OUT-H CAN-IN-L CAN-IN-H Display Head Unit(Commander) GU Electronic...
- Page 45 11. Install Manual 6. Installation CAN connection Remove the original gray connector. Attach the connector carefully to the locking part. GU Electronic...
- Page 46 11. Install Manual 7. Installation CarPlay - KPLAY * When installing CarPlay, set it to OSD MENU-OPTION-NAV COM-KPLAY. Iphone Microphone 3.5pie aux cable Screen GU Electronic...
- Page 47 11. Install Manual 8. Installation CarPlay – NV17 * When installing CarPlay, set it to OSD MENU-OPTION-NAV COM-NV17. 3.5pie aux cable Iphone Screen Screen Microphone Screen GU Electronic...
- Page 48 2. LVDS cable must be connected correctly according to the manual 3. Insulate the end of wire by using electrical tape 4. The installation should be done by expert 5. GU electronic does not take any responsibility for any problem caused by wrong installation GU Electronic...
Need help?
Do you have a question about the AD-4G-151223 and is the answer not in the manual?
Questions and answers