Table of Contents
Advertisement
Quick Links
Advertisement
Table of Contents

Subscribe to Our Youtube Channel
Related Manuals for Journey So Lite S1


Summary of Contents for Journey So Lite S1
- Page 1 PRODUCT MANUAL...
-
Page 2: Table Of Contents
Welcome! Congratulations on the purchase of your new Mobility Scooter! You are going to enjoy driving it, and you’ll appreciate its many helpful features, starting with the advanced ultra-lightweight design, its well-engineered folding capability and the extra attention that’s been paid to comfort, performance and safety. -
Page 3: Safety Guidelines
SAFETY GUIDELINES An authorized provider or qualified technician must perform the initial setup of this scooter, performing all of the procedures in this manual. The symbols below are used throughout this Owner’s Manual. It is very important for you to read them and understand them completely. WARNING! Indicates a hazardous situation that could result in serious injury or death if it is not avoided. -
Page 4: Pre-Ride Safety Check
PRE-RIDE SAFETY CHECK Get to know the feel of your scooter and its capabilities. We recommend that you perform a safety check before each use to make sure your scooter operates smoothly and safely. Perform the following inspections prior to using your scooter: •... -
Page 5: Specifications
SPECIFICATIONS Model Reference 08474 Speed (Max) 5 mph (8 km/h) Battery 1 x 24V 10Ah Lithium User Weight (Max) 265 lbs (120kg) Total Weight w/o Batteries 40.8 lbs (18.5kg) Total Weight with Batteries 44.5 lbs (20.2kg) Overall Length 1000 mm (39.5 in.) Overall Width 550 mm (21.5 in.) Overall Height... -
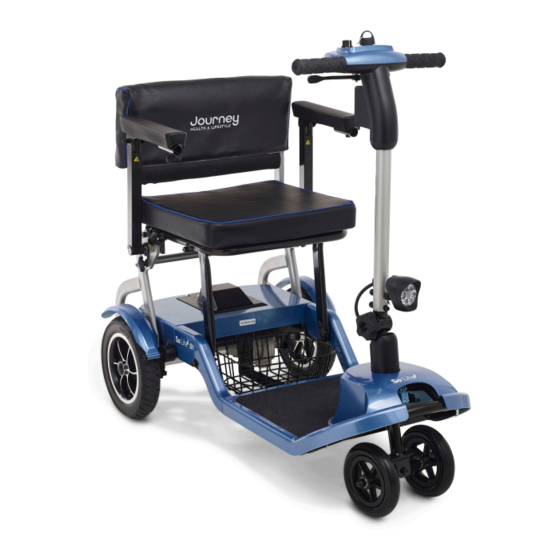
Page 6: Components
COMPONENTS 1. Seat Back Cushion 8. Front Wheel 2. Seat Base Cushion 9. Tiller Adjuster 3. Seat Folding Knob 10. LED Light 4. Battery Box 11. Control Panel 5. Rear Mud Guard 12. Anti-Tip Wheel 6. Rear Wheel 13. Freewheel Lever 7. -
Page 7: Control Panel
CONTROL PANEL 1. Battery indicator/gauge 5. Throttle lever forward/back 2. Speed adjustment dial 6. Light switch 3. Key switch 7. Tiller handle 4. Horn button 5.1 Battery Indicator/Gauge (1) Indicates the voltage of the batteries: • Green — batteries are fully charged. •... - Page 8 CONTROL PANEL 5.4 Horn Button (4) This button activates a warning horn. Your scooter must be turned on for the horn to be operational. Do not hesitate to use the warning horn when doing so may prevent an accident or injury. 5.5 Throttle Control Lever - Forward/Back (5) This lever allows you to control the forward speed and the reverse speed of your scooter up to the maximum speed you pre-set with the speed adjustment dial.
-
Page 9: Folding & Unfolding
FOLDING & UNFOLDING The scooter is quick and easy to assemble and to fold, using the following steps: STEP 1 Unfold Scooter To unfold the scooter first sit the scooter with all wheels on the ground as shown [Fig 6.0.1]. Loosen off the tiller adjuster knob [Fig 6.0.2] and lift the tiller into drive position [Fig 6.0.3]. - Page 10 FOLDING & UNFOLDING STEP 3 Fold the Scooter To fold the scooter, pull out the fold knob as shown below [Fig 6.3.1]. At the same time gently lower the seatback down into its folded position [Fig 6.3.2]. [Fig 6.3.1] [Fig 6.3.2] Now with the seat folded, loosen the tiller adjuster knob and gently lower the tiller into the folded position [Fig 6.3.3].
-
Page 11: Seat Covers & Battery Box
SEAT COVERS & BATTERY BOX 7.1 Seat Covers The cushion is removable. 7.2 Padded Seat Bar To fit the padded back bar cover, simply undo the Velcro and fold cover around the back bar; then connect the Velcro back into position. [Fig 7.1.1] 7.3 Seat Back Cover To fit the seat back cover, make sure the back support section is positioned. -
Page 12: Freewheel Lever
FREEWHEEL LEVER The freewheel lever on the scooter is located on the rear section of the scooter. Before driving, the scooter needs to be put into the drive position. The two positions are: 1. Drive position is indicated by “Closed.” Pull the lever backwards for the position [Fig 9.0.1]. -
Page 13: Batteries & Charging
BATTERIES & CHARGING General Information and Instructions on Charging Your scooter requires 1 x lithium battery that is sealed and maintenance free. The battery is recharged by the supplied off-board charging system. • Fully charge your travel scooter’s battery for at least 10 to 12 hours prior to using it for the first time. - Page 14 BATTERIES & CHARGING WARNING! Risk of short circuit and electric shock if the battery charger has been damaged. Never use the charger if it has been dropped or damaged. WARNING! Do not use the battery if it gives off an odor, generates heat or appears abnormal in any way.
- Page 15 BATTERIES & CHARGING • Make sure you read and understand the battery charger User Manual, if supplied”—not battery chargers user manual. • Turn off the scooters power and remove the key. • Remove the battery box from the scooter. • Slide away the cover of the charger outlet point either positioned on the front of the battery box [Fig 10.3.1].
- Page 16 BATTERIES & CHARGING Charging the battery via the front 1. Please turn off the scooter before charging. 2. Put the charger terminal into the front charge port [Fig 11.1.3], then plug in the other end of the charger into the socket. [Fig 11.1.1] Front light on/off Front charge port...
-
Page 17: Driving Your Scooter
DRIVING YOUR SCOOTER Before Getting on to Your Scooter • Keep your batteries fully charged and avoid deeply discharging your batteries. • Never leave the manual freewheel lever in the forward position unless you are manually pushing your scooter. WARNING! Never attempt to get onto or off of your scooter without first removing the key from the key switch. - Page 18 DRIVING YOUR SCOOTER Starting • Make sure you are seated safely and properly on your scooter. • Turn the speed adjustment dial fully anti-clockwise to the slowest setting. • Insert the key into the key switch. • Turn the key clockwise to the ‘’On’’ position. •...
- Page 19 DRIVING YOUR SCOOTER • Try to keep your scooter moving when climbing or descending an incline. If you have to stop, restart and accelerate slowly and carefully. WARNING! Never descend or climb a gradient which is greater than the recommended maximum see Specifications. WARNING! Never drive across (traverse) an incline, ramp etc, in any direction.
-
Page 20: Emi/Rfi
EMI/RFI The rapid development of electronics, especially in the area of communications, has saturated our environment with electromagnetic (radio) waves that are emitted by television transmitters, cellular phones, citizen’s band radios (CBs), amateur radios (ham radios), wireless computer, microwave transmitters, paging transmitters, etc. These electromagnetic (EM) waves are invisible and increase in strength the closer one gets to the source of transmission. -
Page 21: Checking & Maintenance
CHECKING & MAINTENANCE Check the following items before driving. If you find anything abnormal, contact your scooter dealer for a further inspection before using it. Item Inspection Content Handlebars Are they tight? Can they be turned left or right smoothly? Speed Dial Can it be adjusted freely and functioning well? Throttle Lever... -
Page 22: Basic Troubleshooting
BASIC TROUBLESHOOTING This table is only a guide to aid you in getting your scooter operating, should you have any problems. If you are unable to get your scooter operating, please contact your Scooter dealer. Symptom Possible Solution Scooter does 1. -
Page 23: Flash Codes
FLASH CODES Scooter Controller Internal Diagnostics The diagnostic flash codes for your scooter are designed to help you perform basic troubleshooting quickly and easily. A diagnostic flash code flashes from the Power light in the event one of the conditions listed below develops. Flash Flash Fault... -
Page 24: Warranty
Manual; damage in shipment of the product (claims must be presented to the carrier); repair, attempted repair or modifications made by anyone other than Journey Health and Lifestyle; any unit on which the serial number has been defaced, modified or removed; normal wear items; any periodic maintenance; deterioration due to perspiration, corrosive atmosphere, or ground covering such as pine needles or crushed limestone dust, or other external causes such as punctures, extremes in temperature or humidity;... - Page 25 If you have any questions, call us at our toll free number: 1-800-958-8324...
Need help?
Do you have a question about the So Lite S1 and is the answer not in the manual?
Questions and answers
when I put the seat in the sitting position it has a lot of play, is there any parts availible for the release button,I **** not sure what is worn out,please advise me