Table of Contents
Advertisement
Advertisement
Table of Contents

Related Manuals for Journey So Lite S1


Summary of Contents for Journey So Lite S1
- Page 1 PRODUCT MANUAL Date edited: 2022-AUG-16th Version: V.03...
-
Page 2: Table Of Contents
TABLE OF CONTENTS 1. Preface ..........................3 2. Dos and Don’ts ........................4 2.1 Inspection upon delivery ................... 4 2.2 Explanation of symbols ....................4 2.3 Safety instructions ..................... 4 2.4 Intended use ......................7 2.5 Electromagnetic interference(EMI) ................ 7 2.6 Transporting the scooter .................... -
Page 3: Preface
PREFACE 1. Preface Welcome! First, we thank you for putting your trust in us by selecting the outstanding So Lite™ S1 scooter. This product manual will help you get acquainted with the operation of this scooter and present you with some invaluable safety tips. -
Page 4: Dos And Don'ts
DOS AND DON'TS 2. Dos and Don’ts 2.1 Inspection upon delivery Please check to see that the main frame and accessories (as listed below) are all there. If any parts are missing or damaged, please contact the dealer immediately. ■ Scooter: 1 piece ■... - Page 5 DOS AND DON'TS Prohibit! Do not drive the scooter in bad weather conditions, such as rain, snow, fog, strong winds, temperatures below 14°F or above 104°F, etc. Driving the scooter under these adverse conditions may damage the electrical system and cause control failure.
- Page 6 DOS AND DON'TS Mandatory! Please do a regular check of the scooter to make sure the brakes are sensitive, the performance is normal, the parts that fold and unfold are securely in place, and the battery is properly charged. Prohibit! Do not remove the anti-tip wheel. Prohibit! The scooter cannot be used for carrying or towing goods.
-
Page 7: Intended Use
DOS AND DON'TS Prohibit! Do not overload. The max loading capacity is 275 lb—driver only! Prohibit! Do not disassemble the battery, motor and controller yourself. For replacement, please purchase original parts from an authorized dealer. (Scooters that have been modified or that use non-original parts will not be covered under warranty). - Page 8 DOS AND DON'TS WARNING! Avoid using any transmitter-receiver or cell phone in the immediate environment of your scooter for as long as the scooter is turned on. WARNING! Check the area for transmitter towers and avoid using the scooter close to them. WARNING! If involuntary scooter movements or unexpected braking occurs, turn off the scooter as soon as it is safe to do so.
-
Page 9: Transporting The Scooter
PRODUCT DESCRIPTION 4. Please be aware that adding accessories or components or modifying the scooter may make it more susceptible to EMI. (Note: There is no easy way to evaluate the effect of such additions and modifications on the overall EMI resistance of the scooter.) 2.6 Transporting the scooter The first step in preparing to transport the scooter is to (1) make sure the brake handle is released so you can roll or drive the scooter to a... -
Page 10: Components
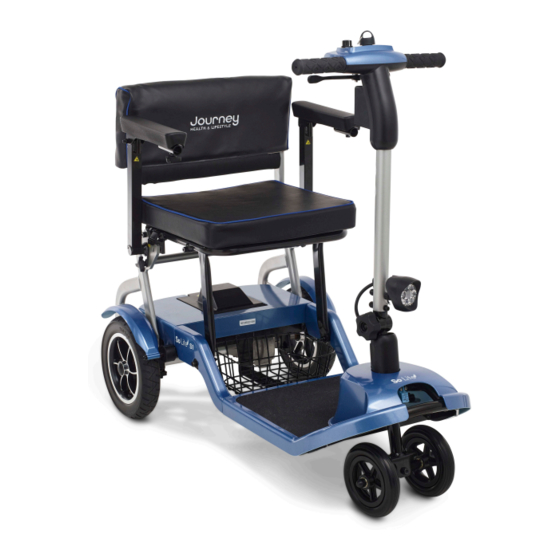
PRODUCT DESCRIPTION 3.2 Components Seatback Cushion 8. Front wheel Seat Base Cushion Tiller Adjuster Seat Folding Knob LED Light Battery Box Control Panel Anti-Tip Wheel Rear Mud Guard Freewheel Lever Rear Wheel Storage Basket Your scooter is equipped with a number of elements and parts. You should know these before using the scooter. -
Page 11: Technical Specifications
PRODUCT DESCRIPTION 3.3 Technical specifications Model Reference 08474 Speed (Max) 5 mph (8 km/h) Battery 1 x 24V 10Ah Lithium User Weight (Max) 275 lbs. (125kg) Total Weight w/o Batteries 40.8 lbs. (18.5kg) Total Weight with Batteries 44.5 lbs. (20.2kg) Overall Length 1000 mm (39.5 in.) Overall Width... -
Page 12: Installation And Adjustment
INSTALLATION AND ADJUSTMENT 4. Installation and adjustment The scooter is quick and easy to assemble and to fold, using the following steps: Unfolding and folding the scooter STEP 1 Unfold the Scooter To unfold the scooter, first place the scooter with all wheels on the ground as shown [Fig 4.1.1]. - Page 13 INSTALLATION AND ADJUSTMENT STEP 3 Fold the scooter To fold the scooter, pull out the fold knob as shown below [Fig 4.1.5]. At the same time gently lower the seatback down into its folded position [Fig 4.1.6]. [Fig 4.1.5] [Fig 4.1.6] Now with the seat folded, loosen the tiller adjuster knob and gently lower the tiller into the folded position [Fig 4.1.7].
-
Page 14: Mounting And Removing The Battery
INSTALLATION AND ADJUSTMENT 4.2 Mounting and removing the battery Insert battery box 4.2.1 To insert the battery box, simply place it into position push forward shown below [Fig 4.2.1], gently lowering into position. Make sure the rubber protector flap remains on top of the battery box. -
Page 15: Use
Correct Incorrect 5. Use Before you use the scooter for the first time, please read this section carefully and fully understand the various precautions, so as to drive the scooter safely, comfortably and freely. If you have any questions, please contact the nearest dealer. - Page 16 Battery indicator/gauge 6. Light switch Speed adjustment dial 7. Tiller handle Key switch 8. Charger port Horn button 9. Fuse Throttle lever forward/back 5.2.2 Battery Indicator/Gauge (1) Indicates the voltage of the batteries: • Green — batteries are fully charged. •...
- Page 17 5.2.6 Throttle control lever - Forward/Back (5) This lever allows you to control the forward and reverse speeds of your scooter, up to the maximum speed you have pre-set using the speed adjustment dial. Place your right hand on the right-hand tiller handle and your left hand on the left hand tiller handle.
- Page 18 Picture 1 Picture 2 WARNING! Please make sure the new fuse has the same rating as the old one. The electrical system will be damaged with the wrong rated fuse. 5.2.10 Adjust the tiller assembly Loosen the knob on the tiller adjuster, hold the tiller lever to a comfortable angle for driving, then tighten the knob.
-
Page 19: Tires
[Fig 5.2.11.1] [Fig 5.2.11.2] WARNING! Before placing your scooter into or out of freewheel mode, remove the key from the key switch. Never sit on the scooter when it is in freewheel mode. Never put your scooter in freewheel mode on any incline. WARNING! When your scooter is in freewheel mode, the braking system is disengaged. -
Page 20: Anti-Tip Wheel
5.4 Anti-tip wheel The anti-tip wheel assembly is installed on the back of the scooter frame for your safety. It prevents the scooter from tipping backwards when you drive over obstacles that do not exceed the specified maximum height. 5.5 Transfer in or out the scooter WARNING! Be sure to turn off the power switch and remove the key before getting on or off the scooter. -
Page 21: The First Driving
5.8 The first driving WARNING! From the beginning, take control of your scooter, practice in a safe area, and get used to driving it. WARNING! Do not use both throttle control levers at the same time. Doing so could result in loss of control of the scooter. WARNING! To avoid risk of injury, do not adjust speed controls while driving. - Page 22 WARNING! Risk of rollover: Please don't zigzag or otherwise drive erratically. In corners and bends, use both hands to turn the handlebars in the direction you want to go. The front wheels will turn accordingly and guide the scooter in the proper direction. It is very important that you make sure there is enough space for you to pass through at corners and curves.
-
Page 23: Driving On A Slope
When you are driving on a slope, the battery indicator light may move left and right. This is normal and no cause for concern. 5.8.3 Going downhill WARNING! Take control of your scooter and practice driving it downhill. WARNING! Never leave the scooter on a slope with the manual freewheel lever on. -
Page 24: Driving Over The Obstacles
2. Please refer to the instructions in the section "Your first drive." 5.10 Driving over the obstacles WARNING! Risk of injury from accidental movement. • Don't take the scooter on an escalator. • Never drive over obstacles and steps over 1.57 in. •... -
Page 25: Lithium Battery And Charging
LITHIUM BATTERY AND CHARGING WARNING! Risk of injury: Remove all loose parts before transport. WARNING! Risk of injury-- Risk of injury: During transport, no person or object should be beneath the scooter at any point, and no person or object should ever be sitting or standing on the pedal or standing on the seat during transport. -
Page 26: Battery Charging
LITHIUM BATTERY AND CHARGING 6.2 Battery charging 6.2.1 After use, carefully check the LED with charging bar on control panel to determine whether it needs to be charged. 6.2.1.1 This electric scooter can be charged with a charger with an output of 29.2Vdc 2A. -
Page 27: Charger
LITHIUM BATTERY AND CHARGING Caution! To determine whether the lithium battery is fully charged, check the charging indicator on the charger. To know more about the charger indicator, refer to section “6.3 Charger.” The LED with charging bar does not prove that the battery is fully charged, it should be subject to the charger indicator turning green. -
Page 28: Maintenance
MAINTENANCE DO NOT USE a power frequency voltage higher than the standard public electrical, or common standard supply voltage. 3. DO NOT USE the charger in instances of high tide and high heat. 4. The charger has its automatic protection function, and no special care is required when charging. -
Page 29: Instructions For Reuse
MAINTENANCE (4) All parts must be thoroughly dry before use after cleaning and disinfection. 7.3 Instructions for reuse 7.3.1 Maintenance points Please review the following before each reuse: (1) Check the battery status: Charge the battery (2) Wheels/tires condition. Make sure there are no wires, hair, sands and carpet fibers under the tires. -
Page 30: Reuse After A Hiatus
MAINTENANCE 7.4.2 Weekly inspection (1) Before checking, please confirm that the power is turned off. (2) Check whether the throttle control lever is detached or broken. (3) Wipe the scooter with a soft, damp cloth that has been wrung out, taking care not to wet the electrical system. -
Page 31: Transportation And Storage
TRANSPORTATION AND STORAGE & COMMON FAULTS AND TREATMENT 8. Transportation and storage 8.1 Transportation and storage a) Ambient temperature range:-13° F—104° F; b) Relative humidity:≤80%; c) Atmospheric pressure range:80kPa~105kPa; Can be transported in general transportation. 9. Common faults and treatment 9.1 Basic Troubleshooting This table is only a guide to aid you in getting your scooter operating, should you have any problems. -
Page 32: Scooter Controller Internal Diagnostics
COMMON FAULTS AND TREATMENT 9.2 Scooter Controller Internal Diagnostics Flash Flash Effect on Solution Concern Code Indication Scooter 1. Charge batteries. Battery charge * ***** Scooter 2. Check all battery wiring connections. is too low or stops 3. Contact your service agent. there is a driving bad connection... -
Page 33: Warranty
(6) months from the original purchase date. If within such warranty period the components or parts referenced in this paragraph shall be proven to Journey Health and Lifestyle’s satisfaction to be defective, the product shall, at Journey Health and Lifestyle’s option, be repaired or replaced with new or refurbished... - Page 34 Journey Health and Lifestyle shall not be liable for any consequential or incidental damages whatsoever and disclaims any liability beyond the initial purchase price of the So Lite™...
- Page 35 If you have any questions, call us at our toll free number: 1-800-958-8324...
Need help?
Do you have a question about the So Lite S1 and is the answer not in the manual?
Questions and answers
I have followed both instructions for charging the So Lite S1 scooter (my dad's scooter), and while the indicator light on the charger is green, the light on the scooter's battery indicator only goes to the yellow and the scooter beeps loudly and repeatedly. I was trying to get a picture of the battery indicator on the scooter, but I can't catch it in the yellow. The battery indicator on the scooter does not light green. I'm trying to figure out how to get his scooter charged and working for him again.
If the battery indicator only shows yellow (orange) and does not turn green after charging, it means the battery is still charging or not fully charged. You should:
1. Ensure the charger is connected properly.
2. Allow more time for charging.
3. Check for a defective battery or charger if the indicator does not turn green after extended charging.
4. Confirm the charger output is 24V, 2A max (1.8A).
5. If the issue persists, contact your scooter dealer.
This answer is automatically generated
Can you mail me the physical manual? My 94 yr old dad bought a used Journey so lite scooter and does not use internet.