
Subscribe to Our Youtube Channel
Related Manuals for Pack Leader ELF-20


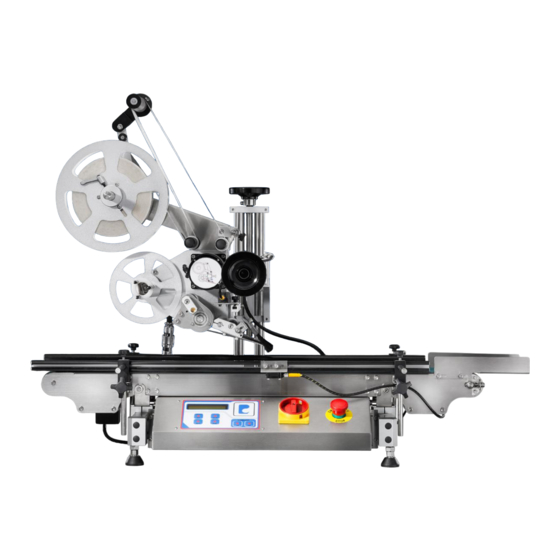
Summary of Contents for Pack Leader ELF-20
- Page 1 ELF-20 Tabletop Top Labeling Machine OPERATION MANUAL A portable machine for top label applications with the efficiency and mobility desired in small production runs...
-
Page 2: Table Of Contents
TABLE OF CONTENTS Applicator Motor Assembly MACHINE SPECIFICATIONS Base Paper Collect Assembly Label Peel Plate Assembly Machine Sub-Assemblies Applicator Driving Assembly Machine Dimensions Bearing Seat Fixing Plate Assembly Specification of Label Reel PU Roller Assembly Aluminum Knurled Roller Assembly GENERAL INFORMATION Label Supply Assembly Safety Regulations Label Supply Plate Assembly... -
Page 3: Machine Specifications
MACHINE SPECIFICATIONS... -
Page 4: Machine Sub-Assemblies
MACHINE SUB-ASSEMBLIES LABEL APPLICATOR CONVEYOR GUIDE RAIL CONTROL PANEL... -
Page 5: Machine Dimensions
MACHINE DIMENSIONS 1101 mm... - Page 6 Maximum Conveyor Speed: the product, each and every time. components run at the same 52.5’/minute, (16m/minute), • It’s easy to upgrade the ELF-20 to speed. 60 cont/minute activate hot-foil printer controls. Practicality This integrated feature simplifies...
-
Page 7: Specification Of Label Reel
SPECIFICATION OF LABEL REEL Base Paper: Copy positions 1-4 labels wound out: Opaque or Translucent Top of Reel Inner Diameter: 3" (76 mm) copy dispenses Reel Outer Diameter: 9.8" (250) mm first. Interval of Label: Min. 3 mm (between label) Width of Base Paper: Bottom Label Width + 4 mm... -
Page 8: General Information
GENERAL INFORMATION... -
Page 9: Safety Regulations
SAFETY REGULATIONS INSPECT BEFORE OPERATING • Make sure the power is connected to the correct power source • Adjust the object sensor to the correct position • Adjust label sensor to the proper setting DANGEROUS SAFE Be sure hands are completely dry before inserting the plug into the outlet. Especially, in the food industries or in wet environments. -
Page 10: Label Applicator
LABEL APPLICATOR Follow these instructions to insert the labels into the label applicator. WITH PRINTER WITHOUT PRINTER Place the label roll on the supply plate and pass the labels around the tension roller to control over rotation of the roll. Secure the labels by adding tension to the label press pad. - Page 11 LABEL APPLICATOR The dispensing plates peel the label from the base paper and apply it to the products. The PU drive roller pulls the base paper to apply the labels. The aluminum knurled roller must be closed and locked in place with the PU roller in order to squeeze the base paper and pull effectively.
-
Page 12: Sensitivity Adjusting Of Label Sensor
SENSITIVITY ADJUSTING OF LABEL SENSOR Remove a label from the backing substrate before the sensor. On the control panel, hold down “LENGTH SET” (Figure 1) until the backing substrate only is positioned in the sensor (Figure 2). FIGURE 1 LENGTH SET On the label sensor, hold down the “NORMAL”... - Page 13 OBJECT SENSOR The object sensor is a fiber optic infra-red sensor use to detect the presence of bottle on the labeling zone. If the sensor is not able to detect a bottle, adjust the intensity of the amplifier until the sensor is able to trigger the applicator to apply a label.
-
Page 14: Parts Adjustments
PARTS ADJUSTMENTS Conveyor adjustment: To adjust the tightness of the conveyor belt, turn the two screws. Turn counter clockwise to loosen and clockwise to tighten. Make sure the conveyor is centered. If not it can cause the belt to wear prematurely. Conveyor height adjustment: Adjust the four footing screw to adjust conveyor to the appropriate height. -
Page 15: Control Panel
CONTROL PANEL CONTROL PANEL LIST DESCRIPTION FUNCTION Main Power Switch Cut off or connect to main power supply Emergency Switch Emergency cutoff of power supply Liquid Crystal Display Displays the data To set up the label length required Length Set Value To select the numeric value to be entered/on for printer Menu... -
Page 16: Machine Operation
MACHINE OPERATION... -
Page 17: Machine Operation
MACHINE OPERATION PLEASE FOLLOW STEPS AND INSTRUCTION BEFORE MACHINE OPERATION. Connect machine to the appropriate power source and make sure the Emergency Stop is not engaged. Machine adjusted to product specification range. The height of label applicator adjusted in appropriate position. Object sensor adjusted in right position. -
Page 18: Control Panel Setup
CONTROL PANEL SETUP LABEL LENGTH PRE COUNT COUNTER PRECOUNT SETUP Press menu to select "PRECOUNT" and press "DIGIT" to select the digit then press "VALUE" to set the numbers. Press "MENU" to exit. LABEL DELAY SETUP Use "MENU" to select "LABEL POSITION" to change the value of the delay. - Page 19 CONTROL PANEL SETUP LABEL HEAD SETUP Press "VALUE" to turn the label head ON and press "DIGIT" to turn the label head OFF. SPEED SETUP Press "VALUE" to select speed 1-4. PRINTER SETUP Use "MENU" to select "PRINTER." Press "DIGIT" to turn "OFF"...
-
Page 20: Control Panel Warnings
CONTROL PANEL DANGER • Do not bump or press heavily on control panel. • Lightly press on any point inside the control panel to input data. • Lightly press buttons with a finger to select appropriate button (do not use a tool or sharp object). DO NOT USE TOOL OR SHARP OBJECT •... -
Page 21: Trouble Shooting
1. Inspect that the wires are properly connected. If the wires are not connected, please connect them and reset the labeling applicator. 2. If the problem is not in the wiring, please contact Pack Leader USA. PROBLEM 2: MORE THAN ONE LABEL IS DISPENSED AT A TIME A. - Page 22 TROUBLE SHOOTING PROBLEM 4: LABEL IS SLANTING A. BOTTLE IS NOT EVEN B. LABEL IS DIAGONALLY PLACED ON THE BASE PAPER WHEN THE LABELS ARE MADE C. THE SLANTING OCCURRED WHEN LABELING. THIS IS CAUSED WHEN THE PEEL PLATE IS NOT SQUARE TO THE PRODUCT.
- Page 23 PROBLEM 8: CONVEYOR DOES NOT WORK A. WILL NOT RESPOND ON THE TOUCH SCREEN 1. Please re-start the machine. 2. After restarting the machine, if the conveyor still does not work contact Pack Leader USA. B. CONVEYOR MOTOR 1. Gearwheel belt is damaged or loose.
-
Page 24: Electronic Panel
ELECTRONIC PANEL... -
Page 25: Electronic Diagram
ELECTRONIC DIAGRAM | 25... -
Page 26: Control Box Frame
CONTROL BOX FRAME | 26... -
Page 27: Control Box Parts List
CONTROL BOX FRAME PARTS LIST DESCRIPTION PARTS NO. QTY. Button Fixing Plate CS1-ELF-004 Push Button 2YPCB-SS30326A LCD Display C-1040 IC Chip 89S51-24PU 2YIC-89S5124AT IC Chip 89C51(ATMEL) 2YIC-89C51 PC Board SS30105B V2 2YPCB-SS30105B 2 Phase Stepper Driver DA2D20B 2YF2-DA2D20B Power Supply RD35B 2YE2-RD35B 6cm Fan Cover 2Y2G-SF06... -
Page 28: Applicator
APPLICATOR... -
Page 29: Applicator Exploded View
APPLICATOR EXPLODED VIEW APPLICATOR EXPLODED VIEW PART LIST DESCRIPTION PARTS NO. QTY. Timing Belt 200XL050 T2Q2-200XL050 Cable Connector QVQR-MG16A-10B Applicator Motor Assembly See page 31 Base Paper Collect Assembly See page 33 Label Peel Plate Assembly ELF1050501 Applicator Driving Assembly See page 35 Label Supply Plate Assembly See page 40... -
Page 30: Applicator Motor Assembly
APPLICATOR MOTOR ASSEMBLY | 30... - Page 31 APPLICATOR MOTOR ASSEMBLY PART LIST DESCRIPTION PARTS NO. QTY. Applicator Base Plate ELF1050501-001 PU Roller Bearing Seat LA1-ELF-021 Bearing 6002NR 5TGH-6002NR Pad Of Stepper Motor LA1-ELF-023 Motor Gear LA1-ELF-040 Spacing Rod LA1-ELF-022 Bearing 6901NR 5TGH-6901NR Stepper Motor A21R-DA29902H8 Double Head Round Keys RGM-4420 Socket Set Screw XN5Z-M45...
-
Page 32: Base Paper Collect Assembly
BASE PAPER COLLECT ASSEMBLY BASE PAPER COLLECT ASSEMBLY PART LIST DESCRIPTION PARTS NO. QTY. Paper Collect Plate LA1-ELF-018 Paper Collect Base LA1-ELF-017 Collector Rods LA1-ELF-019 Philips Head Screws XNMW-M415 Paper Collect Shaft LA1-ELF-020 Washer XNQC-M8 Spring Washer 2FWO-M8 Screw Nut XAXR-M8S Collector Cap LA1-ELF-039... -
Page 33: Label Peel Plate Assembly
LABEL PEEL PLATE ASSEMBLY LABEL PEEL PLATE ASSEMBLY PART LIST DESCRIPTION PARTS NO. QTY. Dispenser Base ELF1050501-004B Dispenser Fixing Shaft LA1-ELF-011 Label Roller LA1-ELF-013 Label Roller Sleeve LA1-ELF-038B Dispenser Plate ELF1050501-005 Washer XNQC-M5 Spring Washer 2FWO-M5 Socket Head Cap Screws XNJW-M512 Spring LA1-PL150-052... -
Page 34: Applicator Driving Assembly
APPLICATOR DRIVING ASSEMBLY APPLICATOR DRIVING ASSEMBLY PART LIST DESCRIPTION PARTS NO. QTY. Bearing Seat Fixing Plate Assembly See page 35 PU Roller Assembly See page 36 Aluminum Knurled Roller Assembly See page 37 Aluminum Knurled Roller Lever LA1-ELF-009 Aluminum Block Mount LA1-ELF-006C Ball Plunger 51WR-9.5... -
Page 35: Bearing Seat Fixing Plate Assembly
BEARING SEAT FIXING PLATE ASSEMBLY BEARING SEAT FIXING PLATE ASSEMBLY PART LIST DESCRIPTION PARTS NO. QTY. Bearing Seat Fixing Plate ELF1050501-009 Bearing 5TGH-6901NR Bearing 5TGH-6901NR | 35... -
Page 36: Pu Roller Assembly
PU ROLLER ASSEMBLY PU ROLLER ASSEMBLY PART LIST DESCRIPTION PARTS NO. QTY. PU Roller LA1-ELF-005 Roller Shaft ELF1050501-007B Bearing 6002NR RGM-5515 S-Ring S15 DCSV-S15 Double Head Round Keys RGM-4425 Pulley of PU Roller T2Q2X-22XL050154 Socket Assembly Screw XN5Z-M45 | 36... -
Page 37: Aluminum Knurled Roller Assembly
ALUMINUM KNURLED ROLLER ASSEMBLY ALUMINUM KNURLED ROLLER ASSEMBLY PART LIST DESCRIPTION PARTS NO. QTY. Aluminum Knurled Roller LA1-ELF-007 Bearing 6804ZZ 5TGH-6804ZZ Aluminum Knurled Roller Shaft ELF1050501-008 S-Ring DCSV-S20 Spring of Tension Bar LA1-ELF-024 Spring Seat LA1-ELF-025 | 37... -
Page 38: Label Supply Assembly
LABEL SUPPLY ASSEMBLY LABEL SUPPLY ASSEMBLY PART LIST DESCRIPTION PARTS NO. QTY. Feeding Tray Base ELF1050501-010 Bearing 5TGH-6002NR Feeding Shaft Pad ELF1050501-012 Feeding Tray Shaft ELF1050501-011 Label Supply Plate Assembly See page 39 Tension Bar Assembly ELF1050501 Pillar 51WR-SWIPOZ0625 Brake Belt ELF1050501-027 Spring 51WC-WUT8-30... -
Page 39: Label Supply Plate Assembly
LABEL SUPPLY PLATE ASSEMBLY LABEL SUPPLY PLATE ASSEMBLY PART LIST DESCRIPTION PARTS NO. QTY. Lock Block ELF1050501-013B Label Feed Tray LA1-ELF-033 Socket Button Head Cap Screws XN1M-M516 | 39... -
Page 40: Tension Bar Assembly
TENSION BAR ASSEMBLY TENSION BAR ASSEMBLY PART LIST DESCRIPTION PARTS NO. QTY. Tension Bar ELF1050501-014 Spring Rod 51WR-SWIPOZ0625 Tension Bar Rotating Shaft ELF1050501-016 Spring Rod 51WR-SWIPOZ0420 Tension Bar Pad ELF1050501-015 Roller Shaft of Tension Bar LA1-PL150-065 E-Ring E4 DCEV-E4 Interior Roller Of Tension Bar LA1-PL150-066 Exterior Roller Of Tension Bar LA1-PL150-067... -
Page 41: Label Roller Assembly
LABEL ROLLER ASSEMBLY LABEL ROLLER ASSEMBLY PART LIST DESCRIPTION PARTS NO. QTY. Label Roller LA1-ELF-013 Roller Shaft of Label Orientation LA1-ELF-016B Washer-M6 XNQC-M6 Spring Washer-M6 2FWO-M6 Socket Head Cap Screws XNJW-M6100 Label Roller Sleeve (Large) LA1-PL150-019 Plug QVDG-HP16 Label Roller Sleeve LA1-ELF-038B Spring LA1-PL150-052... -
Page 42: Label Sensor Base Assembly
LABEL SENSOR BASE ASSEMBLY LABEL SENSOR BASE ASSEMBLY PART LIST DESCRIPTION PARTS NO. QTY. Sensor Adjusted Bar LA1-PL150-077D Sensor Adjusted Pad ELF1050501-020 Sensor Locking Pad ELF1050501-021B LERRC Label Sensor 2YE2-LERRCM8171 Square Nut XAZV-NSM4 Stainless Steel Knob 51WR-802020M410 Socket Head Cap Screws XNJW-M520 Spring Washer-M5 2FWO-M5... -
Page 43: Label Load Assembly (Without Printer)
LABEL LOAD ASSEMBLY (WITHOUT PRINTER) LABEL LOAD ASSEMBLY (WITHOUT PRINTER) PART LIST DESCRIPTION PARTS NO. QTY. Roller Pad ELF1050501-019 Press Roller Assembly See page 45 Paper Press Assembly See page 44 Socket Head Cap Screws XNJW-M616 Socket Head Cap Screws XNJW-M625 | 43... -
Page 44: Label Press Assembly
LABEL PRESS ASSEMBLY LABEL PRESS ASSEMBLY PART LIST DESCRIPTION PARTS NO. QTY. Label Press Plate Bracket LA1-ELF-044 Label Press Plate Base LA1-PL150-046 Label Press Plate LA1-PL150-037 Philips Head Screws XNMW-M35 Spring Washer 2FWO-M3 Label Press Pad LA1-PL150-089 Knob 802020M410 51WR-802020M410 E-Ring E8 DCEV-E8 Spring... -
Page 45: Applicator Adjustment Assembly
APPLICATOR ADJUSTMENT ASSEMBLY APPLICATOR ADJUSTMENT ASSEMBLY PART LIST DESCRIPTION PARTS NO. QTY. Applicator Up/Down Adjustment Assembly AA1-ELF Applicator Front/Rear Adjustment Assembly AA1-ELF Labeling Applicator Adjustment Base ELF1050501-024 Self Run Bearing 5TDU-LBF2015 | 45... -
Page 46: Applicator Up/Down Adjustment Assembly
APPLICATOR UP/DOWN ADJUSTMENT ASSEMBLY | 46... - Page 47 APPLICATOR UP/DOWN ADJUSTMENT ASSEMBLY PART LIST DESCRIPTION PARTS NO. QTY. Mounting Base Of Hand Wheel AA1-ELF-014 Screw Rod M16300 AA1-ELF-007 Nylon Washer 2FN2-101610 Applicator Shaft Clamp AA1-ELF-002B Right Angle Seat AA1-ELF-009 Transfer Sleeve Of Shaft AA1-ELF-003 Hand Wheel QRGX-KRA100CB65 Socket Head Cap Screws XNJW-M512 Socket Head Cap Screws XNJW-M625...
-
Page 48: Applicator Front/Rear Adjustment Assembly
APPLICATOR FRONT/REAR ADJUSTMENT ASSEMBLY APPLICATOR ADJUSTMENT ASSEMBLY PART LIST DESCRIPTION PARTS NO. QTY. Hand Wheel QRGX-KRA100CB65 Socket Head Cap Screws XNJW-M512 Mounting Base Of Hand Wheel AA1-ELF-014 Sliding Shaft D20400 AA1-ELF-004 Applicator Sliding Base AA1-ELF-001B Self Run Bearing 5TDU-LBF2015 Socket Head Cap Screws XNJW-M620 Nylon Washer 2FN2-101610... -
Page 49: Conveyor
CONVEYOR... -
Page 50: Conveyor Assembly
CONVEYOR ASSEMBLY | 50... - Page 51 CONVEYOR ASSEMBLY PART LIST DESCRIPTION PARTS NO. QTY. Conveyor Plate CV1-ELF-001C Conveyor Driven Pulley Assembly See page 54 Conveyor Driving Pulley Assembly See page 53 Conveyor Motor Assembly See page 52 Conveyor Belt 150W*2040L T2EW-150W2040LA Heater Box Fixed Rod CV1-ELF-020 Bridging Plate CV1-ELF-012 Tension Adjustment Block...
-
Page 52: Conveyor Motor Assembly
CONVEYOR MOTOR ASSEMBLY CONVEYOR MOTOR ASSEMBLY PART LIST DESCRIPTION PARTS NO. QTY. 3 Phase Stepper Motor A2EU-51K40GNST Gear Reducer 5GN15K A2RG-5GN15K-1 Double Head Round Keys RGM-4425 Pulley CV1-ELF-017 Socket Set Screw XN5Z-M45 Spring Washer 2FWO-M6 Socket Head Cap Screws XNJW-M675 Socket Head Cap Screws XNJW-M685 | 52... -
Page 53: Conveyor Driving Pulley Assembly
CONVEYOR DRIVING PULLEY ASSEMBLY CONVEYOR DRIVING PULLEY ASSEMBLY PART LIST DESCRIPTION PARTS NO. QTY. Conveyor Driving Pulley CV1-ELF-002B Bearing 6202 ZZ 5TGH-6202ZZ Conveyor Driving Pulley Cover CV1-ELF-003B Gear CV1-ELF-004 Bolt XNAW-M320 Conveyor Driving Pulley Shaft CV1-ELF-005B S-Ring S15 DCSV-S15 Bolt XNAW-M315 | 53... -
Page 54: Conveyor Driven Pulley Assembly
CONVEYOR DRIVEN PULLEY ASSEMBLY CONVEYOR DRIVEN PULLEY ASSEMBLY PART LIST DESCRIPTION PARTS NO. QTY. Conveyor Driven Pulley CV1-ELF-007B Bearing 6202ZZ 5TGH-6202ZZ Conveyor Driven Pulley Shaft CV1-ELF-006B S-Ring DCSV-S15 Pulley Adjustment Block CV1-ELF-009 | 54... -
Page 55: Foot Stand
FOOT STAND... - Page 56 FOOT STAND ASSEMBLY | 56...
- Page 57 FOOT STAND ASSEMBLY PART LIST DESCRIPTION PARTS NO. QTY. Top Cover CS1-ELF-006 Control Box Panel Fixed Plate (Left) FT1-ELF-022 Control Box Panel Fixed Plate (Right) FT1-ELF-021 Panel CS1-ELF-002B Base CS1-ELF-001C Stand Connector - Front Left FT1-ELF-032 Stand Connector - Front Right FT1-ELF-033 Plug QVDG-HP13...
- Page 58 www.PackLeaderUSA.com sales@packleaderusa.com 3951 E 137th Terrace Phone: 1.816.581.4330 Grandview, MO 6 4 0 3 0 Parts & Service: 1.816.788.6689...
Need help?
Do you have a question about the ELF-20 and is the answer not in the manual?
Questions and answers