
Subscribe to Our Youtube Channel
Related Manuals for Westinghouse Saynet-EI-Alloy LED-WH21


Summary of Contents for Westinghouse Saynet-EI-Alloy LED-WH21
- Page 1 Saynet-EI-Alloy LED (no dimmer)-WH21 OWNER'S MANUAL מדריך למשתמש Alloy Please write model number here for future reference: :אנא כתוב מספר דגם כאן לעיון בעתיד...
-
Page 2: Safety Tips
Saynet-EI-Alloy LED (no dimmer)-WH21 SAFETY TIPS READ AND SAVE THESE INSTRUCTIONS WARNING: TO REDUCE THE RISK OF FIRE, ELECTRIC SHOCK, OR INJURY TO PERSONS, OBSERVE THE FOLLOWING: 1. Proceed with caution. Read all instructions before beginning the installation. 2. WARNING! This fan may be operated only with a 2-pole switch with a 3mm contact opening each. 3. - Page 3 Saynet-EI-Alloy LED (no dimmer)-WH21 טיפים לבטיחות קרא ושמור את ההוראות :אזהרה: להפחתת סיכון לשריפה, התחשמלות או פגיעה באנשים, הקפידו לפעול לפי ההוראות הבאות .1. המשך בזהירות. קרא את כל ההוראות לפני שתתחיל בהתקנה .2. אזהרה! מאוורר זה יכול להיות מופעל רק עם מתג דו-קוטבי עם פתח מגע 3 מ"מ כל אחד .3.
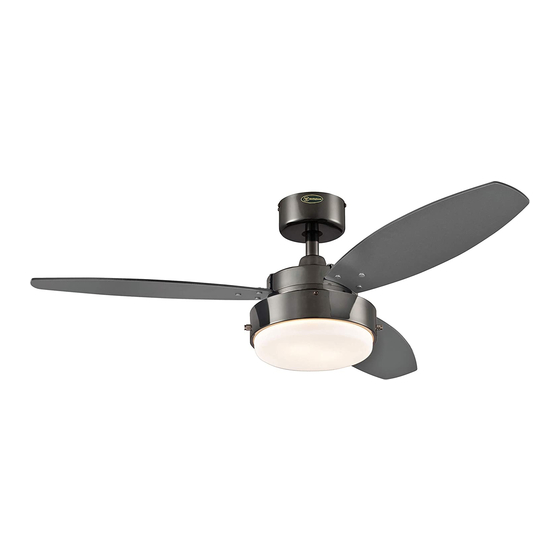
- Page 4 Saynet-EI-Alloy LED (no dimmer)-WH21 FEATURES מאפיינים COMBO-BLADE Combo-Blades feature two high quality finishes on one blade. Select the one that best complements your decor, or change the style with just a flip of the blade. להבים משולבים להבים משולבים כוללים שני גימורים באיכות גבוהה על להב אחד. בחר את זה שהכי .מתאים...
-
Page 5: Preparing For Installation
Saynet-EI-Alloy LED (no dimmer)-WH21 PREPARING FOR INSTALLATION MOUNTING BRACKET INSTALLATION הכנה להתקנה התקנת תושבת תליה Remove the screws from the two mating holes (1) on the canopy. Loosen (do not remove) the Unpack and inspect fan carefully to be certain all contents are included. Turn off power screws in the mating slots (2) on the canopy. - Page 6 Saynet-EI-Alloy LED (no dimmer)-WH21 MOUNTING BRACKET INSTALLATION התקנת תושבת תליה Note: This step is for Solid Wood construction ceiling installation, for concrete ceiling Note: Proper care must be taken when mounting to concrete ceilings and add the expansion anchors installation step for mounting bracket. installation, skip to step 4.
- Page 7 Saynet-EI-Alloy LED (no dimmer)-WH21 MOUNTING BRACKET INSTALLATION התקנת תושבת תליה Drive the expansion anchors (1) into the holes. (Note: do not detach hex nut (2), spring washer (3) and metal washer (4) for this step). Tighten hex nut until feel the metal expansion anchor is not working loose. הכנס...
- Page 8 Saynet-EI-Alloy LED (no dimmer)-WH21 MOUNTING BRACKET INSTALLATION התקנת תושבת תליה Pull the supply mains (1) through the center of the ceiling, and align the two oval holes in the mounting bracket with the expansion anchors (1), re-install metal washer, spring washer and hex nut, tighten the hex nut until the mounting bracket is fix stably. Remove the hex nut, spring washer, metal washer, keep them for next step usage.
-
Page 9: Wiring Options
Saynet-EI-Alloy LED (no dimmer)-WH21 WIRING OPTIONS MOUNTING BRACKET INSTALLATION אפשרויות חיווט התקנת תושבת תליה Wiring: From House: TERMINAL BLOCK Connector: Live (L) Neutral (N) Ground Follow diagram above to make wiring connections to the termi- nal block on the mounting bracket. חיווט... - Page 10 Saynet-EI-Alloy LED (no dimmer)-WH21 DOWNROD MOUNT התקנת מוט תליה Remove clamp pin (2) and cross pin (1) from downrod. Loosen setscrew in downrod ball (3) until ball moves easily up and down the downrod. Do not remove ground wire (4) from downrod. Slide downrod ball down, exposing cross pin (5).
- Page 11 Saynet-EI-Alloy LED (no dimmer)-WH21 DOWNROD MOUNT התקנת מוט תליה Insert the downrod through the canopy and coupling cover. Carefully thread lead wires and plug though the downrod and ball assembly. Re-install cross pin into downrod and slide downrod ball up until cross pin fits firmly into ball.
- Page 12 Saynet-EI-Alloy LED (no dimmer)-WH21 DOWNROD MOUNT התקנת מוט תליה Loose (but do not remove) the set screws from the down rod coupling. Insert downrod (1) into downrod coupling (2). Make sure to align hole in downrod with the hole in downrod coupling.
-
Page 13: Blades Installation
Saynet-EI-Alloy LED (no dimmer)-WH21 BLADES INSTALLATION התקנת הלהבים Attach blade brackets to blades using the blade bracket screws (1), fabric washers (2), and decorative nuts (3). .)3( חבר את מחזיקי הלהבים ללהבים בעזרת ברגי מחזיק הלהב (1), דיסקיות בד (2) ואומים דקורטיביים... - Page 14 Saynet-EI-Alloy LED (no dimmer)-WH21 BLADES INSTALLATION התקנת הלהבים Attach blade assembly to motor using the screws and washers provided. .חבר את מכלול הלהבים למנוע באמצעות הברגים והדיסקיות המצורפים...
- Page 15 Saynet-EI-Alloy LED (no dimmer)-WH21 MOUNTING BRACKET INSTALLATION תליית המאוורר והתקנתו על התושבת Carefully lift fan assembly onto mounting bracket. Rotate fan until notch on downrod After hanging fan onto the mounting bracket, make sure plug connectors from the ceiling ball (1) engages the ridge (2) on the mounting bracket. This will allow for hands free fan and terminal block (1) are moved away from the space located above the downrod ball wiring.
-
Page 16: Remote Sensor
Saynet-EI-Alloy LED (no dimmer)-WH21 MOUNTING BRACKET INSTALLATION REMOTE SENSOR תליית המאוורר והתקנתו על התושבת חיישן שליטה מרחוק Be sure to place the sensor from the remote into the sensor hole on the inside of the canopy. 1. Unscrew the red cap and remove it from the remote sensor. 2. - Page 17 Saynet-EI-Alloy LED (no dimmer)-WH21 SECURE TO CEILING קיבוע לתקרה The canopy has two mating slots (1) and two mating holes (2). Position both slots on canopy directly under and in line with two screws in the mounting bracket (3). Lift the canopy, allowing the two screws to slide into the mating slots.
-
Page 18: Light Fixture Installation
Saynet-EI-Alloy LED (no dimmer)-WH21 LIGHT FIXTURE INSTALLATION התקנת גוף התאורה Locate the indentations on the neck of the glass (2) and align with the protrusions from the light kit (1). Lift the glass up allowing the protrusions to engage the indenta- tions on the glass, and twist the glass clockwise to lock into place. -
Page 19: Remote Control
Saynet-EI-Alloy LED (no dimmer)-WH21 REMOTE CONTROL שלט רחוק Remote Control Operation 1. Turning fan On/Off – press and release. The remote control operates the fan speed as follows: 3 - high; 2 - medium; 1 – low; 0 - off. 2. - Page 20 Saynet-EI-Alloy LED (no dimmer)-WH21 BRACKET OF TRANSMITTER INSTALLATION התקנת תושבת לשלט Note: Install two AA batteries by removing battery cover on back of transmitter, installing batteries, and replacing battery cover. If desired, install the transmitter holder onto the wall with included screws.
-
Page 21: Operation And Maintenance
Saynet-EI-Alloy LED (no dimmer)-WH21 OPERATION & MAINTENANCE Operation Speed settings for warm or cool weather depend on factors such as room size, ceiling height, number of fans and so on. The slide switch controls direction, forward or reverse. Warm weather/down position - (Forward) Fan turns counterclockwise direction. A downward air flow creates a cooling effect as shown in illustration A. This allows you to set your air conditioner on a higher temperature setting without affecting your comfort. - Page 22 Saynet-EI-Alloy LED (no dimmer)-WH21 תפעול ותחזוקה תפעול .הגדרות המהירות למזג אוויר חם או קריר תלויות בגורמים כמו גודל החדר, גובה התקרה, מספר המאווררים וכן הלאה .קיים מתג השולט בכיוון הסיבוב, עם או נגד כיוון השעון .Aמזג אוויר חם / נגד כיוון השעון - המאוורר מסתובב נגד כיוון השעון, זרימת אוויר כלפי מטה יוצרת אפקט קירור כפי שמוצג באיור .דבר...
-
Page 23: Troubleshooting Guide
Saynet-EI-Alloy LED (no dimmer)-WH21 If you have difficulty operating your new ceiling fan, it may be the result of incorrect assembly, installation, or wiring. In some cases, these installation errors may be TROUBLESHOOTING GUIDE mistaken for defects. If you experience any faults, please check this Trouble Shooting Chart. - Page 24 Saynet-EI-Alloy LED (no dimmer)-WH21 מדריך פתרון בעיות אם אתה מתקשה להפעיל את מאוורר התקרה החדש שלך, זה עשוי להיות תוצאה של הרכבה, התקנה או חיווט שגויים. במקרים מסוימים, טעויות התקנה אלה עלולות להיחשב לעתים בתור פגמים. אם אתה נתקל בתקלות כלשהן, אנא בדוק...
- Page 25 Saynet-EI-Alloy LED (no dimmer)-WH21 Meaning of crossed-out wheeled dustbin: Do not dispose of electrical appliances as unsorted municipal waste, use separate collection facilities. Contact you local government for information regarding the collection systems available. If electrical appliances are disposed of in landfills or dumps, hazardous substances can leak into the groundwater and get into the food chain, damaging your health and well-being.
- Page 26 Saynet-EI-Alloy LED (no dimmer)-WH21...
- Page 27 Saynet-EI-Alloy LED (no dimmer)-WH21...
- Page 28 Saynet-EI-Alloy LED (no dimmer)-WH21 Westinghouse Lighting, Philadelphia, PA 19154-1029, U.S.A. www.westinghouselighting.com and Westinghouse are trademarks of Westinghouse Electric Corporation. Used under license by Westinghouse Lighting. All Rights Reserved. Made in China...
Need help?
Do you have a question about the Saynet-EI-Alloy LED-WH21 and is the answer not in the manual?
Questions and answers