Table of Contents
Advertisement
Available languages
Available languages
Quick Links
SMART DEWHEATER AND CONTROLLER 2X
INSTRUCTION MANUAL
Model #94035
ENGLISH
Congratulations on purchasing the Celestron Smart DewHeater
and Controller 2x. This controller delivers "smart" and efficient
power usage for up to two of your telescope system's dew
heaters plus another 12V DC device-while also providing cable
management for your setup. When you plug your dew heaters
into the controller, one cable connects everything to your power
source, while another connects the setup to your PC, if desired.
If you prefer not to connect to a PC, simply plug your dew heaters
into the controller and power it on. The controller will automatically
monitor the ambient temperature and humidity using its integrated
environmental sensor. The thermistor port monitors the lens's
temperature and provides only enough power to prevent dew.
If you're using battery power, this "smart" system significantly
reduces the heaters' power consumption, extending battery life. If
you would like to manually adjust settings or monitor data, connect
to a PC or your Celestron mount's hand control.
TABLE OF CONTENTS
1. Parts List . . . . . . . . . . . . . . . . . . . . . . . . . . . . . . . . . . . . . . . . . . . . Pg.1
2. Controller Overview . . . . . . . . . . . . . . . . . . . . . . . . . . . . . . . . . . Pg.1
3. Mounting the Controller to Your Setup . . . . . . . . . . . . . . . . . . Pg.3
4. Powering the Controller . . . . . . . . . . . . . . . . . . . . . . . . . . . . . . . Pg.4
5. Connecting to a Celestron Mount . . . . . . . . . . . . . . . . . . . . . . Pg.5
6. Using the Controller with a Celestron Hand Control . . . . . . . . Pg.5
7. Connecting to a PC. . . . . . . . . . . . . . . . . . . . . . . . . . . . . . . . . . . Pg.6
8. Using the Controller with CPWI Software . . . . . . . . . . . . . . . Pg.7
9. Specifications . . . . . . . . . . . . . . . . . . . . . . . . . . . . . . . . . . . . . . . Pg.10
Appendix A:
Determining Power Supply Requirement Examples . . . . . . . . . Pg.11
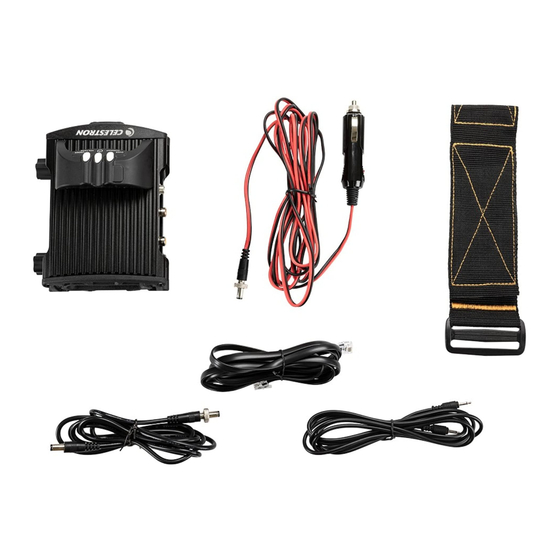
1. Parts List
Fig 1 - All included items
1.
Smart DewHeater Controller 2x
2.
Power cable
3.
Auxilliry cable
1.
2.
3.
4.
4.
Mount power cable
5.
Tripod leg strap
6.
Thermistor Cable
5.
6.
If you are missing any parts in the Parts List, please contact Celestron
Technical Support at www.celestron.com/pages/technical-support
for assistance.
2. Controller Overview
Refer to Figure 2 for an overview of the input jacks, output ports, and
features of the Smart DewHeater Controller 2x.
Fig 2-1
1.
3.
Fig 2-2
Fig 2-3
7.
1.
Dew heater ports
2.
Power input jack
3.
Thermistor ports
4.
AUX ports
2.
4.
5.
6.
5.
PC port
6.
Power output port
7.
Bridge
ENGLISH |
1
Advertisement
Chapters
Table of Contents

Related Manuals for Celestron SMART DEWHEATER AND CONTROLLER 2X


Summary of Contents for Celestron SMART DEWHEATER AND CONTROLLER 2X
-
Page 1: Table Of Contents
4. Powering the Controller ....... Pg.4 5. Connecting to a Celestron Mount ..... . Pg.5 6. - Page 2 If you are using a heating band or strip from another manufacturer, you will need the optional Celestron Thermistor for Smart DewHeater Controllers. Connect a Celestron Dew Heater Ring to the controller using the extension cable that comes with the ring and the thermistor cable that comes with the controller.
-
Page 3: Mounting The Controller To Your Setup
The power port can deliver a maximum of 84W power (7A max CG-5/Vixen or CGE/Losmandy dovetail bar. If you have a dovetail current). If a connected device draws more than 84W, the port will bar on your optical tube, this is perhaps the easiest and most automatically shut off to protect the circuitry. -
Page 4: Powering The Controller
If you need 5A (60W) of power or less for your setup, and you have access to an AC power outlet, you can use the Celestron AC Adapter-5A to power the controller. Use the threaded Helpful formulas: barrel connector for the most secure connection. -
Page 5: Connecting To A Celestron Mount
INPUT POWER To use the NexStar+ or StarSense hand control, connect the supplied AUX cable to an AUX port on the Celestron mount and an AUX port Select this to monitor the power draw from the devices connected to on the Smart DewHeater Controller 2x. Then, plug the mount’s hand the controller. -
Page 6: Connecting To A Pc
If a device is connected to the port and you select “Power Port” from If using a Celestron computerized mount, you can connect to the the Dew Heater menu, the LCD will display the power draw. To disable... -
Page 7: Using The Controller With Cpwi Software
PowerTank Lithium Pro If you are using a Celestron mount with the SkyPortal WiFi Module, you can connect to the Fig 14 controller via WiFi through the mount using the supplied AUX cable. You can also use the included mount power cable to power your mount from the power output port. - Page 8 to the right. In the upper-left corner of the Overview screen, you slider to set the aggression. If you are unsure of what aggression can see the total power and current draw from the controller and setting to use, try 5 (the default setting) initially. the input voltage from the power source.
- Page 9 also “pinch to zoom” if you have a touchpad or use your mouse’s scroll wheel to zoom in and out. Use the slider that appears at the bottom of the graph to find a particular time range. ENVIRONMENT GRAPH Select “Environment Graph” from the Dew Heater menu to bring up the Environment Graph window (Figure 18).
-
Page 10: Specifications
Thermistor Jack: 2x 2.5mm Audio jack, compatible with Celestron Dew Heater Rings and optional Celestron Thermistor AUX Ports: 2x AUX ports, compatible with Celestron mounts and other Celestron products Environmental Sensor: Integrated, gives ambient temperature and... - Page 11 12V before connecting it to the controller. Also, remember that the power input jack is tip positive. - Celestron 8” Dew Heater Ring connected to dew heater port #1 - For portable setups, the Celestron PowerTank Lithium Pro can Max current draw of 8”...
- Page 12 © 2021 Celestron • All rights reserved celestron.com/pages/technical-support 2835 Columbia Street • Torrance, CA 90503 U.S.A. FCC NOTE: This equipment has been tested and found to comply with the limits for a Class B digital device, pursuant to part 15 of the FCC Rules. These limits are designed to provide reasonable protection against harmful interference in a residential installation.
- Page 13 4. Alimenter le contrôleur ....... . Pg.4 5. Connexion à une monture Celestron ..... . Pg.5 6.
- Page 14 Si vous utilisez une bande ou une languette chauffante d'un autre fabricant, vous aurez besoin de la thermistance Celestron en option pour les contrôleurs de chauffage anti-buée Connectez un anneau de chauffage anti-buée Celestron au contrôleur à l'aide du câble intelligents.
-
Page 15: Monter Le Contrôleur À Votre Système
à barillet. Vous pouvez le visser sur la configuration de votre télescope. Vous avez plusieurs options : prise d'alimentation des montures Celestron avec un connecteur - Utilisez la pince en queue d'aronde intégrée pour connecter le fileté... -
Page 16: Alimenter Le Contrôleur
Si vous avez besoin de 5 A (60 W) ou moins pour votre configuration et que vous avez alimentation, il est crucial de déterminer la quantité approximative accès à une prise secteur, vous pouvez utiliser l'adaptateur secteur Celestron 5 A pour d'énergie nécessaire à votre installation et la capacité de batterie alimenter le contrôleur. -
Page 17: Connexion À Une Monture Celestron
Pour utiliser la télécommande NexStar+ ou StarSense, connectez courant que le maximum spécifié, la LED « Over Current » s'allumera. le câble AUX fourni à un port AUX sur le support Celestron et à Par défaut, la consommation de courant maximale est de 2,0A, ce qui un port AUX sur le contrôleur intelligent double de chauffage anti-... - Page 18 PORT D'ALIMENTATION REMARQUE: Si vous utilisez la commande StarSense, vous devrez utiliser les boutons de DÉFILEMENT pour voir l'intégralité du texte Cette sélection vous permet de surveiller la sortie d'alimentation 12V pour certaines sélections de menu. CC vers un appareil connecté au port d'alimentation. PUISSANCE D'ENTRÉE Si un appareil est connecté...
- Page 19 Module Wi-Fi SkyPortal PowerTank Lithium Pro Si vous utilisez une monture Celestron avec le module WiFi SkyPortal, vous pouvez vous Fig 14 connecter au contrôleur via WiFi par le support à l'aide du câble AUX fourni. Vous pouvez également utiliser le câble d'alimentation de la monture inclus pour alimenter votre monture Écran d’aperçu...
- Page 20 du contrôleur (Figure 14). Les icônes à côté des ports actuellement le plus haut niveau de prévention de la buée lors de conditions utilisés deviendront orange avec la consommation d'énergie au fil environnementales changeantes. En général, vous pouvez utiliser du temps dans le petit graphique à droite. Dans le coin supérieur un réglage d'activité...
- Page 21 souhaitez changer la couleur d'un port, placez la souris sur le port et faites un clic droit. Vous pouvez masquer un port du graphique en cliquant sur le cercle à gauche du nom du port. Pour réactiver sa ligne sur le graphique, il suffit de cliquer à...
-
Page 22: Spécifications
Prise Jack de thermistance: 2x prise audio jack 2,5 mm, compatible avec les anneaux chauffants Chauffage anti-buée Celestron et la thermistance Celestron en option Ports AUX: 2x ports AUX, compatibles avec les montures Celestron et autres produits Celestron Capteur environnemental: Intégré, donne des données de température et d'humidité... -
Page 23: Exemples De Calculs D'exigences D'alimentation
Consommation de courant maximale pour la monture CGX EQ lors de l'orientation à vitesse maximale = environ 3,0 A - Anneau de chauffage anti-buée Celestron de 8" connecté au port Puissance maximale requise pour la monture CGX EQ lors de n°1 du chauffage anti-buée... - Page 24 © 2021 Celestron • Tous droits réservés. celestron.com/pages/technical-support 2835 Columbia Street • Torrance, CA 90503 É.-U. NOTE DE LA FCC: Cet équipement a été testé et jugé conforme aux limites établies pour un dispositif numérique de classe B, conformément à la section 15 de la réglementation de la FCC. Ces limites sont conçues pour fournir une pro- tection raisonnable contre les interférences nuisibles dans une installation résidentielle.
- Page 25 4. Steuerung mit Strom versorgen ......S.4 5. Anschluss an eine Celestron-Montierung..... S.5 6.
- Page 26 Wenn Sie ein Heizband oder einen Heizstreifen eines anderen Herstellers verwenden, benötigen Sie den optionalen Celestron-Thermistor für Intelligente Tauheizungssteuerungen. Schließen Sie eine Tauheizmanschette von Celestron mit dem mitgelieferten Verlängerungskabel und dem Thermistorkabel an die Steuerung an. Jeder der Tauheizungsanschlüsse kann eine maximale Leistung von Wenn Sie die automatische intelligente Steuerung für mehr als...
-
Page 27: Befestigung Der Steuerung An Ihrer Ausrüstung
gewährleisten. Der Strom fließt durch den Anschluss, sobald Sie das – Verwenden integrierte Schwalbenschwanzklemme, Gerät anschließen; es ist nicht nötig, den Anschluss einzuschalten um die Steuerung an eine CG-5/Vixen oder CGE/Losmandy (es sei denn, Sie haben den Anschluss zuvor deaktiviert, worauf wir Schwalbenschwanzschiene anzuschließen. -
Page 28: Steuerung Mit Strom Versorgen
Wenn Sie einen Strom von 5 A (60W) oder weniger für Ihre Ausrüstung benötigen Hilfreiche Formeln: und Zugang zu einer Netzsteckdose haben, können Sie den Celestron AC Adapter-5A – Spannung (in Volt) x Strom (in Ampere) = Leistung (in Watt) zur Stromversorgung der Steuerung verwenden. -
Page 29: Anschluss An Eine Celestron-Montierung
Verwenden Sie die Firmware-Manager (CFM) Software zum Tauheizung-Menü und drücken Sie ENTER. Verwenden Sie von Celestron, um die Firmware zu aktualisieren, falls erforderlich. nun die SCROLL-Tasten, um die Menüoptionen für die Tauheizung Die neueste Version finden Sie hier: https://www.celestron.com/ anzuzeigen und wählen Sie mit ENTER aus. -
Page 30: Anschluss An Einen Pc
EINGANGSLEISTUNG STROMVERSORGUNGSANSCHLUSS Wählen Sie diese Option, um die Stromaufnahme der an die Mit dieser Auswahl können Sie den 12-VDC-Ausgang für ein an den Steuerung angeschlossenen Geräte zu überwachen. Sie können Stromanschluss angeschlossenes Gerät überwachen. auch den Eingangsstrom der Stromquelle überprüfen und die max. Wenn ein Gerät an den Anschluss angeschlossen ist und Sie „Power Stromaufnahme einstellen. -
Page 31: Steuerung Mit Cpwi-Software Verwenden
CPWI-Tauheizungsmenü SkyPortal WLAN-Modul PowerTank Lithium Pro Wenn Sie eine Celestron-Montierung mit dem SkyPortal WLAN-Modul verwenden, können Sie über das mitgelieferte AUX-Kabel eine WLAN-Verbindung zur Steuerung über die Montierung herstellen. Abb. 14 Sie können auch das mitgelieferte Stromkabel der Montierung verwenden, um die Montierung über den Stromausgang mit Strom zu versorgen. - Page 32 Wenn Tauheizungssymbol auswählen, wird und 100 – der Prozentsatz der max. Leistung der an den Anschluss Tauheizungsmenü angezeigt. (Abbildung 13). Die erste Zeile im angeschlossenen Tauheizung. Sobald Sie den gewünschten Wert Tauheizungsmenü zeigt die Gesamtleistungsaufnahme aller an die eingegeben haben, drücken Sie ENTER. Steuerung angeschlossenen Geräte an.
- Page 33 LEISTUNGSDIAGRAMM Wählen Sie „Power Graph“ (Leistungsdiagramm) aus dem Tauheizungsmenü, um das Leistungsdiagramm-Fenster aufzurufen (Abbildung 17). Sie können das Leistungsdiagramm auch direkt vom Übersichtsbildschirm aus aufrufen, indem Sie auf das Pfeilsymbol neben dem Wort „Power“ (Leistung) oben links im Übersichtsbildschirm tippen. Das Leistungsdiagramm zeigt den Strombedarf aller Geräte über die Zeit an, die an die Tauheizungsanschlüsse und den Ausgangsstromanschluss der Steuerung angeschlossen sind.
-
Page 34: Technische Daten
Tauheizungsausgänge: 2 x Cinchbuchsen, 12 VDC, 7 A max. Ausgangsstrom für jeden Anschluss Thermistor-Buchse: 2 x 2,5-mm-Audiobuchse, kompatibel mit Abb. 20 Celestron-Tauheizungsmanschetten und optionalem Celestron- Thermistor Anwendungsabschaltfenster AUX-Anschlüsse: 2 x AUX-Anschlüsse, kompatibel mit Celestron- Montierungen und anderen Celestron-Produkten Wenn Sie die Umgebungstemperatur oder die Umgebungssensor: Integriert, liefert Daten Luftfeuchtigkeit während der Neukalibrierung überprüfen,... - Page 35 – Wenn Sie Zugang zu einer Netzsteckdose haben, wäre das intelligente Steuerung für die Tauheizmanschette. In diesem Celestron 5-A-Netzteil, das bis zu 60 W liefern kann, eine gute Fall können Sie davon ausgehen, dass der Akku wesentlich Wahl für die Stromversorgung der Steuerung.
- Page 36 © 2021 Celestron • Alle Rechte vorbehalten celestron.com/pages/technical-support 2835 Columbia Street • Torrance, CA 90503 USA. FCC-ERKLÄRUNG: Dieses Gerät wurde getestet und entspricht den Grenzwerten für digitale Geräte der Klasse B in Übereinstimmung mit Artikel 15 der FCC-Bestimmungen. Diese Grenzwerte sollen einen angemessenen Schutz gegen schädliche Störungen in Wohngebieten bieten.
- Page 37 6. Utilizzo del comando anticondensa con un comando manuale Celestron ....Pag.5 7. Collegamento a un PC....... Pag.6 8.
- Page 38 Se si utilizza l’alimentazione Celestron, che è a contatto diretto con la lente del correttore. di una batteria, nella maggior parte dei casi, questo sistema prolunga Consente comunque un controllo automatico e intelligente di notevolmente la durata della batteria.
-
Page 39: Come Montare Il Comando In Base Alla Propria Configurazione
collegamento ottimale. L’alimentazione passa attraverso la porta non - Utilizzare il fermo a coda di rondine per collegare il comando appena viene collegato il dispositivo: non occorre attivare la porta (a alla barra a coda di rondine di tipo CG-5/Vixen oppure CGE/ meno che la porta non sia stata disabilitata in precedenza, il che verrà... -
Page 40: Alimentazione Del Comando Anticondensa
Se, per la propria configurazione, occorrono 5 A (60 W) di potenza o meno e si ha - Corrente (in Amp) x Tempo (in ore) = Corrente della batteria accesso a una presa di corrente CA, è possibile utilizzare l’adattatore CA 5 A Celestron necessaria (in Amp/ore) per alimentare il comando. -
Page 41: Come Collegare Una Montatura Celestron
NOTA: L’alimentazione non passa attraverso le porte AUX a meno 5. Come collegare una montatura che la montatura Celestron sia collegata a una delle porte AUX e accesa. Se non è collegata una montatura Celestron, il comando Celestron manuale collegato direttamente a una delle porte AUX non viene alimentato. - Page 42 12 V CC per un dispositivo collegato alla porta di alimentazione. Se si utilizza una montatura computerizzata Celestron, è possibile Se un dispositivo è collegato alla porta e viene selezionato “Porta connettersi alla montatura e comandarla attraverso il comando smart...
-
Page 43: Utilizzo Del Comando Anticondensa Con Il Software Cpwi
Panoramica è possibile visualizzare PowerTank Lithium Pro Se si utilizza una montatura Celestron con il Modulo Wi-Fi SkyPortal, è possibile collegarsi al comando via Wi-Fi attraverso la montatura mediante il cavo AUX in dotazione. È inoltre... - Page 44 la potenza e la corrente totali consumate dal comando anticondensa maggiore per aperture maggiori e un livello inferiore in caso e la tensione in ingresso della fonte di alimentazione. Al di sotto di di utilizzo di uno scudo anti-rugiada o se l’ambiente è ventoso. tale dato è...
- Page 45 grafico, basta fare nuovamente clic sul cerchio. Per ingrandire una determinata porzione di tempo nel grafico per accedere a maggiori dettagli, utilizzare i cerchi “+” e “-” nell’angolo inferiore destro del grafico. Se si utilizza un touchscreen, è inoltre possibile avvicinare le dita per ingrandire oppure utilizzare la rotellina del mouse per ingrandire e ridurre l’ingrandimento.
-
Page 46: Specifiche
Connettore jack termistore: 2x jack audio 2,5 mm, compatibile con anelli riscaldanti anticondensa Celestron e termistore Celestron opzionale Porte AUX: 2x porte AUX, compatibili con montature Celestron e altri prodotti Celestron Sensore ambiente: Integrato, fornisce dati relativi a temperatura ambiente e umidità, può essere ricalibrato per prestazioni ottimali Protezione circuito: fusibili ripristinabili internamente per ciascuna porta, protezione per polarità... -
Page 47: Esempi Su Come Determinare I Requisiti Di Alimentazione
- Se si ha accesso a un’alimentazione CA, è una buona idea scegliere maggiore poiché l’anello non funzionerà continuamente alla l’adattatore CA 5 A Celestron, che può gestire fino a 60 W, per massima potenza. Similmente, se il telescopio non viene alimentare il comando anticondensa. - Page 48 © 2021 Celestron • Tutti i diritti riservati. celestron.com/pages/technical-support 2835 Columbia Street • Torrance, CA 90503 Stati Uniti NOTA FCC: La presente apparecchiatura è stata testata ed è risultata conforme ai limiti imposti per i dispositivi digitali di Classe B, ai sensi della Parte 15 delle Normative FCC. Tali limiti sono stati ideati per fornire un’adeguata protezione nei confronti di interferenze dannose in installazioni residenziali.
- Page 49 4. Alimentar el controlador ......Pg.4 5. Conectar a un soporte Celestron ..... . Pg.5 6.
- Page 50 Cable extensor Cable termistor Fig. 4 Si usa una banda o tira calentadora de otro fabricante, necesitará el termistor Celestron opcional para controladores de calefactor de condensación inteligentes. Fig. 3 Conecte una arandela calefactora de condensación Celestron usando el cable extensor que incluye la arandela y el cable termistor que incluye el controlador.
- Page 51 El puerto de alimentación puede ofrecer un máximo de 84W a una barra machihembrada CG-5/Vixen o CGE/Losmandy. Si de potencia (corriente máxima 7A). Si un dispositivo conectado tiene una barra machihembrada en su tubo óptico, es posiblemente consume más de 84W, el puerto se apagará automáticamente para la forma más sencilla y práctica para conectar el controlador a su proteger los circuitos.
- Page 52 Si necesita 5A (60W) de potencia o menos para su instalación, y tiene acceso a una - Voltaje (en voltios) x Corriente (en amperios) = Potencia (en vatios) salida de alimentación CA, puede usar el adaptador CA 5A de Celestron para alimentar el - Corriente (en amperios) x tiempo (en horas) = Capacidad de controlador.
- Page 53 NOTA: No pasará energía por los puertos AUX a menos que se 5. Conectar a un soporte Celestron conecte un soporte Celestron a uno de los puertos AUX y se encienda. Si no tiene conectado un soporte Celestron, un mando manual conectado directamente a uno de los puertos AUX no Si usa el controlador de calefactor de condensación inteligente 2x...
- Page 54 LCD mostrará el consumo de energía. Para desactivar la alimentación al Si usa un soporte informatizado Celestron, puede conectar al soporte puerto para apagar un dispositivo conectado, pulse ENTER para y controlarlo con el Controlador de calefactor de condensación el puerto seleccionado.
- Page 55 PowerTank Lithium Pro Si usa un soporte Celestron con el módulo WiFi SkyPortal, puede conectar al controlador por WiFi mediante el soporte usando el cable AUX incluido. También puede usar el cable Fig. 14 de alimentación del soporte incluido para alimentar el soporte desde el puerto de salida de...
- Page 56 El menú Resumen también es donde puede activar o desactivar Puede renombrar cada puerto en la pantalla Resumen pulsando en el cada puerto de salida, incluyendo ambos puertos de calefactor nombre del puerto. Aparecerá la ventana Editor de nombre de puerto de condensación y el puerto de salida de alimentación.
- Page 57 izquierda de la gráfica. También puede "hacer pinza para aumentar" si tiene un panel táctil o usar la rueda de desplazamiento del ratón para aumentar y reducir. Use el deslizador de la parte inferior de la gráfica para encontrar una gama de tiempo específica. GRÁFICA AMBIENTE Seleccione "Gráfica ambiente"...
- Page 58 Toma termistor: 2x toma audio de 2,5mm, compatible con arandelas calefactoras de condensación Celestron y Termistor Celestron opcional Puertos AUX: 2x puertos AUX, compatibles con soportes Celestron y otros productos Celestron Sensor ambiental: Integrado, ofrece datos de temperatura y humedad ambientes, puede recalibrarse para mejorar el rendimiento Protección de circuito: fusibles restablecibles internamente para...
- Page 59 120W de potencia (corriente máxima 10A), por lo que debería funcionar con esta instalación de - Si tiene acceso a alimentación CA, el adaptador CA 5A Celestron, ejemplo. Sin embargo, puede no tener la suficiente capacidad de que puede gestionar hasta 60W, sería una buena elección para...
- Page 60 © 2021 Celestron • Todos los derechos reservados celestron.com/pages/technical-support 2835 Columbia Street • Torrance, CA 90503 EE.UU. NOTA FCC: Este equipo ha sido probado y cumple con los límites de un dispositivo digital de Clase B, según el apartado 15 de las normas FCC. Estos límites están diseñados para proporcionar una protección razonable contra interferencias dañinas en una instalación doméstica.
Need help?
Do you have a question about the SMART DEWHEATER AND CONTROLLER 2X and is the answer not in the manual?
Questions and answers