Brinsea TLC-40 Advance II Series User Instructions
Thermal life-support cabinet
Hide thumbs
Also See for TLC-40 Advance II Series:
- User instructions (10 pages) ,
- User instructions (25 pages) ,
- User instructions (17 pages)
Table of Contents
Advertisement
Quick Links
User instructions
Contents
Section
1
2
3
4
5
6
7
8
9
10
11
12
13
14
Danger. Not intended for use with oxygen gas. Use of oxygen creates a fire
hazard.
Damaged appliances shall not be used.
The appliance and its supply cord must be placed in an indoor area not subject
to splashes of water or wet conditions and protected from or out of reach of
animals.
Repairs shall be carried out only by a suitably qualified person.
This appliance shall not be used, cleaned or maintained by children or persons
with reduced physical, sensory or mental capabilities or lack of experience and
knowledge without supervision. Children shall not play with the appliance.
Disconnect the brooder/ICU from the mains power supply during cleaning.
Ensure that all electrical parts are kept dry. Avoid alcohol-based solutions and
make sure that all disinfectant is thoroughly rinsed off plastic parts with clean
water. Disinfectant solutions may cause severe cracking of plastic if not
correctly rinsed off.
Record your appliance serial number here: __________________
Brinsea Products Ltd and its agents or distributors will not be responsible for loss of animals in the event of
failure however caused and the user is advised to arrange his own insurance cover where loss of power or
mechanical or electrical failure might result in unacceptable losses.
TLC-40 Advance Series II / TLC-50 Advance Series II
T
hermal
L
ife-support
C
abinet
Subject
IMPORTANT NOTICE
Page
2
2
4
5
7
9
11
11
12
12
13
14
15
16
1
HD4011 US Issue 01
Read instructions
before use.
Advertisement
Table of Contents

Subscribe to Our Youtube Channel
Related Manuals for Brinsea TLC-40 Advance II Series


Summary of Contents for Brinsea TLC-40 Advance II Series
-
Page 1: Table Of Contents
IMPORTANT NOTICE Brinsea Products Ltd and its agents or distributors will not be responsible for loss of animals in the event of failure however caused and the user is advised to arrange his own insurance cover where loss of power or... -
Page 2: Introduction
1-888-667-7009. Go to www.Brinsea.com and register as a free member of the Brinsea Email Group to receive the latest news and information such as advance notice about new products, special offers, exclusive competitions and much more. - Page 3 HD4011 US Issue 01 MAIN MENU – QUICK REFERENCE PRESS BOTH BUTTONS TO UNLOCK THE MAIN MENU SELECT THE OPTION / RETURN TO THE MENU. GO FORWARD ONE SCREEN / INCREASE THE VALUE / DISPLAY IN CELSIUS. GO BACK ONE SCREEN / DECREASE THE VALUE / DISPLAY IN FAHRENHEIT. 30.0C TEMP TEMPERATURE.
-
Page 4: Unpacking
7mm / 8mm wrench Please identify each part and check that they are all present and undamaged. If there are any parts damaged or missing please contact your retailer or Brinsea Products (at the address at the end of the document). -
Page 5: Location And Assembly
HD4011 US Issue 01 4 Location and Assembly Your brooder/ICU will give best results in a room free from wide temperature variations and with generous ventilation – particularly if several incubators / brooders are running at the same time. Ensure that the room temperature cannot drop on a cold night. - Page 6 HD4011 US Issue 01 If caring for small animals with long claws such as hedgehogs, the door edge strip may be fitted as shown to ensure claws cannot pass through any door gap: Loosen the top hinge/cabinet Loosen the bottom Slide the door as far as it will fixing.
-
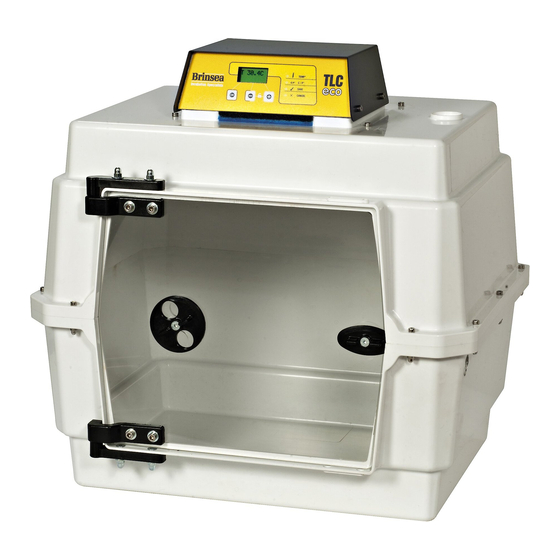
Page 7: Digital Control System
HD4011 US Issue 01 Your brooder/ICU is supplied with air filter media fitted at the air inlet (see fig 1) and at each end of the heater enclosure (see picture 9 above). For details of filter replacement see the Servicing section. Fit the nebuliser solution holder by inserting the "mouthpiece"... - Page 8 HD4011 US Issue 01 HIGH INCUBATION TEMPERATURE ALARM DISPLAY – If the measured temperature goes up by more than the figure in the ALARM HI screen, the alarm will sound immediately and “H” will be displayed. Press OK to silence the alarm for 30 minutes. If the high temperature problem rectifies itself the “H”...
-
Page 9: Temperature
HD4011 US Issue 01 CHANGING SETTINGS – The Main Menu allows the various settings to be modified and saved. All changes are retained in the event of a power cut. – To access the Main Menu, press the buttons simultaneously to unlock the display. For full details of menu settings please refer to the guide on page 3. -
Page 10: Humidity And Ventilation
HD4011 US Issue 01 recommendations above are for guidance only, always observe the chick’s behaviour (see below) to verify setting. Temperatures too high can cause heat stress, dehydration, deformities or haemorrhaging under the skin. Low temperature may reduce appetite and retard growth. Observation of the bird is the best guide to its comfort. -
Page 11: Introducing Young Birds
HD4011 US Issue 01 Press the - and + buttons simultaneously to unlock the main menu. Press + once to display the fan speed option and then OK to select. Adjust as necessary using the + and – buttons. Press OK to return to the Main Menu and then scroll down to Save. -
Page 12: Internal Lighting
HD4011 US Issue 01 Table 1. Typical thermoneutral and active temperature ranges (ATR) Species: Temperature range: Mammals 59 – 68°F (15 – 20°C) Medium and Large Birds 59 – 77°F (15 – 25°C) Small Birds 68 – 86°F (20 – 30°C) Very Small Birds 77 –... -
Page 13: Cleaning Up
4 for assembly guide. The cabinet base and the door may be wet-cleaned with mild detergent and then disinfected with water-based disinfectant solution. 12.5 Replacement filters and evaporating blocks are available from Brinsea Products at the address at the end of this document or from your Brinsea agent. -
Page 14: Servicing And Calibration
HD4011 US Issue 01 13 Servicing and Calibration 13.1 Although it is not regarded as necessary for routine cleaning, the heater enclosure may be safely removed to allow the heater and fan to be dusted. Disconnect the power lead. Remove the water pan. Loosen the 4 cap-head screws (on top of the white plastic cabinet, not the grey control box) as shown and then finally remove each one while supporting the metal enclosure inside. -
Page 15: Specification
Contact your distributor or Brinsea directly at sales@brinsea.com for further information and advice. BE CAUTIOUS OF LOW COST ANALOGUE OR DIGITAL THERMOMETERS AND HYGROMETERS.
Need help?
Do you have a question about the TLC-40 Advance II Series and is the answer not in the manual?
Questions and answers