Table of Contents
Advertisement
Quick Links
Advertisement
Table of Contents

Related Manuals for Sena ACS 10


Summary of Contents for Sena ACS 10
- Page 1 For Arai Quantic Helmet USER’S GUIDE Version 1.0.0 ENGLISH...
-
Page 2: Table Of Contents
ABOUT THE ACS10 1.1 Product Features 1.2 Product Details 1.3 Package Contents INSTALLING THE HEADSET ON YOUR HELMET 8 2.1 Installing the Headset GETTING STARTED 3.1 Downloadable Sena Software 3.1.1 Sena Utility App 3.1.2 Sena Device Manager 3.1.3 Firmware Upgrades 3.2 Charging... - Page 3 TABLE OF CONTENTS CONTINUED 4.4 Advanced Selective Pairing: Hands-Free or A2DP Stereo 4.4.1 Phone Selective Pairing - Hands-Free Profile 4.4.2 Media Selective Pairing - A2DP Profile MOBILE PHONE USAGE 5.1 Making and Answering Calls 5.2 Speed Dialing 5.2.1 Assigning Speed Dial Presets 5.2.2 Using Speed Dial Presets STEREO MUSIC...
- Page 4 TABLE OF CONTENTS CONTINUED UNIVERSAL INTERCOM 8.1 Universal Intercom Pairing 8.2 Two-Way Universal Intercom 8.3 Multi-Way Universal Intercom 8.3.1 Three-Way Universal Intercom 8.3.2 Four-Way Universal Intercom FUNCTION PRIORITY 10. CONFIGURATION SETTING 10.1 Headset Configuration Menu 10.1.1 Delete All Pairings 10.1.2 Remote Control Pairing 10.2 Software Configuration Setting 10.2.1...
-
Page 5: About The Acs10
1. ABOUT THE ACS10 1.1 Product Features Bluetooth ® Four-Way Intercom Intercom up to 1.6 km (1.0 mi)* Audio Multitasking™ Advanced Noise Control™ * in open terrain ACS10 Motorcycle Bluetooth Communication System | 5 ®... -
Page 6: Product Details
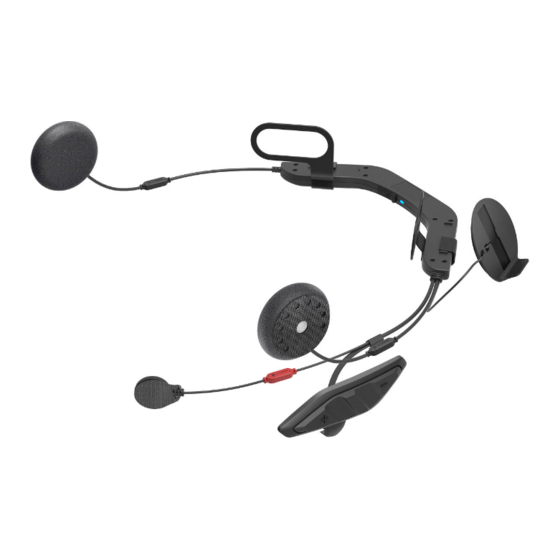
1 ABOUT THE ACS10 1.2 Product Details DC Power Charging & Firmware Upgrade Port Pinhole Fault Reset Button Status LED Main Unit Speakers Connectors Antenna Microphone Connector (–) Button Center Button (+) Button ACS10 Motorcycle Bluetooth Communication System | 6 ®... -
Page 7: Package Contents
1 ABOUT THE ACS10 1.3 Package Contents ACS10 Speakers Adhesive Tapes for the Control Unit Wired Microphone Hook and Loop Fasteners Hook and Loop Fastener for the Main Unit for Wired Microphone USB Power & Data Cable Hook and Loop Fasteners for Speakers ACS10 Motorcycle Bluetooth Communication System | 7... -
Page 8: Installing The Headset On Your Helmet
2. INSTALLING THE HEADSET ON YOUR HELMET 2.1 Installing the Headset • The ACS10 is compatible with Arai Quantic Helmet. 1. Before you install the ACS10, remove the cheek pads and the neckroll. 2. Insert the ACS10 between the external shell and the inner shell. Align its snap holders with the rear snaps, then click them through the snap holders. - Page 9 2 InSTALLIng THE HEADSET On YOUR HELMET 4. Peel off the cover of the adhesive tape of the headset buttons and attach it to the helmet. 5. Peel off the cover of the adhesive tape of the hook and loop fastener for microphone and attach it on the inside of the helmet’s chin guard.
- Page 10 2 InSTALLIng THE HEADSET On YOUR HELMET 8. Remove the cover of the cheek pad, and attach the loop fastener for speakers on the corner of the ear pocket. 9. Attach the speaker and put the cover back on. Go through the same process for the other cheek pad.
-
Page 11: Getting Started
3. GETTING STARTED 3.1 Downloadable Sena Software 3.1.1 Sena Utility App By simply pairing your phone with your headset, you can use the Sena Utility App for quicker, easier set up and management. Sena Utility • Download the Sena Utility App on Google Play Store Store. -
Page 12: Charging
• The headset automatically turns off during charging. • Any 3rd party USB charger can be used with Sena products if the charger is approved by either the FCC, CE, or IC. • The ACS10 is compatible with 5 V input USB-charged devices only. -
Page 13: Checking The Battery Level
3 gETTIng STARTED 3.5 Checking the Battery Level Instructions are for when powering the headset on. Powering On HOLD Note: • The battery performance may be reduced over time with usage. • Battery life may vary depending on conditions, environmental factors, functions of the product in use, and devices used with it. -
Page 14: Pairing The Headset With Other Bluetooth Devices
The headset can pair with multiple Bluetooth devices such as a mobile phone, GPS, MP3 player or Sena SR10 Two-Way Radio Adapter via Mobile Phone Pairing, Second Mobile Phone Pairing and GPS Pairing. -
Page 15: Pairing When The Acs10 Is Turned Off
4 PAIRIng THE HEADSET WITH OTHER BLUETOOTH DEvICES 4.1.2 Pairing When the ACS10 is Turned Off 1. While the headset is off, press and hold the Center Button and the (+) Button for 5 seconds. Blinking HOLD “ Phone Pairing” 2. -
Page 16: Second Mobile Phone Pairing - Second Mobile Phone, Gps, And Sr10
4 PAIRIng THE HEADSET WITH OTHER BLUETOOTH DEvICES 4.2 Second Mobile Phone Pairing - Second Mobile Phone, GPS, and SR10 1. Press and hold the Center Button for 15 seconds. “ Configuration HOLD Menu” 2. Tap the (+) Button. Blinking “... -
Page 17: Advanced Selective Pairing: Hands-Free Or A2Dp Stereo
4 PAIRIng THE HEADSET WITH OTHER BLUETOOTH DEvICES 4.4 Advanced Selective Pairing: Hands-Free or A2DP Stereo Phone Pairing allows the headset to establish two Bluetooth profiles: Hands-Free or A2DP Stereo. Advanced Selective Pairing allows the headset to separate the profiles to enable connection with two devices. 4.4.1 Phone Selective Pairing - Hands-Free Profile 1. - Page 18 4 PAIRIng THE HEADSET WITH OTHER BLUETOOTH DEvICES 3. Select ACS10 in the list of Bluetooth devices detected. If your mobile Bluetooth phone asks for a PIN, enter 0000. ACS10 Device B ACS10 Motorcycle Bluetooth Communication System | 18 ®...
-
Page 19: Mobile Phone Usage
5.2 Speed Dialing 5.2.1 Assigning Speed Dial Presets Speed Dial Presets could be assigned through the Sena Device Manager or the Sena Utility App. 5.2.2 Using Speed Dial Presets 1. Enter into the Speed Dial menu. - Page 20 5 MOBILE PHOnE USAgE 3. Call one of your Speed Dial Presets numbers. “ Speed dial (#)” 4. Redial the last number called. “ Last number redial” ACS10 Motorcycle Bluetooth Communication System | 20 ®...
-
Page 21: Stereo Music
6. STEREO MUSIC 6.1 Bluetooth Stereo Music Play/Pause Music Volume Up/Down HOLD Next Track Previous Track HOLD HOLD 6.2 Music Sharing You can start sharing music with one intercom friend using Bluetooth stereo music during a two-way intercom conversation. Start/Terminate Sharing Music HOLD During a two-way intercom conversation Note:... -
Page 22: Bluetooth Intercom
7.1.1 Using the Smart Intercom Pairing (SIP) SIP allows you to quickly pair with your friends for intercom communication by scanning the QR code on the Sena Utility App without remembering the button operation. 1. Pair the mobile phone with the headset. -
Page 23: Using The Button
(B) is paired with you (A) correctly. 7. Repeat steps 4-6 to pair with Intercom Friends (C) and (D). Note: The Smart Intercom Pairing (SIP) is not compatible with Sena products that use Bluetooth 3.0 or below. 7.1.2 Using the Button Users (You, B) enter into Intercom Pairing. -
Page 24: Last-Come, First-Served
7 BLUETOOTH InTERCOM 7.2 Last-Come, First-Served The intercom pairing queue is Last-Come, First-Served. If a headset has multiple paired headsets for intercom conversations, the last paired headset is set as the First Intercom Friend. For example, after the pairing procedures listed above, headset (D) is the First Intercom Friend of headset (A). -
Page 25: Two-Way Intercom
7 BLUETOOTH InTERCOM 7.3 Two-Way Intercom You can start or end an intercom conversation with an Intercom Friend. Intercom Intercom Intercom Friend1 Friend2 Friend3 Start/End Conversation with the First Intercom Friend D Intercom Friend1 Start/End Conversation with the Second Intercom Friend C Intercom Friend2 Start/End Conversation with the Third Intercom Friend B... -
Page 26: Multi-Way Intercom
7 BLUETOOTH InTERCOM 7.4 Multi-Way Intercom Multi-Way Intercom enables conference-call-style conversations with up to three Intercom Friends at the same time. While Multi-Way Intercom is in progress, the mobile phone connection is temporarily disconnected. However, as soon as Multi-Way Intercom terminates, the mobile phone connection will be reestablished. -
Page 27: Starting A Four-Way Intercom Conference
7 BLUETOOTH InTERCOM 7.4.2 Starting a Four-Way Intercom Conference With three Intercom Friends connected, a new participant (D) can make it a Four-Way Intercom Conference by making an intercom call to either (B) or (C). 1. Intercom friend (B) needs to be paired with a new participant (D). Intercom Intercom Participant... -
Page 28: Three-Way Conference Phone Call With Intercom Users
7 BLUETOOTH InTERCOM 7.5 Three-Way Conference Phone Call with Intercom Users You can have a Three-Way Conference Phone Call by adding an Intercom Friend to the mobile phone conversation. 1. During a mobile phone call, tap the Center Button once, twice, or three times to invite one of your Intercom Friends to the conversation. -
Page 29: Group Intercom
7 BLUETOOTH InTERCOM 7.6 Group Intercom Group Intercom allows you to instantly create a Multi-Way Conference Intercom with three of the most recently paired headsets. To Start the Group Intercom 1. Go through intercom pairing with up to three headsets you want to have Group Intercom with. -
Page 30: Universal Intercom
Universal Intercom allows you to have intercom conversations with users of non-Sena Bluetooth headsets. Non-Sena Bluetooth headset can be connected to the Sena headset if they support the Bluetooth Hands-Free Profile (HFP). You can pair the headset with only one non-Sena headset at a time. -
Page 31: Multi-Way Universal Intercom
1. You (A) need to be paired with a non-Sena Bluetooth headset (B) and another headset (C) for the Three-Way Conference Intercom. - Page 32 8 UnIvERSAL InTERCOM 4. Now you (A), non-Sena Bluetooth headset (B), and the other headset (C) are having a Three-Way Conference Intercom. Non-Sena Headset 8.3.2 Four-Way Universal Intercom You may make the Four-Way Universal Intercom call the same way as a normal Four-Way Intercom call.
-
Page 33: Function Priority
9. FUNCTION PRIORITY The headset operates in the following order of priority: (highest) Mobile phone Bluetooth Intercom Music sharing by Bluetooth stereo music (lowest) Bluetooth stereo music A lower priority function is always interrupted by a higher priority function. Note: If you select music as the Audio Source Priority, the order of priority will change as below: (highest) Mobile phone... -
Page 34: Configuration Setting
10. CONFIGURATION SETTING 10.1 Headset Configuration Menu Accessing the Configuration Navigating Between Menu Menu Options HOLD Execute Menu Options Headset Configuration Menu Voice Configuration Menu Tap the Center Button Second Mobile Phone Pairing None GPS Pairing None Phone Selective Pairing None Media Selective Pairing None... -
Page 35: Delete All Pairings
3. Enter pairing mode in the Remote Control device. The headset will automatically connect with the Remote Control device in pairing mode. 10.2 Software Configuration Setting You can change the settings of the headset through the Sena Device Manager or the Sena Utility App. Sena Utility Sena Device Manager... - Page 36 10 COnFIgURATIOn SETTIng 10.2.1 Unit Language You can select the device language. The selected language is maintained even when the headset is rebooted. 10.2.2 Audio Equalizer (Default: Off) You can use the Audio Equalizer to increase/decrease the decibel level of different frequency ranges of audio. •...
- Page 37 10 COnFIgURATIOn SETTIng 10.2.5 VOX Intercom (Default: Disable) If this feature is enabled, you can initiate an intercom conversation with the last connected intercom friend by voice. When you want to start intercom, say a word such as “Hello” loudly or blow air into the microphone.
-
Page 38: Advanced Noise Control™ (Default: Enable)
The volume of the foreground audio can be adjusted using the headset. How much background audio that is heard can be adjusted using the Sena Utility App. HD Intercom, HD Voice and Audio Source Priority become disabled temporarily when Audio Multitasking is enabled. -
Page 39: Background Volume (Default: Level 5)
10 COnFIgURATIOn SETTIng Foreground and Background Combination Table Foreground* Background** Model Phone Intercom Music or Smart Navi ACS10 * Two audio sources in the foreground can be heard simultaneously with the same volume level. ** Only one background source can be heard at a time while listening to an audio source in the foreground. -
Page 40: Troubleshooting
11.1 Fault Reset When the headset is not working properly, you can easily reset the unit: 1. Locate the Pinhole Fault Reset Button next to the Sena logo. 2. Gently insert a paper clip into the hole and press and Pinhole Fault Reset Button with light pressure. - Page 41 Hero4 allowing for Bluetooth capabilities. The Bluetooth word mark and logos are owned by the ® Bluetooth SIG, Inc. and any use of such marks by Sena is under license. iPhone and iPod touch are registered trademarks of ®...
Need help?
Do you have a question about the ACS 10 and is the answer not in the manual?
Questions and answers