Table of Contents
Advertisement
DIGITAL VIDEO CAMERA
GR-D370AH
For Accessories
:
http://www.jvc.co.jp/english/accessory/
INSTRUCTIONS
Dear Customer,
Thank you for purchasing this digital
video camera. Before use, please
read the safety information and
precautions contained in the pages
2 – 5 to ensure safe use of this
product.
GETTING STARTED
VIDEO RECORDING &
PLAYBACK
DIGITAL STILL CAMERA
(D.S.C.) RECORDING &
PLAYBACK
ADVANCED FEATURES
REFERENCES
TERMS
For Customer Use:
Enter below the Model No. and
Serial No. which is located on the
bottom of the camcorder. Retain this
information for future reference.
Model No.
Serial No.
To deactivate the demonstration,
set "DEMO MODE" to "OFF".
(
pg. 32, 35)
LYT1557-001B
ENGLISH
8
20
27
32
47
Back cover
EN
Advertisement
Chapters
Table of Contents

Related Manuals for JVC GR-D370AH


Summary of Contents for JVC GR-D370AH
-
Page 1: Digital Video Camera
DIGITAL VIDEO CAMERA GR-D370AH For Accessories http://www.jvc.co.jp/english/accessory/ INSTRUCTIONS Dear Customer, Thank you for purchasing this digital video camera. Before use, please read the safety information and precautions contained in the pages 2 – 5 to ensure safe use of this product. -
Page 2: Read This First
So, for important recordings, we recommend using SP mode. For safety and reliability. It is recommended only genuine JVC batteries and accessories are used in this camcorder. This product includes patented and other proprietary technology and will operate only with JVC Data Battery. -
Page 3: Safety Precautions
Continue using the camcorder or AC Adapter under these conditions could lead to fire or electric shock. Contact your JVC dealer. Do not attempt to repair the malfunction yourself. To prevent shock, do not open the cabinet. No user serviceable parts inside. - Page 4 Do not point the lens or the viewfinder directly into the sun. This can cause eye injuries, as well as lead to the malfunctioning of internal circuitry. There is also a risk of fire or electric shock. CAUTION! The following notes concern possible physical damage to the camcorder and to the user.
- Page 5 So, for important recordings, we recommend using SP mode. It is recommended that you use JVC brand cassette tapes. Your camcorder is compatible with all brands of commercially available cassette tapes complying...
- Page 6 Major Features of this Camcorder Wipe/Fader Effects You can use the Wipe/Fader Effects to make pro-style scene transitions. ( Fade out Program AE, Effects and Shutter Effects For example, “SPORTS” mode allows fast- moving images to be captured one frame at a time, for vivid, stable slow-motion.
-
Page 7: Table Of Contents
GETTING STARTED Index ... 8 Provided Accessories ... 12 Power ... 14 Operation Mode... 16 Language Settings... 17 Date/Time Settings ... 17 Grip Adjustment... 18 Viewfinder Adjustment... 18 Brightness Adjustment Of The Display... 18 Tripod Mounting... 18 Loading/Unloading A Cassette ... 19 Loading/Unloading A Memory Card ... -
Page 8: Getting Started
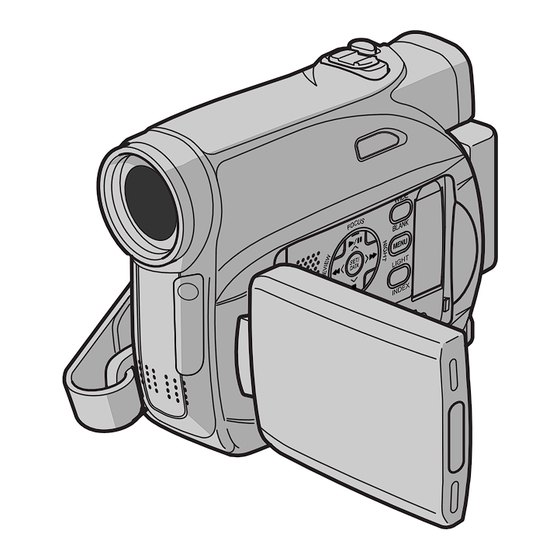
GETTING STARTED Index 16:9... - Page 9 Controls 1Rewind Button [1] ( pg. 23) Left Button [1] Quick Review Button [QUICK REVIEW] pg. 22) 2Set Button [SET] ( pg. 17) Data Battery Button [DATA] ( 3Stop Button [7] ( pg. 23) Down Button [4] Backlight Compensation Button [BACKLIGHT] 4VIDEO/MEMORY Switch ( 5Play/Pause Button [6] ( Up Button [3]...
- Page 10 GETTING STARTED LCD Monitor/Viewfinder Indications During Video Recording Only 1 2 3 16:9 " SOUND 12 B I T 15:55 1Tape Running Indicator ( (Rotates while tape is running.) 2Selected Wide Mode Indicator ( 3Live Slow Indicator ( pg. 37) 4Recording Speed Mode (SP/LP) ( (only LP indicator is displayed) 5Tape Remaining Time (...
- Page 11 During 16:9 Recording Wide 1 6 : 9 (16:9) mode Indicator 1 00min The lower side of the screen blackens when “16:9” is selected in Wide Mode ( Some of the indicators are displayed on the area. During Video Playback B I T BLANK SEARCH PUSH "STOP"...
-
Page 12: Provided Accessories
GETTING STARTED Provided Accessories 1 AC Adapter AP-V14E 2 Power Cord 3 Battery Pack BN-VF707U 4 Audio/Video Cable (ø3.5mini-plug to RCA plug) 5 USB Cable 6 Core Filter (for USB cable, pg. 13 for attachment) 7 CD-ROM 8 Remote Control Unit RM-V720U 9 Lithium Battery CR2025* (for remote control unit) ! Shoulder Strap (see the right column for... - Page 13 How To Attach The Core Filter Attach the core filters to the cables. The core filter reduces interference. Release the stoppers on both ends of the core filter. Stopper Run the cable through the core filter, leaving approx. 3 cm of cable between the cable plug and the core filter.
-
Page 14: Power
NOTES: PUSH This product includes patented and other BATT. proprietary technology and will operate only with JVC Data Battery. Use the JVC BN- VF707U/VF714U/VF733U battery packs. Using generic non-JVC batteries can cause damage to the internal charging circuitry. POWER/ If the protective cap is attached to the battery CHARGE pack, remove it first. - Page 15 DATA several times, there may be a problem with your battery. In such a case, consult your nearest JVC dealer. Using AC Power Perform steps 4 – 6 in “Charging The Battery Pack”.
-
Page 16: Operation Mode
GETTING STARTED Operation Mode To turn on the camcorder, set the Power Switch to any operation mode except “OFF” while pressing down the Lock Button located on the switch. Lock Button AUTO VIDEO/ MEMORY MENU Choose the appropriate operation mode according to your preference using the Power Switch and VIDEO/MEMORY Switch. -
Page 17: Language Settings
Language Settings The language on the display can be changed. pg. 32, 35) Set the Power Switch to “REC” while pressing down the Lock Button located on the switch. Open the LCD monitor fully. ( Set the recording mode to “ Press MENU. -
Page 18: Grip Adjustment
GETTING STARTED Grip Adjustment Adjust the velcro strip. Pass your right hand through the loop and grasp the grip. Adjust your thumb and fingers through the grip to easily operate the Recording Start/Stop Button, Power Switch and Power Zoom Lever. Be sure to fasten the velcro strip to your preference. -
Page 19: Loading/Unloading A Cassette
Loading/Unloading A Cassette The camcorder needs to be powered up to load or eject a cassette. OPEN/EJECT Cassette holder cover PUSH Cassette holder Make sure the window side is facing out. Slide and hold OPEN/EJECT in the direction of the arrow, then pull the cassette holder cover open until it locks. -
Page 20: Video Recording & Playback
VIDEO RECORDING Basic Recording NOTE: Before continuing, perform the procedures listed below: Power ( pg. 14) Loading A Cassette ( pg. 19) VIDEO/MEMORY Zoom Lever POWER/CHARGE Lamp Lock Button Recording Start/Stop Button Remove the lens cap. ( Open the LCD monitor fully. Set the VIDEO/MEMORY Switch to “VIDEO”. -
Page 21: Zooming
Zooming Produces the zoom in/out effect, or an instantaneous change in image magnification. Zoom In Slide the Power Zoom Lever towards “T”. Zoom Out Slide the Power Zoom Lever towards “W”. The further you slide the Power Zoom Lever, the quicker the zoom action. -
Page 22: Time Code
VIDEO RECORDING Time Code During recording, a time code is recorded on the tape. This code is to confirm the location of the recorded scene on the tape during playback. Display Minutes Seconds Frames* (25 frames = 1 second) 12 : 34 : 24 * Frames are not displayed during recording. -
Page 23: Video Playback
Normal Playback ¡ ¡ ¡ ¡ VOL. +/– Speaker VIDEO/ MEMORY Load a cassette. ( pg. 19) Set the VIDEO/MEMORY Switch to “VIDEO”. Set the Power Switch to “PLAY” while pressing down the Lock Button located on the switch. To start playback, press 6. To stop playback, press 7. -
Page 24: Connections To A Tv Or Vcr
VIDEO PLAYBACK Connections To A TV Or VCR To AV connector (optional) Audio/Video cable (provided) 1Yellow to VIDEO IN (Connect when your TV/ VCR has only A/V input connectors.) 2Red to AUDIO R IN* 3White to AUDIO L IN* 4To S-VIDEO IN (Connect when your TV/VCR has S-VIDEO IN and AV input connectors. -
Page 25: Playback Using The Remote Control
Playback Using The Remote Control The Full-Function Remote Control Unit can operate this camcorder from a distance as well as the basic operations (Playback, Stop, Pause, Fast-Forward and Rewind) of your VCR. It also makes additional playback functions possible. pg. 26) Installing The Battery The remote control uses one lithium battery... -
Page 26: Playback
VIDEO PLAYBACK Zoom (T/W) SLOW ( PLAY (Left) SHIFT Slow-Motion Playback During normal video playback, press SLOW ( ) more than approx. 2 seconds. After approx. 10 minutes, normal playback resumes. To pause Slow-Motion playback, press PAUSE (PAUSE). To stop Slow-Motion playback, press PLAY ( NOTES: You can also engage Slow-Motion Playback from Still Playback by pressing SLOW (... -
Page 27: D.s.c. Recording
Basic Shooting (D.S.C. Snapshot) You can use your camcorder as a Digital Still Camera for taking snapshots. Still images are stored in the memory card. NOTE: Before continuing, perform the procedures listed below: Power ( pg. 14) Loading a Memory Card ( pg. -
Page 28: D.s.c. Playback
D.S.C. PLAYBACK Normal Playback Of Images Images shot with the camcorder are automatically numbered, then stored in numerical order in the memory card. You can view the stored images, one at a time, much like flipping through a photo album. 2 2 2 2 1 1 1 1 VIDEO/... -
Page 29: Additional Features For D.s.c
Resetting The File Name By resetting the file name, a new folder will be made. The new files you are going to make will be stored in the new folder. It is convenient to separate the new files from previously made files. -
Page 30: Deleting Files
ADDITIONAL FEATURES FOR D.S.C. Deleting Files Previously stored files can be deleted either one at a time or all at once. Perform steps 1 – 3 in “Normal Playback Of Images” pg. 28). Press MENU. The Menu Screen appears. Press to select “DELETE”, and press SET. -
Page 31: Initialising A Memory Card
To Print By Selecting Still Images And Number Of Prints Perform steps 1 – 3 in “To Print All Still Images (One Print For Each)”. ( Press to select “CURRENT”, and press SET or . The DPOF screen appears. Press to select the desired file. -
Page 32: Advanced Features
MENUS FOR DETAILED ADJUSTMENT Changing The Menu Settings This camcorder is equipped with an easy-to-use, on-screen menu system that simplifies many of the more detailed camcorder settings. pg. 32 – 36) 1 1 1 1 3 3 3 3 2 2 2 2 VIDEO/ MEMORY 4 4 4 4... -
Page 33: Recording Menus
Recording Menus FUNCTION The following menu settings can be changed only when the Power Switch is set to “REC”. [ ] = Factory-preset WIPE/FADER pg. 41), “Wipe or Fader Effects” EFFECT pg. 42), “Program AE, Effects and Shutter Effects” PROGRAM AE pg. - Page 34 MENUS FOR DETAILED ADJUSTMENT SNAP/SLOW* [SNAP]: Snapshot mode SLOW : Live Slow mode For details on the procedure, refer to “Live Slow” pg. 37) and “Snapshot (Record Still Image On Tape)” ( pg. 38). * Available only when the VIDEO/MEMORY Switch is set to “VIDEO”.
- Page 35 DISPLAY The following menu settings can be changed only when the Power Switch is set to “REC”. The DISPLAY settings except “BRIGHT” and “LANGUAGE” are effective only for shooting. [ ] = Factory-preset BRIGHT pg. 18, “Brightness Adjustment Of The Display”...
-
Page 36: Playback Menus
MENUS FOR DETAILED ADJUSTMENT Playback Menus [ ] = Factory-preset SOUND MODE and NARRATION During tape playback, the camcorder detects the sound mode in which the recording was made, and plays the sound back. Select the type of sound to accompany your playback picture. According to the menu access explanation on page 32, select “SOUND MODE”... -
Page 37: Features For Recording
LED Light LED Light can be used to brighten the subject in the dark place during video recording or D.S.C. shooting. Press LIGHT repeatedly to change the setting. OFF: Turns off the light. ON: The light is on always. ( AUTO: The light turns on automatically when dark. -
Page 38: Night-Scope
FEATURES FOR RECORDING Night-Scope Makes dark subjects or areas even brighter than they would be under good natural lighting. Although the recorded image is not grainy, it may look as if it is strobing due to the slow shutter speed. Set the Power Switch to “REC”. -
Page 39: Exposure Control
Exposure Control Manual exposure control is recommended in the following situations: When shooting using reverse lighting or when the background is too bright. When shooting on a reflective natural background such as at the beach or when skiing. When the background is overly dark or the subject is bright. -
Page 40: Backlight Compensation
FEATURES FOR RECORDING Backlight Compensation Backlight compensation brightens the subject quickly. With simple operation, backlight compensation feature brightens the dark subject portion by increasing the exposure. Set the Power Switch to “REC”. Press BACKLIGHT so that the Backlight Compensation indicator “ To cancel Backlight Compensation Press BACKLIGHT twice so that the “... -
Page 41: Manual White Balance Adjustment
Manual White Balance Adjustment Adjust the white balance manually when shooting under various types of lighting. Set the Power Switch to “REC”. Set the recording mode to “ Hold a sheet of plain white paper in front of the subject. Adjust zoom or position yourself so that the white paper fills the screen. -
Page 42: Program Ae, Effects And Shutter Effects
FEATURES FOR RECORDING Program AE, Effects And Shutter Effects Set the Power Switch to “REC”. Set the recording mode to “ Set “EFFECT”, “PROGRAM AE” or “SHUTTER” in FUNCTION Menu. ( The EFFECT, PROGRAM AE or SHUTTER menu disappears and the selected effect is activated. The selected effect indicator appears. -
Page 43: Editing
* Not required for watching still images only. NOTE: The S-Video cable is optional. Be sure to use the YTU94146A S-Video cable. Consult the JVC Service Sentre described on the sheet included in the package for details on its availability. Make sure to connect the end with a core filter to the camera. -
Page 44: Dubbing To Or From A Video Unit Equipped With A Dv Connector (Digital Dubbing)
DV IN/OUT connector. When using a DV cable, be sure to use the optional JVC VC-VDV204U DV cable. To use this camcorder as a recorder Make sure all units are turned off. -
Page 45: Connection To A Personal Computer
Connect only the cable you wish to use to the camcorder. Core filter When using a DV cable, be sure to use the optional JVC VC-VDV206U or VC-VDV204U DV cable depending on the type of DV connector To DV connector (4 or 6 pins) on the PC. -
Page 46: Audio Dubbing
EDITING Audio Dubbing The audio track can be customised only when recorded in the 12-BIT and SP modes. pg. 33) Use the provided remote control. Speaker START/ STOP PAUSE PLAY STOP INSERT A.DUB Play back the tape to locate the point where editing will start, then press PAUSE (8). -
Page 47: References
If, after following the steps in the chart below, the problem still exists, please consult your nearest JVC dealer. The camcorder is a microcomputer-controlled device. External noise and interference (from a TV, a radio, etc.) might prevent it from functioning properly. In such cases, first disconnect its power supply unit (battery pack, AC Adapter, etc.) and wait a few minutes;... - Page 48 17) The built-in clock battery has run out and the previously set date/time has been erased. ➜Consult your nearest JVC dealer for replacement. Files stored in the memory card cannot be deleted. Files stored in the memory card are protected.
- Page 49 17) The built-in clock battery has run out and the pg. 25) previously set date/time has been erased. Consult your nearest JVC dealer for pg. 25) replacement. LENS CAP Appears for 5 seconds after power is turned on if the lens cap is attached or when it is dark.
- Page 50 (battery, etc.) and wait a few minutes for the indication to clear. When it does, you can resume using the camcorder. If the indication remains, consult your nearest JVC dealer. UNIT IN SAFEGUARD MODE EJECT AND REINSERT TAPE The error indications (03 or 04) show what type of malfunction has occured.
-
Page 51: User Maintenance
Mold may form if the lens is left dirty. When using a cleaner or chemically treated cloth refer to the cautions of each product. To clean the viewfinder, please consult your nearest JVC dealer. USER MAINTENANCE... -
Page 52: Cautions
CAUTIONS Battery Packs The supplied battery pack is a lithium-ion battery. Before using the supplied battery pack or an optional battery pack, be sure to read the following cautions: To avoid hazards ... do not burn..do not short-circuit the terminals. When transporting, make sure the provided battery cap is attached to the battery. - Page 53 Also refer to the cleaning cassette’s instructions. If, after using the cleaning cassette, the problems still exist, consult your nearest JVC dealer. Mechanical moving parts used to move the video heads and video tape tend to become dirty and worn out over time.
- Page 54 Serious malfunctioning If malfunctioning occurs, stop using the unit immediately and consult your local JVC dealer. The camcorder is a microcomputer-controlled device. External noise and interference (from a TV, a radio, etc.) might prevent it from...
-
Page 55: Specifications
Camcorder For General Power supply DC 11 V (Using AC Adapter) DC 7.2 V (Using battery pack) Power consumption Approx. 2.4 W (2.6 W*) (LCD monitor off, viewfinder Approx. 2.7 W (2.9 W*) (LCD monitor on, viewfinder off) * Using LED Light Dimensions (W x H x D) 59 mm x 94 mm x 114 mm (with the LCD monitor closed and the viewfinder pushed back in) - Page 56 ENGLISH SOFTWARE INSTALLATION AND USB CONNECTION GUIDE LYT1520-006A...
- Page 57 Contents JVC SOFTWARE LICENSE AGREEMENT..3 Notice for Users ... 5 System Requirements ... 6 Software Installation (Windows ® Connecting (Windows ) ... 8 Viewing the Contents of a Memory Card ® (Windows ) ... 9 Copying Files to the PC (Windows...
-
Page 58: Jvc Software License Agreement
COPYRIGHT; OWNERSHIP You acknowledge that all copyrights and other intellectual property rights in the Program are owned by JVC and its licensor, and remain vested in JVC and such licensor. The Program is protected under the copyright law of Japan and other countries, and related Conventions. - Page 59 Should You breach any provision of this Agreement, JVC may terminate this Agreement without giving any notice to You. In this event, JVC may claim against You for any damages caused by Your breach. Should this Agreement be terminated, You must immediately...
-
Page 60: Notice For Users
CD-ROM to run this software. Do not attempt to modify this software. Changes or modifications not approved by JVC could void user’s authority to operate the equipment. How to handle a CD-ROM Take care not to soil or scratch the mirror surface (opposite to the printed surface). -
Page 61: System Requirements
PC card adapter CU-VPSD60 or the floppy disk adapter CU-VFSD50 to load the files in the memory card to the hard disk on your PC. (Refer to “JVC Accessories” on our world web site at: http://www.jvc-victor.co.jp/ english/accessory/) ® Windows... -
Page 62: Software Installation (Windows ® )
Software Installation ® (Windows Follow the procedure described below to install the software. Quit any other software you are using. (Check that there are no other application icons on the status bar.) Digital Photo Navigator 1.5 This application is used to organise still images and convert them into a variety of formats. -
Page 63: Connecting (Windows ® )
Connecting (Windows Connecting the USB cable Connect the USB cable to copy still image files in a memory card to the PC. Camcorder To assure safety, make sure all units are turned off before making any connections. Use the USB cable to connect the camcorder to the PC. -
Page 64: Viewing The Contents Of A Memory Card (Windows )
Viewing the Contents of a Memory Card (Windows Make sure that there is a memory card in the camcorder. Set the camcorder’s VIDEO/ MEMORY Switch to “MEMORY”. Set the camcorder’s Power Switch to “PLAY” while pressing down the Lock Button located on the switch. -
Page 65: Copying Files To The Pc (Windows ® )
Copying Files to the PC ® (Windows Still image files that are stored in a memory card can be copied to the PC and played back on the PC. Perform the procedure in “Viewing the Contents of a Memory Card (Windows pg. -
Page 66: Disconnecting The Usb Cable (Windows ® )
Disconnecting the USB cable ® (Windows Before loading or unloading memory cards or turning off the PC, first disconnect the USB cable and turn off the camcorder. Confirm that “ currently displayed on the LCD monitor of the camcorder. If “ ”... -
Page 67: Connections (Macintosh)
Connections (Macintosh) Connect the USB cable to copy still image files in a memory card to the PC. Camcorder To assure safety, make sure all units are turned off before making any connections. Use the USB cable to connect the camcorder to the PC. To USB To USB connector... -
Page 68: Viewing The Contents Of A Memory Card (Macintosh)
Viewing the Contents of a Memory Card (Macintosh) Make sure that there is a memory card in the camcorder. Set the camcorder’s VIDEO/ MEMORY Switch to “MEMORY”. Set the camcorder’s Power Switch to “PLAY” while pressing down the Lock Button located on the switch. -
Page 69: Copying Files To The Pc (Macintosh)
Copying Files to the PC (Macintosh) Still image files that are stored in a memory card can be copied to the PC and played back on the PC. Double-click the memory card icon on the desktop. The folders in the memory card appear. -
Page 70: Disconnecting The Usb Cable (Macintosh)
Disconnecting the USB cable (Macintosh) Before loading or unloading memory cards or turning off the PC, first disconnect the USB cable and turn off the camcorder. Drop the memory card icon on the desktop into the [Trash] icon. If the confirmation message appears, click [OK]. - Page 71 Printed in Malaysia M6D1 © 2006 Victor Company of Japan, Limited 0306ASR-PR-VM...
- Page 72 TERMS AC Adapter ... 14 Audio Dubbing ... 46 Auto/Manual Mode ... 16 Backlight Compensation ... 40 Battery Pack ... 14, 15, 52 Blank Search ... 23 Changing The Menu Settings ... 32 – 36 Charging The Battery Pack ... 14 Connection To A Personal Computer ...
Need help?
Do you have a question about the GR-D370AH and is the answer not in the manual?
Questions and answers