Table of Contents
Advertisement
Quick Links
Advertisement
Table of Contents

Related Manuals for EPH Controls RDTP


Summary of Contents for EPH Controls RDTP
- Page 1 RDTP Recessed Room Thermostat Installation and Operation Guide...
-
Page 2: Table Of Contents
Table of contents Installation Instructions Factory Default Settings Speci cations LCD Display Buttons Wiring Mounting & Installation Operating Instructions Adjusting the Target Temperature Locking the Keypad Backlight Mode Selection Setting the Date, Time and Programming Mode Holiday Mode How your Programmable Thermostat works Factory Program Setting Programming Modes Adjust the Program Setting in 5/2 Day Mode... - Page 3 Temporary Override / Permanent Override Boost Function Menu Function P0 1 Operating Mode Normal Mode (Nor) Optimum Start Control (OS) Time Proportional Integral Mode (TPI) P0 2 Setting High & Low Limits P0 3 Hysteresis HOn & HOFF P0 4 Calibrate P0 5 Frost Protection P0 6 Resetting the Thermostat P0 7 Exiting the Menu...
-
Page 4: Installation Instructions
Mains operated programmable Room Thermostat Installation Instructions... -
Page 5: Factory Default Settings
Factory Default Settings High and Low Temp. limitation: Keypad lock: Operating mode: Normal Temperature indicator: ˚C Frost protection: On (5˚C) HYS On: 0.4˚C HYS OFF: 0.0˚C EPH Controls Ltd. -
Page 6: Speci Cations
Contact rating: 10(3)A 230VAC Dimensions: 95 x 95 x 40mm Internal Temperature sensor: NTC 100K External Temperature sensor: NTC 10K Backlight: White IP rating: IP20 Pollution degree: Hysteresis Adjustable from 0 to 1°C (Switching di erential) 0.1°C increments Automatic action: RDTP... -
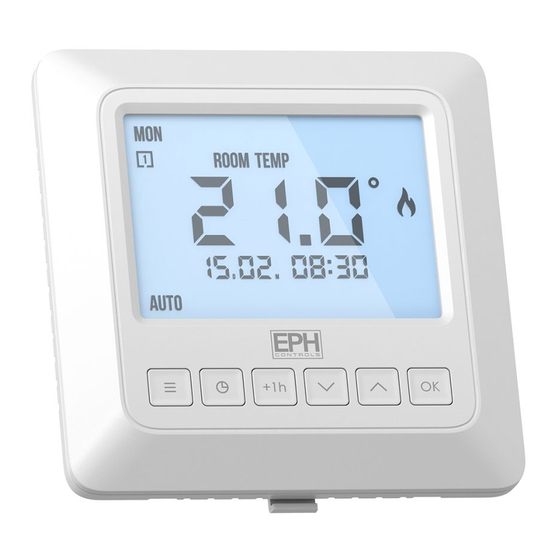
Page 7: Lcd Display
Displays when the thermostat is calling for heat. Displays current time and date. Displays when setting holiday mode. Displays when thermostat is in boost mode. [10] Displays current operating mode. [11] Displays current / target temperature. [12] Displays current [12] time program. [11] [10] EPH Controls Ltd. -
Page 8: Buttons
Buttons Menu button OK Button Time Down Button Button Button Button RDTP... -
Page 9: Wiring
Notes: 1. If mains output is required terminals L and 3 must be electrically linked. 2. If an external NTC 10K sensor is connected, the thermostat will automatically detect and read the temperature from the probe’s location. EPH Controls Ltd. -
Page 10: Mounting & Installation
Prior to setting the thermostat, it is necessary to complete all required settings ƒ described in this section. Before commencing installation, the thermostat must be rst disconnected ƒ from the mains. This thermostat can be mounted to a recessed conduit box. RDTP... - Page 11 10. Wire the thermostat according to the wiring diagram on page 7. Screw the rear wiring box to the recessed back box. Attach the front housing to the rear wiring box until it clips securely into place. EPH Controls Ltd.
- Page 12 40.2 15.2 45 113 RDTP...
-
Page 13: Operating Instructions
Mains operated programmable Room Thermostat Operating Instructions... -
Page 14: Adjusting The Target Temperature
To lock the thermostat, press and hold for 10 seconds. will appear on the screen. The buttons are now disabled. To unlock the thermostat, press and hold for 10 seconds. will disappear from the screen. The buttons are now enabled. RDTP... -
Page 15: Backlight
The backlight is permanently o . To adjust the backlight setting, press and hold for 10 seconds. ‘AUtO’ appears on the screen. to change the mode between AUTO, ON and OFF. Press to con rm selection and to return to normal operation. EPH Controls Ltd. -
Page 16: Mode Selection
When in the OFF mode the thermostat will display the current room temperature and the word ‘OFF’ . When in the AUTO mode the thermostat will display the current room temperature, the number of the current program and the word ‘AUTO’ . RDTP... -
Page 17: Setting The Date, Time And Programming Mode
‘HOLIDAY TO’ will appear on the screen. Press to set time for holiday mode to end. The thermostat will switch o for the holiday period. Press to cancel the holiday function. EPH Controls Ltd. -
Page 18: How Your Programmable Thermostat Works
Example: If P1 is set to be 21˚C at 6am, and if P2 is set to be 10˚C at 8am, the thermostat will look for the temperature to be 21˚C between 6am and 8am. RDTP... -
Page 19: Factory Program Setting
17:30 22:00 Mon-Fri 21˚C 10˚C 10˚C 10˚C 21˚C 10˚C 08:00 10:00 12:00 14:00 17:30 23:00 Sat-Sun 21˚C 10˚C 10˚C 10˚C 21˚C 10˚C 24 Hour 06:30 08:00 12:00 14:00 17:30 22:00 Everyday 21˚C 10˚C 10˚C 10˚C 21˚C 10˚C EPH Controls Ltd. -
Page 20: Programming Modes
Programming Modes The RDTP Room Thermostat has the following programming modes available: 5/2 Day mode Programing Monday to Friday as one block and Saturday and Sunday as a 2nd block. Each block can have 6 di erent times and target temperatures. -
Page 21: Adjust The Program Setting In 5/2 Day Mode
P1 temperature. Press Repeat this process to adjust P2 to P6 times & temperatures. Press Press to return to automatic mode. While in programming mode, pressing will jump to the next day (block of days). EPH Controls Ltd. -
Page 22: Temporary Override / Permanent Override
‘MAN’ or manual mode (Permanent Override). Press Press to adjust the target temperature. Press or wait 5 seconds, the thermostat will operate to this target temperature. To cancel permanent override, press until the ‘AUTO’ or ‘OFF’ mode are selected. RDTP... -
Page 23: Boost Function
5 seconds for the boost to activate. ‘BOOST TO’ will now be displayed on the screen with the end time for the boost program. Press again to deactivate the boost, the thermostat will revert to its previous operating mode. EPH Controls Ltd. -
Page 24: Menu Function P0 1 Operating Mode
The default setting is Normal. Press and hold & together for 5 seconds. ‘P01’ will appear on the screen. Press to select. to select between: nOr (Normal mode) OS (Optimum start mode) tPi (Time proportional integral mode) Press to con rm the mode. RDTP... -
Page 25: Normal Mode (Nor)
When the temperature rises above the target temperature, will disappear, and the thermostat will cancel the demand for heat. Graph (23.1): Normal Mode (On / O Control) Temp 22˚C Target Temperature 21˚C 20˚C 19˚C 18˚C 17˚C Time Minutes EPH Controls Ltd. -
Page 26: Optimum Start Control (Os)
The time (in minutes) that it will take to overcome (TTD) is called Optimum Start Time (OST) and its maximum value is 3 hours = 180 mins. This is subtracted from the start time. As the temperature increases the thermostat will recalculate the OST. RDTP... - Page 27 Example when Ti = 10 Program 1 on the thermostat is 21°C for 06:30am and the room temperature is 18°C. The thermostat will start the heating at 06:00am to reach 21°C for 06:30am @ Ti=10. Target Temperature Di erence ˚C EPH Controls Ltd.
-
Page 28: Time Proportional Integral Mode (Tpi)
2. The Proportional Bandwith CyC – Number of Heating Cycles per hour 6 Cycles This value will decide how often the thermostat will cycle the heating on and o when trying to achieve the target temperature. You can select 2/3/6 or 12. RDTP... - Page 29 TPI control. You can set this temperature from 1.5°C to 3.0°C in 0.1°C increments. Graph (27.1): TPI Control Temp 22˚C 21˚C Target Temperature 20˚C Proportional Bandwidth 19˚C 18˚C 17˚C Time Minutes Heating On Heating O EPH Controls Ltd.
- Page 30 Once TPI mode is selected, ‘CYC’ and ‘06’ will appear on the screen. to select from 2,3,6 or 12. Press to con rm. ‘P Band’ and ‘2.0’ will appear on the screen. to select from 1.5 to 3.0. Press to con rm. Press to return to normal operation. RDTP...
-
Page 31: P02 Setting High & Low Limits
Press to con rm. The settings will be saved. Press to return to the previous screen. When this setting is enabled, ‘LIM’ will appear permanently on the screen. EPH Controls Ltd. -
Page 32: P0 3 Hysteresis Hon & Hoff
‘HOn’ will appear on the screen and the di erential temperature will begin to ash. & to select the ‘HOn’ temperature, press to con rm. ‘HOFF’ will appear on the screen and the di erential temperature will begin to ash. & to select the ‘HOFF’ temperature, press to con rm. RDTP... -
Page 33: P04 Calibrate
‘CAL’ and the actual temperature will appear on the screen. Press to calibrate the temperature. Press to con rm the temperature. The current temperature will be saved and the user will be returned to the previous screen. EPH Controls Ltd. -
Page 34: P05 Frost Protection
‘Fr’ will appear on the screen and ‘ON’ will begin to ash. to turn frost protection ‘ON’ or ‘OFF’ . Press to con rm. The setting will be saved and the user will be returned to the previous screen. RDTP... -
Page 35: P06 Resetting The Thermostat
‘YES’ will ash on the screen. Press to con rm. The thermostat will restart and revert to its factory de ned settings. P07 Exiting the Menu To exit from the installer menu at anytime press Alternatively navigate to P07 and press EPH Controls Ltd. - Page 36 EPH Controls IE sales@ephcontrols.com www.ephcontrols.com T +353 21 434 6238 F +353 21 454 5890 EPH Controls UK sales@ephcontrols.co.uk www.ephcontrols.co.uk T +44 1933 626 396 F +44 1933 626 218...
Need help?
Do you have a question about the RDTP and is the answer not in the manual?
Questions and answers