Table of Contents
Advertisement
Quick Links
Advertisement
Table of Contents

Related Manuals for Doro 5860


Summary of Contents for Doro 5860
- Page 1 Doro 5860 English...
- Page 2 You can obtain addition- al accessories from your local Doro dealer. The supplied accessories pro- vide the best performance with your phone.
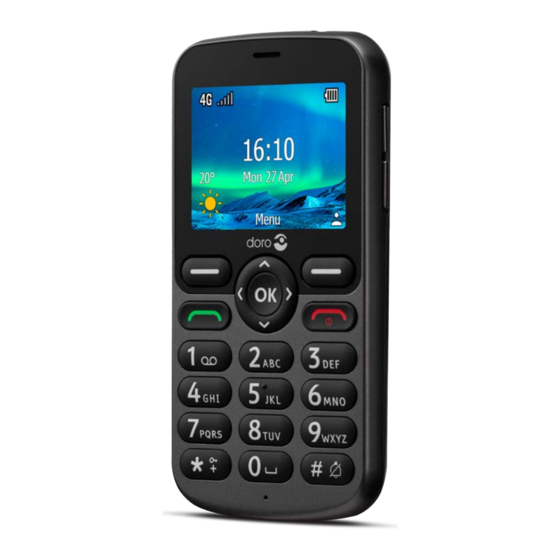
- Page 3 Speaker 11. Right selection button Four-way navigation keys 12. End call/Power on/off Left selection button 13. OK-button Call button 14. Input method/Silent mode Voicemail 15. Second microphone International prefix/symbols/ 16. Camera lens keypad lock 17. Camera flash and torch Microphone 18.
-
Page 4: Table Of Contents
English Contents Congratulations on your purchase ..............1 Getting started ....................1 Unbox your new phone ................. 1 Insert SIM card, memory card and battery ........... 2 Charge the phone................... 4 Save energy .................... 5 Turn the phone on and off..............5 Get to know your phone................ - Page 5 English Weather ....................... 23 Camera ......................24 Alarm ......................25 Torch......................26 Organiser ..................... 26 Calendar ....................26 Calculator ..................... 27 My files ....................27 Media ......................28 Gallery ....................28 FM radio ....................28 Sound recorder ..................29 Settings......................30 General ....................
- Page 6 English Care and maintenance ................. 50 Warranty ...................... 51 Device OS software warranty .............. 52 Specifications ....................52 Copyright and other notices ..............52 Hearing aid compatibility..............54 Specific Absorption Rate (SAR) ............54 Correct disposal of this product ............55 Correct disposal of batteries in this product ........
-
Page 7: Congratulations On Your Purchase
HD voice, HAC (Hearing Aid Compatibility), built-in torch and an assistance button that can be used to alert up to five trusted friends or relatives if help is needed. For more information about accessories or other Doro products please visit www.doro.com or contact our Helpline. -
Page 8: Insert Sim Card, Memory Card And Battery
Availability of accessories is subject to change depending on manufac- turing availability. For more information about available accessories, refer to the Doro website. Insert SIM card, memory card and battery The SIM and memory card holder’s are located inside the battery compartment. - Page 9 English Insert the SIM and memory cards Insert the micro-SIM (3FF) card by gen- tly sliding it into the SIM card slot. Make sure that the SIM card’s contacts are facing inwards and that the cut off cor- ner is as shown. Take care not to scratch or bend the contacts on the SIM card.
-
Page 10: Charge The Phone
English Insert the battery Insert the battery by sliding it into the battery compartment. Replace the back cover. Charge the phone While it’s possible that your phone will already come with enough power to be turned on right out of the box, we recommend charging the device fully before using it. -
Page 11: Save Energy
English Save energy When the battery is fully charged, disconnect the charger from the device and unplug the charger from the wall outlet. To save power, the screen turns off after a while. Press any button to wake the screen up. Full battery capacity will not be reached until the battery has been charged 3–4 times. -
Page 12: Start-Up Wizard
English Start-up Wizard When starting the device for the first time, a Start-up Wizard will be initi- ated to set some basic settings. Select the wanted language and press You will be provided a tutorial about the navigation of the phone. Press Next to step through the tutorial. - Page 13 English Options Press to see more options available in selected menu. In different menus and features it will display available options for that feature. Try to always press this button to explore more options. Back Return to the previous screen. Assistance Press to make an assistance call.
-
Page 14: Keypad Lock
English CAUTION Using a headset at high volume may damage your hearing. Adjust the volume level carefully when using a headset. Keypad lock You can lock the keypad to prevent the keys being accidentally pressed, for example, when your phone is in your pocket or handbag. Incoming calls can be answered by pressing even if the keypad is locked. - Page 15 English Enter text with predictive text In some languages you can use predictive text input method which uses a dictionary to suggest words. See Predictive text, p.31 on how enable/dis- able the feature. Press each key once, even if the displayed character is not the one •...
-
Page 16: Hearing Aid Compatible
English Hearing aid compatible This phone is hearing aid compatible. Hearing aid compatibility is not a guarantee that a specific hearing aid will work with a specific phone. Mo- bile phones contain radio transmitters that may interfere with hearing aid performance. -
Page 17: Calls
English Drag and drop selected files between the phone and the computer. Note! You can transfer files using a USB cable on most devices and operating systems supporting a USB Mass Storage interface. Disconnect the USB cable safely Make sure to enable the hardware to be safely removed. Disconnect the USB cable. -
Page 18: Call Information
English Call information During a call, the outgoing or incoming phone number and the elapsed call time is displayed. If the identity of the caller is withheld or unknown, Pri- vate or Unknown are displayed. Call options Mute During a call, press Mute to disable the microphone. -
Page 19: Call Log
English Call log Received, missed and dialed calls are saved in a combined call log. Press Alternatively, press Call log. Calls are displayed as follows depending on call type: Incoming call Outgoing call Missed call Select wanted entry and press to dial, or... -
Page 20: Manage Phonebook Contacts
English Manage phonebook contacts Press to open Contacts. Select a contact and press Add contact to add an entry in the phonebook. • Edit to edit the contact. When done, press Save. • Search contact to search for a contact. •... -
Page 21: Ice (In Case Of Emergency)
English ICE (In Case of Emergency) First responders can access additional information such as medical infor- mation from the victim's phone ICE in case of emergency. In the event of a trauma, it is critical to have this information as early as possible to in- crease the chances of survival. -
Page 22: Assistance Button
English Assistance button The assistance button allows easy access to contact your predefined Help- ers should you need help. Make sure that the assistance function is acti- vated and configured before use, enter recipients in the numbers list and edit the text message. See Assistance settings, p.16. Make an assistance call CAUTION When an emergency call is activated the phone is pre-set to handsfree... - Page 23 English IMPORTANT! Always inform recipients in the numbers list that they are listed as your assistance contacts. Press Menu Settings Assistance Helpers. Press Add Manual to add names/numbers manually. Alternatively, press Contacts to add a contact from the phonebook. Press Save to confirm. Tip: To edit or remove an existing entry, select it and press Edit or Delete as helper.
-
Page 24: Messages
English Messages Create and send text message (SMS)/picture message (MMS) A text message (SMS) is a short text message that can be sent to other mo- bile phones. A picture message (MMS) can contain text and media objects such as pictures, sound recordings and video. The settings for messaging are supplied by your service provider and can be sent to you automatically via text message. -
Page 25: Read And Handle Messages
English Read and handle messages Inbox, Drafts, Sent and Outbox Press Menu Messages. Select Inbox, Drafts, Sent or Outbox. Press Delete all to delete all messages. Select a message and press to Open the message. Press Reply to send a reply or press for more options: Call to call the selected number/contact. - Page 26 English message will not be forwarded to the recipient mobile phone when it be- comes online. This period is called the validity period. Press Menu Messages Settings SMS. Check SMS validity period with to enable. Delivery report You can select if you want the phone to notify you when your text message has reached the recipient.
- Page 27 English • GSM alphabet to convert any special character to plain alphabet characters. Memory status Display the memory space used on the SIM card and in the phone memory. Press Menu Messages Settings Memory status. Display the memory space used on the SIM card and in the phone memory.
- Page 28 English • DNS address to add a DNS IP address for your service provider. • Network type to set the network type. Select between WAP and HTTP. Press Save when done. • Search to search all available MMS accounts (APN). •...
-
Page 29: Weather
English Check related channel to receive messages on that channel. Press for channel handling: • Add channel to add a new channel to receive broad- cast messages on. Set channel number, title and press Save to save and activate it. Edit channel to edit the selected channel and press •... -
Page 30: Camera
English Select Weather: The first time you open the weather function, you will be requested to enter the city nearest to you for your weather forecasts. Enter the name of the city and press to search. Select the city in the list and press . Press for options. -
Page 31: Alarm
English Note! The flash setting made will remain until you change it. Camera/Video camera Switch between camera and video recording. • Quality Set the level of quality for the photo/video. The higher, the better • quality. Note! Higher quality will consume more memory capacity. Shutter sound Select to have the Shutter sound on or Off. -
Page 32: Torch
English Snooze or turn off When the alarm goes off a signal will sound. Press to turn off the • alarm or press to snooze and repeat the alarm after 9 minutes. Tip: To edit or delete an alarm, select the alarm and press Edit or Delete. -
Page 33: Calculator
English Tip: To edit or delete an event, select the event and press Edit or Delete. Calendar options Press Menu Organiser Calendar Add/New event, then enter your required information. See Add calen- • dar event, p.26. • View to view events for the day. View All to view all events. -
Page 34: Media
English Video file types like, MP3, AAC, AAC+, AMR-NB, AMR WB, PCM, Audio ADPCM, WMA, MIDI Other file types that are not recognised as audio, photo, video or Others vCard. Photos Image file types like, JPG, GIF, PNG, BMP Video file types like, 3GP, MP4, AVI,FLV Video vCard, with file format VCF (Virtual Contact File), is the standard for vCard... -
Page 35: Sound Recorder
English Turning the radio on/off Connect a headset to the headset socket Press Menu to turn the radio on ( Media FM radio ) / off ( ). The tuned frequency is displayed. Tip: Press to return to standby mode. The radio will continue to play. Disconnecting the headset will turn off the radio. -
Page 36: Settings
English • Recordings for the list of recordings and press to play the re- cording. Press for options: • Add folder to add a folder. • Set as ringtone to use the recording as ringtone for incom- ing calls or as alarmtone. •... - Page 37 English Note! Setting the date manually will turn off the automatic time and date update. Time format Press Menu Settings General Time & date Time format. Select 12 hours or 24 hours and press Date format Press Menu Settings General Time &...
-
Page 38: Display
English Battery See your battery status. Press Menu Settings General Battery. See the current battery status. Restore settings Press Menu Settings General Restore settings. All the changes that you have made to the phone settings will be reset to default settings. Enter the phone code and press to reset. -
Page 39: Security
English Note! The brighter the display is, the more batter power it will consume. Backlight Select the delay time for the display backlight. Press Menu Settings Display Backlight. Select the how long time the display is lit. Press to confirm. Main menu You can select different styles for the main menu. - Page 40 English Enter new PIN and press . Enter new PIN again and and press When done, Succeeded will appear. Modify PIN2 Press Menu Settings Security Modify PIN2. Enter the current PIN and press Enter new PIN and press . Enter new PIN again and and press When done, Succeeded will appear.
- Page 41 English Note! The main local emergency number can be dialled without unlocking the keypad. Auto keypad lock The phone automatically locks after the set time period. Press Menu Settings Security Keypad lock Auto keypad lock. Select after what time the phone automatically locks. Press to confirm.
-
Page 42: Calls
English Blacklist You can compile a blacklist of phone numbers so that any phone number on your blacklist is blocked when calling or texting you. Add blacklist numbers Press Menu Settings Security Blacklist Blacklist. Press for options. New to add a number to list of blocked numbers. Enter name •... - Page 43 English Press Menu Settings Calls Call divert: Call forwarding unconditional to divert all voice calls. • Call forwarding on busy to divert incoming calls if the line is busy. • Call forwarding on no reply to divert incoming calls if •...
-
Page 44: Connections
English • International outgoing calls to block calls to international numbers. • International outgoing call while roaming to block incoming calls while roaming (operating in other networks). Press Cancel all barring to cancel all call barring. • Press to confirm. Caller ID Display or hide your phone number on the recipient's phone when you call. - Page 45 English Follow the steps below if your service provider’s profile is not in the list or if you need to change any setting. Contact your service provider for correct settings. Press Menu Settings Connections Network account: Select your service provider and press to activate that MMS account.
- Page 46 English IMPORTANT! Using mobile data services can be costly. We recommend that you check your data rates with your service provider. Enable data service for services like software update. Uncheck to avoid da- ta charges. Press Menu Settings Connections. Check Data service to activate it or uncheck to deactivate. Data service counter The Data service counter gathers traffic information from all apps using mobile data.
-
Page 47: Sound
English Select Auto select to select network automatically or Manual select to select network manually and a list of available network operators is displayed (after a short delay). Select desired operator and press . IMPORTANT! If you select a network manually, your phone will lose network connection when the selected network is out of reach. - Page 48 English • Normal for normal hearing in normal conditions. High for moderate hearing impairment or use in a very noisy • environment. • HAC for use with hearing aid. Press to confirm. Note! Try different settings to find the one that suits your hearing the best. Tone setup Select various ringtones and alerts on your device.
-
Page 49: Bluetooth
English • Ring volume. • Message volume. • Alarm volume. • In-call volume. Press Save to save. Alert type Select to use ringtone and/or vibration for different notifications. Press Menu Settings Sound Alert type. Select type of notification, like Call alert, Message alert, Alarm & cal- endar reminder and adjust the type of alert: Ringtone for ringtone only. - Page 50 English Paired device View already paired devices and pair new. Press Menu Settings Bluetooth Paired device. To search and pair an available Bluetooth devices in your proximity, press Add new device Make sure that the device you want to connect with is within range, visible and in pairing mode.
-
Page 51: Start-Up Wizard
English Transferring files Press Menu Settings Bluetooth Transferring files. View the files being transferred via Bluetooth. Device name Press Menu Settings Bluetooth Device name. DFB-0370 is displayed. Edit the new name. Press Save to save and your new name should appear for other Blue- tooth devices. -
Page 52: Additional Functions
English Press Menu Settings Software update. Press Check for update? Yes to check if there’s a software update available. Press for software update settings: Check again to re-check for update packages to be downloaded. • Version Info to see software version information. •... -
Page 53: Safety Instructions
English Safety instructions CAUTION The unit and the accessories can contain small parts. Keep all of the equipment out of the reach of small children. The mains adapter is the disconnect device between the product and mains power. The mains socket outlet must be close to the equipment and easily accessible. Network services and costs Your device is approved for use on the 4G LTE FDD 1 (2100), 3 (1800), 7 (2600), 8 (900), 20 (800), 28 (700) MHz, 4G LTE TDD 38 (2600) MHz, WCDMA 1 (2100), 8 (900) MHz, GSM... -
Page 54: Areas With Explosion Risk
English Areas with explosion risk Always turn off the unit when you are in an area where there is a risk of explosion. Follow all signs and instructions. There is a risk of explosion in places that include areas where you are normally requested to turn off your car engine. -
Page 55: Emergency Calls
English Emergency calls IMPORTANT! Mobile phones use radio signals, the mobile phone network, the terrestrial network and user-programmed functions. This means that connection cannot be guaranteed in all circumstances. Therefore, never rely only on a mobile phone for very important calls such as medical emergencies. -
Page 56: Malware And Viruses
English When disposing of your device, back up all data and then reset your device to pre- • vent misuse of your personal information. Carefully read the permissions screen when downloading applications. Be particularly • cautious with applications that have access to many functions or to a significant amount of your personal information. -
Page 57: Warranty
Please note that this is a voluntary manufacturer’s warranty and provides rights in addi- tion to, and does not affect statutory rights of end-users. This guarantee does not apply if batteries other than DORO original batteries are used. -
Page 58: Device Os Software Warranty
English Device OS software warranty By using the device, you accept to install any OS software updates provided by Doro, at earliest possibility. By updating your device, you help to maintain your device secure. Doro will keep updates available for the duration of the guarantee/ statutory warranty pe- riod, providing that this is possible from a commercial and technical perspective. - Page 59 Doro reserves the right to revise this document or withdraw it at any time without prior notice.
-
Page 60: Hearing Aid Compatibility
Malmö, Sweden. To be valid, such a request must be made within three (3) years from the date of the distribution of this product by Doro AB, or in the case of code licensed under the GPL v3 for as long as Doro AB offers spare parts or customer support for this product model. -
Page 61: Correct Disposal Of This Product
EU Declaration of Conformity Hereby, Doro declares that the radio equipment type DFB-0370 (Doro 5860) is in compli- ance with Directives: 2014/53/EU and 2011/65/EU including delegated Directive (EU) 2015/863 amending Annex II. -
Page 62: Uk Declaration Of Conformity
English UK Declaration of Conformity Hereby, Doro declares that the radio equipment type DFB-0370 (Doro 5860) is in compli- ance with the relevant UK legislation. The full text of the UK declaration of conformity is available at the following internet ad- dress: www.doro.com/dofc... - Page 63 English...
- Page 64 DFB-0370 (Doro 5860) English Version 1.0 ©2021 Doro AB. All rights reserved. www.doro.com REV 20091 — STR 20211104...
Need help?
Do you have a question about the 5860 and is the answer not in the manual?
Questions and answers
I have just opend phone box to get started but canot find sim or memory card
The SIM card and memory card slots on the Doro 5860 can be accessed by inserting them into the phone as described in the section "Insert the memory/SIM cards and battery" of the manual.
This answer is automatically generated