Advertisement
Chú ý: Ch dùng hư ng d n này cho trư ng h p có s n ch u ã ư c l p
trang này và xem hư ng d n l p
Notice: Only use this installation guide in case you have already got an installed sink. In case you purchase sink and pedestal together,
please ignore this page and see the installation guide attached with sink
Bư c 1:
Tháo ng th i và ch u,
c
nh chân ch u, c
nh chân ch u.
Step 1:
Remove the drainpipe and sink, set the pedestal into
installation position, mark and drill the fixing holes.
ánh d u và khoan
Mark and drill
Tháo
Remove
ánh d u
Mark
Bư c 2:
t l i châu vào móc treo, o khe h ch u và vân ch u, tháo
ch u ra r i dán cao su lên
Step 2:
Reset the sink onto the hangers, check the gap between the
sink and the pedestal, remove the sink again, paste buffer on
the pedestal top.
o khe h
Dán mút
Paste the buffer
Check the gap
Chú ý:
m mút là
gi m thi u khe h
chân ch u. Trư ng h p quý khách mu n dùng
hoàn toàn ng th i thì vui lòng chuy n qua bư c 3, tuy nhiên có
th có v n
tư ng b y u và v t x u ch ti p xúc gi a ch u
v i tư ng x u l ra do thay
x lý ư c v n
ó. N u khe h gi a áy ch u và ch u không
thành v n
, vui lòng b qua bư c 3 và sang bư c 4.
Notice: The buffer is used to reduce the gap between the sink
and the pedestak. If you want to hide the drainpipe by buffer,
please go to step 3, howerver some problems maybe happen as
because you change position of the sink, redrill holes so the wall
is weak or the dirty tangent area of the sink and the wall is
displayed and you must be sure that you can solve those
problems. If the gap between the sink and the pedestal doesn't
matter with you, you can ignore sep 3 and go to step 4
0IM51501/02
HƯ NG D N L P
HOW TO INSTALL
t ư c ính kèm v i ch u.
t chân ch u, ánh d u, khoan l v trí
C
nh chân ch u
Fix pedestal
120
nh chân ch u.
m
L p l i ch u
Reset the sink
gi a áy ch u và
m mút
i v trí ch u và b n ph i ch c ch n
T
t r i. Trư ng h p b n s m c b li n lúc, vui lòng b qua
Bư c 3:
ánh d u và khoan l i l , c
này n u khe h gi a ch u và chân
Chú ý: Kho ng cách gi a l cũ và l m i ph i
lên, n u không ph i b t l cũ b ng v t li u c ng trư c khi khoan
l m i.
Step 3:
Mark, drill hanger fixing holes and fix hanger again (ignore this
step if in step 2, gap between sink and pedestal is between 2
and 10mm)
Notice: Distance between old hole and new one must be at
least about 20mm. If not, you have to fill old holes by hard
material before drilling new holes
ánh d u và khoan
Mark and drill
Bư c 4:
-L p ph n ng th i dư i v i ng
th i trên và l ch
sàn.
c n
ư c n i ch c ch n vào l
th i trên sàn. Sau ó làm kín khe
h
gi a ng th i dư i và l ch
trên sàn b ng keo silicôn.
-Hãy ki m tra s kín khít c a ng
th i b ng cách cho nư c vào
ch u và x th xem nư c có b rò
ra không.
*N u rò t i ch silicôn thì chít l i
silicôn, n u rò
ch khác thì vui
lòng tháo ra, ki m tra, l p l i và
ki m tra rò nư c l i m t l n n a.
Step 4:
n
-Connect the lower drainpipe to
the upper drainpipe and outlet
hole in the floor then fill the gap
between
lower
drainpipe
outlet by silicon.
- Please kindly check the tightness
by test of discarding water.
*If there is any leak at the place that was filled by silicon,
please kindly add silion. If there is any leak at other place,
please remove, check, assembly and recheck tightness by test
of discarding water again
4
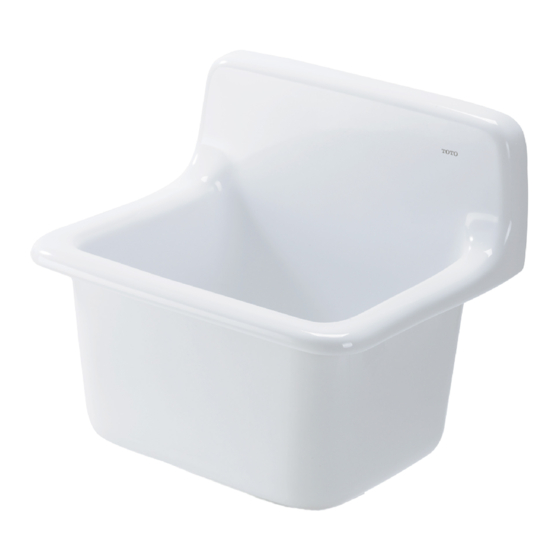
SK322***
CH U D CH V
SERVICE SINK
nh l i móc treo (b qua bư c
bư c 2
t 2~10mm ).
t c 20mm tr
L p l i ch u
Reset sink
175
175
ng th i
and
F-G0111/00
Bít kín
b ng
silicôn
Fill gap by
silicon
Advertisement
Table of Contents

Related Manuals for Toto SK322 Series


Summary of Contents for Toto SK322 Series
- Page 1 SK322*** CH U D CH V SERVICE SINK HƯ NG D N L P HOW TO INSTALL Chú ý: Ch dùng hư ng d n này cho trư ng h p có s n ch u ã ư c l p t r i.
- Page 2 SK322*** CH U D CH V SERVICE SINK HƯ NG D N L P HOW TO INSTALL Bư c 1: Bư c 4: - G n m lên m t trên chân ch u. L p c thoát vào ch u và l p ng t chân ch u vào v trí...
Need help?
Do you have a question about the SK322 Series and is the answer not in the manual?
Questions and answers