Table of Contents
Advertisement
Quick Links
Advertisement
Table of Contents

Related Manuals for AEG BSE778280M


Summary of Contents for AEG BSE778280M
- Page 1 BSE778280M User Manual Steam oven BSE77828BM BSK778280M BSS778280B USER MANUAL...
-
Page 2: Table Of Contents
FOR PERFECT RESULTS Thank you for choosing this AEG product. We have created it to give you impeccable performance for many years, with innovative technologies that help make life simpler – features you might not find on ordinary appliances. Please spend a few minutes reading to get the very best from it. -
Page 3: Safety Information
SAFETY INFORMATION 8. HOW TO USE: ACCESSORIES....23 11.8 How to use: Tank emptying..34 11.9 How to remove and install: Door..35 8.1 Inserting accessories..... 23 11.10 How to replace: Lamp....36 8.2 Food Sensor........24 12. TROUBLESHOOTING......37 9. ADDITIONAL FUNCTIONS....... 26 12.1 What to do if.........37 9.1 How to save: Favourites.... -
Page 4: General Safety
Children should be supervised to ensure that they do not • play with the appliance and mobile devices with My AEG Kitchen. Keep all packaging away from children and dispose of it •... -
Page 5: Safety Instructions
SAFETY INSTRUCTIONS Use only the food sensor (core temperature sensor) • recommended for this appliance. To remove the shelf supports first pull the front of the shelf • support and then the rear end away from the side walls. Install the shelf supports in the opposite sequence. Do not use a steam cleaner to clean the appliance. -
Page 6: Electrical Connection
SAFETY INSTRUCTIONS Width of the front of the appliance 595 mm Width of the back of the appliance 559 mm Depth of the appliance 567 mm Built in depth of the appliance 546 mm Depth with open door 1027 mm Ventilation opening minimum size. -
Page 7: Use
SAFETY INSTRUCTIONS 2.3 Use WARNING! Risk of injury, burns and electric shock or explosion. • This appliance is for household (indoors) use only. • Do not change the specification of this appliance. • Make sure that the ventilation openings are not blocked. •... -
Page 8: Pyrolytic Cleaning
SAFETY INSTRUCTIONS • Replace immediately the door glass panels when they are damaged. Contact the Authorised Service Centre. • Be careful when you remove the door from the appliance. The door is heavy! • Clean regularly the appliance to prevent the deterioration of the surface material. •... -
Page 9: Internal Lighting
PRODUCT DESCRIPTION 2.7 Internal lighting WARNING! Risk of electric shock. • Concerning the lamp(s) inside this product and spare part lamps sold separately: These lamps are intended to withstand extreme physical conditions in household appliances, such as temperature, vibration, humidity, or are intended to signal information about the operational status of the appliance. -
Page 10: Accessories
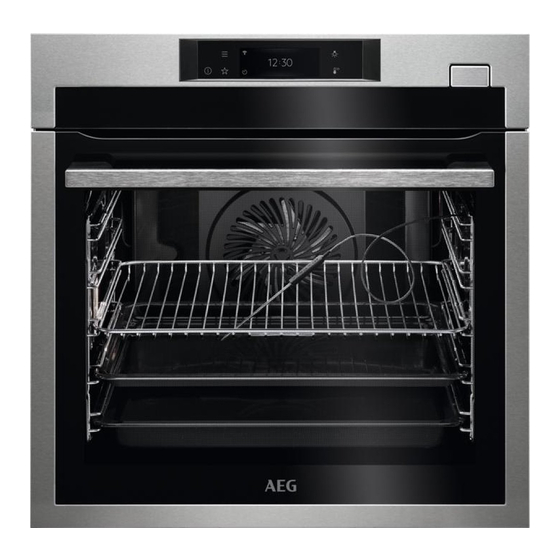
HOW TO TURN OVEN ON AND OFF 3.2 Accessories Wire shelf For cookware, cake tins, roasts. Baking tray For cakes and biscuits. Grill- / Roasting pan To bake and roast or as a pan to collect fat. Food sensor To measure the temperature inside food. 4. -
Page 11: Display
HOW TO TURN OVEN ON AND OFF ON / OFF Press and hold to turn the oven on and off. Menu Lists the oven functions. Favourites Lists the favourite settings. Display Shows the current settings of the oven. Lamp switch To turn the lamp on and off. -
Page 12: Before First Use
BEFORE FIRST USE Display with key functions set. A. Wi-Fi B. Time of day 12:30 C. START/STOP 150°C D. Temperature 85°C E. Heating functions F. Timer START 15min G. Food sensor (selected models only) Display indicators Basic indicators - to navigate on the display. To go one To confirm the selection / set‐... -
Page 13: Initial Cleaning
To connect the oven you need: • Wireless network with the Internet connection. • Mobile device connected to your wireless network. Step 1 Download the mobile app My AEG Kitchen and follow the instructions for the next steps. Step 2 Turn on the oven. -
Page 14: Software Licences
5.4 Software licences The software in this product contains components that are based on free and open source soft‐ ware. AEG gratefully acknowledges the contributions of the open software and robotics communi‐ ties to the development project. To access the source code of these free and open source software components whose license conditions require publishing, and to see their full copyright information and applicable license terms, please visit: http://aeg.opensoftwarerepository.com (folder NIU5). -
Page 15: How To Set: Water Hardness
BEFORE FIRST USE Preheat the empty oven before the first use. Step 3 Set the maximum temperature for the function: Let the oven operate for 15 min. The oven can emit an odour and smoke during preheating. Make sure that the room is ventila‐ ted. -
Page 16: Daily Use
DAILY USE Water hardness Test paper Calcium de‐ Calcium de‐ Water classi‐ posit (mmol/l) posit (mg/l) fication Level 15 - 21 2.6 - 3.8 101 - 150 hard ≥22 ≥ 3.9 ≥151 very hard When the tap water hardness level is 4, fill the water drawer with still bottled water. 6. -
Page 17: How To Set: Assisted Cooking
DAILY USE Step 2 Press . Set the steam heating function. Step 3 Press: . The display shows the temperature settings. Step 4 Set the temperature. Step 5 Press: Step 6 Press the cover of the water drawer to open it. Step 7 Fill the water drawer with cold water to the maximum level (around 950 ml) until the signal sounds or the display shows the message. -
Page 18: Heating Functions
DAILY USE • Weight Automatic • Food Sensor The degree to which a dish is cooked: • Rare or Less • Medium • Well done or More Step 1 Turn on the oven. Step 2 Press: Step 3 Press: . Enter: Assisted Cooking. Step 4 Choose a dish or a food type. - Page 19 DAILY USE Heating function Application To make convenience food (e.g., french fries, potato wedges or spring rolls) crispy. Frozen Foods To bake and roast food on one shelf position. Conventional Cooking To bake pizza. To make intensive browning and a crispy bottom. Pizza Function To bake cakes with crispy bottom and to preserve food.
-
Page 20: Notes On: Moist Fan Baking
DAILY USE Heating function Application To prepare tender, succulent roasts. Slow Cooking To keep food warm. Keep Warm This function is designed to save energy during cooking. When you use this function, the temperature in the cavity may differ from the set temper‐ ature. -
Page 21: Clock Functions
CLOCK FUNCTIONS For the cooking instructions refer to "Hints and tips" chapter, Moist Fan Baking. For general energy saving recommendations refer to "Energy Efficiency" chapter, Energy Saving. 7. CLOCK FUNCTIONS 7.1 Clock functions description Clock function Application Cooking time To set the length of cooking. Maximum is 23 h 59 min. End action To set what happens when the timer ends counting. - Page 22 CLOCK FUNCTIONS How to choose end option Step 1 Choose the heating function and set the temperature. Step 2 Press: Step 3 Set the cooking time. Step 4 Press: Step 5 Press: End action. Step 6 Choose the preferred: End action. Step 7 Press: .
-
Page 23: How To Use: Accessories
HOW TO USE: ACCESSORIES How to change timer settings Step 1 Press: Step 2 Set the timer value. Step 3 Press: You can change the set time during cooking at any time. 8. HOW TO USE: ACCESSORIES 8.1 Inserting accessories A small indentation at the top increases safety. -
Page 24: Food Sensor
HOW TO USE: ACCESSORIES Wire shelf, Baking tray / Deep pan: Push the tray between the guide bars of the shelf support and the wire shelf on the guide bars above. 8.2 Food Sensor Food Sensor- measures the temperature inside the food. You can use it with every heating function. - Page 25 HOW TO USE: ACCESSORIES Insert the tip of Food Sensor into the centre Insert the tip of Food Sensor exactly in the centre of meat, fish, in the thickest part if possible. of the casserole. Food Sensor should be stabi‐ Make sure that at least 3/4 of Food Sensor is lized in one place during baking.
-
Page 26: Additional Functions
ADDITIONAL FUNCTIONS Take a shortcut! 9. ADDITIONAL FUNCTIONS 9.1 How to save: Favourites You can save your favourite settings, such as the heating function, the cooking time, the temperature or the cleaning function. You can save 3 favourite settings. Step 1 Turn on the oven. -
Page 27: Cooling Fan
HINTS AND TIPS (°C) 30 - 115 12.5 120 - 195 200 - 245 250 - maximum The Automatic switch-off does not work with the functions: Light, Food sensor, End time, Slow Cooking. 9.4 Cooling fan When the oven operates, the cooling fan turns on automatically to keep the surfaces of the oven cool. -
Page 28: Moist Fan Baking - Recommended Accessories
HINTS AND TIPS (°C) (min) Swiss Roll baking tray or dripping 15 - 25 Whole fish, 0.2 baking tray or dripping 15 - 25 Cookies, 16 baking tray or dripping 20 - 30 pieces Macaroons, 24 baking tray or dripping 25 - 35 pieces Muffins, 12... -
Page 29: Cooking Tables For Test Institutes
HINTS AND TIPS 10.4 Cooking tables for test institutes Information for test institutes Tests according to: EN 60350, IEC 60350. BAKING ON ONE LEVEL. Baking in tins (°C) (min) Fatless sponge cake True Fan Cooking 140 - 150 35 - 50 Fatless sponge cake Conventional Cook‐... -
Page 30: Care And Cleaning
CARE AND CLEANING MULTILEVEL BAKING. Biscuits (°C) (min) Short bread / Pastry strips True Fan Cooking 25 - 45 1 / 4 Small cakes, 20 per tray, True Fan Cooking 23 - 40 1 / 4 preheat the empty oven Fatless sponge cake True Fan Cooking 35 - 50... -
Page 31: Notes On Cleaning
CARE AND CLEANING 11.1 Notes on cleaning Clean the front of the oven with a soft cloth with warm water and a mild deter‐ gent. Use a cleaning solution to clean metal surfaces. Cleaning Clean stains with a mild detergent. Agents Clean the cavity after each use. - Page 32 CARE AND CLEANING CAUTION! If there are other appliances installed in the same cabinet, do not use them at the same time as this function. It can cause damage to the oven. Before the Pyrolytic Cleaning: Turn off the oven and wait Remove all accessories.
-
Page 33: Cleaning Reminder
CARE AND CLEANING 11.4 Cleaning Reminder When the reminder appears, cleaning is recommended. Use the function: Pyrolytic Cleaning. 11.5 How to use: Descaling Before you start: Turn off the oven and wait Remove all accessories. Make sure that the water drawer until it is cold. -
Page 34: Descaling Reminder
CARE AND CLEANING When descaling ends: If some limestone residue remains in the oven after descaling, the display prompts to repeat the procedure. 11.6 Descaling reminder There are two reminders which prompt you to descale the oven. You cannot disable the descaling reminder. -
Page 35: How To Remove And Install: Door
CARE AND CLEANING Before you start: Turn off the oven and wait until it is cold. Remove all accessories. Step 1 Place the deep pan on the first shelf position. Step 2 Select: Menu / Cleaning / Tank emptying. Duration: 6 min Step 3 Turn on the function and follow the instruction on the display. -
Page 36: How To Replace: Lamp
CARE AND CLEANING Step 4 Hold the door trim (B) on the top edge of the door at the two sides and push inwards to release the clip seal. Step 5 Pull the door trim to the front to remove it. Step 6 Hold the door glass panels on their top edge one by one and... -
Page 37: Troubleshooting
TROUBLESHOOTING Step 2 Remove the metal ring and clean the glass cover. Step 3 Replace the lamp with a suitable 300 °C heat-resistant lamp. Step 4 Attach the metal ring to the glass cover and install it. Side lamp Step 1 Remove the left shelf support to get access to the lamp. - Page 38 TROUBLESHOOTING The oven does not turn on or does not heat up Possible cause Remedy The fuse is blown. Make sure the fuse is the cause of the prob‐ lem. If the problem recurs, contact a qualified electrician. The oven Child Lock is on. Refer to "Menu"...
-
Page 39: How To Manage: Error Codes
TROUBLESHOOTING 12.2 How to manage: Error codes When the software error occurs, the display shows error message. In this section, you will find the list of the problems that you can handle on your own. Code and description Remedy C2 - the Food sensor is in the oven cavity dur‐ Take out the Food sensor. -
Page 40: Energy Efficiency
......... Product number (PNC) ......... Serial number (S.N.) ......... 13. ENERGY EFFICIENCY 13.1 Product Information and Product Information Sheet* Supplier's name BSE778280M 944188427 BSE77828BM 944188570 Model identification BSK778280M 944188420 BSS778280B 944188421 Energy Efficiency Index 61.2 Energy efficiency class Energy consumption with a standard load, conventional 1.09 kWh/cycle... -
Page 41: Energy Saving
MENU STRUCTURE * For European Union according to EU Regulations 65/2014 and 66/2014. For Republic of Belarus according to STB 2478-2017, Appendix G; STB 2477-2017, Annexes A and B. For Ukraine according to 568/32020. Energy efficiency class is not applicable for Russia. EN 60350-1 - Household electric cooking appliances - Part 1: Ranges, ovens, steam ovens and grills - Methods for measuring performance. -
Page 42: Submenu For: Cleaning
MENU STRUCTURE Menu item Application Cleaning Lists cleaning programmes. Favourites Lists the favourite settings. Options To set the oven configuration. Settings Connections To set the network configuration. Setup To set the oven configuration. Service Shows the software version and con‐ figuration. -
Page 43: Submenu For: Connections
MENU STRUCTURE Submenu Application Child Lock Prevents accidental activation of the oven. When the option is on, the text "Child Lock" appears on the display when you turn on the oven. To enable the oven use, choose the code letters in the alphabetical order. When the Child Lock is on and the oven is turned off the oven door is locked. -
Page 44: Submenu For: Service
IT'S EASY! Submenu Description Display brightness Sets the display brightness. Key tones Turns the tone of the touch fields on and off. It is not possi‐ ble to mute the tone for: Buzzer volume Sets the volume of key tones and signals. Water hardness Sets the water hardness. -
Page 45: Take A Shortcut
IT'S EASY! Start using the oven Quick Off Turn off the - press and hold until the oven turns off. oven, any screen or mes‐ sage at any time. Start cooking Step 1 Step 2 Step 3 Step 4 Step 5 - press to turn - select the heat‐... - Page 46 TAKE A SHORTCUT! How to set: Heating functions How to set: Cooking with a steam heating function How to set: Assisted cooking How to set: Cooking time How to delay: Start and end of cooking How to cancel: Set Timer How to use: Food Sensor 46/48...
- Page 47 ENVIRONMENTAL CONCERNS 17. ENVIRONMENTAL CONCERNS Recycle materials with the symbol . Put the packaging in relevant containers to recycle it. Help protect the environment and human health by recycling waste of electrical and electronic appliances. Do not dispose of appliances marked with the symbol with the household waste.
- Page 48 www.aeg.com/shop...
Need help?
Do you have a question about the BSE778280M and is the answer not in the manual?
Questions and answers