
Related Manuals for Sellenis S-JET 600 Series


Summary of Contents for Sellenis S-JET 600 Series
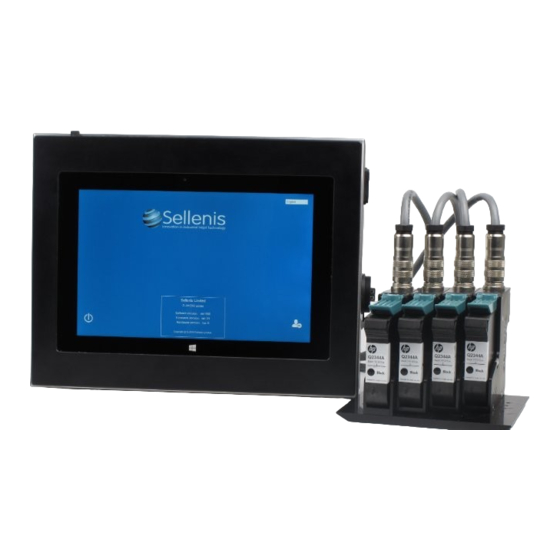
- Page 1 S-JET 600 S ERIES HERMAL NKJET RINTER USER MANUAL V16 Up to Software Version V4452...
-
Page 2: Table Of Contents
Disclaimer: ........................... 6 SECTION 1: S-JET 600 PRINTER HARDWARE ..............7 SECTION 2: INSTALLATION ....................8 SECTION 3: OPERATING THE PRINTER HARDWARE ..........15 SECTION 4: SELLENIS PRINTER CONTROL SOFTWARE..........17 10.0 SECTION 5: ACCESSING THE APPLICATION ............21 11.0 SECTION 6: ACCOUNT MANAGER ................ - Page 3 PAGE LEFT EMPTY Registered Office: 29 High Street, Harston, Cambridge, England, CB22 7PX, Page 3 Copyright © Sellenis Ltd 2020...
-
Page 4: Safety Information
During installation, ensure that the cartridges can be replaced without the risk of injury from moving machine parts Registered Office: 29 High Street, Harston, Cambridge, England, CB22 7PX, Page 4 Copyright © Sellenis Ltd 2020... - Page 5 Registered Office: 29 High Street, Harston, Cambridge, England, CB22 7PX, Page 5 Copyright © Sellenis Ltd 2020...
-
Page 6: Audience
Sellenis Printer Control Software. COPYRIGHT: Copyright © Sellenis Ltd 2019. The contents of this manual are subject to revision without prior notice. Sellenis is a registered trademark of Sellenis Limited UK. The information in this manual is subject to change without notice. -
Page 7: Section 1: S-Jet 600 Printer Hardware
SECTION 1: S-JET 600 PRINTER HARDWARE Overview The S-Jet 600 Printers are high-speed range industrial digital printers from Sellenis Ltd. These printers use the HP TIJ 2.5 ink jet technology. The S-Jet 600 Printers are designed to meet your Online, Live, Hands-Free Coding, and Marking applications. -
Page 8: Section 2: Installation
The connectors for the various inputs and outputs of the S-Jet 600 are located on the back panel of the printer controller, as shown below: Registered Office: 29 High Street, Harston, Cambridge, England, CB22 7PX, Page 8 Copyright © Sellenis Ltd 2020... - Page 9 The connections are in pairs, except for the printheads, as up to four printheads can be connected to the controller, as shown below. Figure 7-4 I/O’s Connections Registered Office: 29 High Street, Harston, Cambridge, England, CB22 7PX, Page 9 Copyright © Sellenis Ltd 2020...
- Page 10 (0) position, so as to prevent any electrical damage to the printer system electronics. Registered Office: 29 High Street, Harston, Cambridge, England, CB22 7PX, Page 10 Copyright © Sellenis Ltd 2020...
- Page 11 Printhead 1 Camera 1 trigger Photocell 1 Lampstack 2 Line Stop 2 Printhead 3 Shaft Encoder 2 Printhead 2 Camera 2 trigger Photocell 2 Registered Office: 29 High Street, Harston, Cambridge, England, CB22 7PX, Page 11 Copyright © Sellenis Ltd 2020...
- Page 12 Pull down the rear clip of the plastic shield and open it by holding the body of the cartridge. Pull the tab at the end remove protective film that covers the nozzle plate and electrical contacts. Registered Office: 29 High Street, Harston, Cambridge, England, CB22 7PX, Page 12 Copyright © Sellenis Ltd 2020...
- Page 13 With your thumb on the cartridge top end, push/press the cartridge until you feel a firm click. The cartridge is now secure against the location datums. Registered Office: 29 High Street, Harston, Cambridge, England, CB22 7PX, Page 13 Copyright © Sellenis Ltd 2020...
- Page 14 Now lift the cartridge while rotating it forward to free it from the base plate. Rotate the cartridge forward then pull it out Registered Office: 29 High Street, Harston, Cambridge, England, CB22 7PX, Page 14 Copyright © Sellenis Ltd 2020...
-
Page 15: Section 3: Operating The Printer Hardware
In such cases, the computer will not boot up immediately after you turn on the printer. If you encounter this problem, leave the unit plugged in and turned on for 15-30 minutes. Registered Office: 29 High Street, Harston, Cambridge, England, CB22 7PX, Page 15 Copyright © Sellenis Ltd 2020... - Page 16 Table 8-1, Voltage specification Item Value 85 – 264 VAC Voltage 47 – 63 Hz Frequency Power 225 W MAX Controller Weight 5 Kg (11 lbs.) Registered Office: 29 High Street, Harston, Cambridge, England, CB22 7PX, Page 16 Copyright © Sellenis Ltd 2020...
-
Page 17: Section 4: Sellenis Printer Control Software
SECTION 4: SELLENIS PRINTER CONTROL SOFTWARE Overview The S-Jet 600 Printer is also associated with the Sellenis Printer Control software, which aids in pre-setting the printer functions before operating the printer. Key Features The following are the key features of S-Jet 600 Printer Control Software: •... - Page 18 Click Next button. The Select Installation Folder screen is displayed. Click Next button. Once you have selected the installation location, the Confirm Installation screen is displayed. Registered Office: 29 High Street, Harston, Cambridge, England, CB22 7PX, Page 18 Copyright © Sellenis Ltd 2020...
- Page 19 Click Close button. The S-Jet 600 installation is initiated. Note: The subsequent steps are performed only during your first installation or during an installation after which you have removed the Sellenis Printer Control software folder and associated files from your computer.
- Page 20 Click Install button. The installation has started, and the following screen is displayed. Once the installation is completed, the application Welcome screen with Login icon is displayed. Registered Office: 29 High Street, Harston, Cambridge, England, CB22 7PX, Page 20 Copyright © Sellenis Ltd 2020...
-
Page 21: Section 5: Accessing The Application
10.0 SECTION 5: ACCESSING THE APPLICATION Once installed, the Sellenis Printer Control software can be accessed by double clicking the application icon, on your computer. Figure 10-1, Controller front screen The application opens the Welcome screen with Login icon, Power Off icon, and the option to... - Page 22 Important: The default login key of the Administrator account is “1234.” It is recommended that you change this after your initial login. You are logged into the Sellenis Printer Control software. Once logged in, the following screen is displayed. Figure 10-3, S-Jet software screen The following are the icons present in the home screen and their respective functionalities.
-
Page 23: Section 6: Account Manager
From the Home screen of the Sellenis Printer Control software, you can click the icon to access the Account Manager section. The Account Manager section is displayed as follows:... - Page 24 Click update button to update the details of the user. You can update the User Name, Pin Code, and user privileges. • Click save button to confirm and save the changes. The user details are updated Registered Office: 29 High Street, Harston, Cambridge, England, CB22 7PX, Page 24 Copyright © Sellenis Ltd 2020...
- Page 25 Home screen. Warning: Deleting a user account removes all the information associated with the user. This action is irreversible Figure 11-5, Deleting user Registered Office: 29 High Street, Harston, Cambridge, England, CB22 7PX, Page 25 Copyright © Sellenis Ltd 2020...
- Page 26 [LOGGER] Report – Create log privileges • [CONFIG] Full Access - NOTHING • [EDITOR] USB Import - NOTHING • [EDITOR] Load/Edit/Save – template privileges Registered Office: 29 High Street, Harston, Cambridge, England, CB22 7PX, Page 26 Copyright © Sellenis Ltd 2020...
-
Page 27: Section 7: Printer Configuration
Therefore, this section completely handles the hardware operation. From the Home screen of the Sellenis Printer Control software, click the icon to access the Printer Configuration section. The Printer Configuration section is displayed as follows:... - Page 28 Group Combinations The Sellenis S-Jet 600 series printer operates on various combinations of printheads. One printhead (one group) of four pens are stitched together to provide a maximum print height of 50.8 mm. You can pre-set the number of groups, edit the grouping options, toggle orientation, and toggle the direction of production line/conveyor belt from this section.
- Page 29 Note: The grouping options are enabled only if the number of printheads selected is more than the number of groups created. Registered Office: 29 High Street, Harston, Cambridge, England, CB22 7PX, Page 29 Copyright © Sellenis Ltd 2020...
- Page 30 Example: If you have selected four printheads and three groups, the Grouping Options available are as follows: Figure 12-5, Option 1: Figure 12-6, Option 2: Figure 12-7, Option 3: Registered Office: 29 High Street, Harston, Cambridge, England, CB22 7PX, Page 30 Copyright © Sellenis Ltd 2020...
- Page 31 The direction selection is available for each group you have created. Firing Voltage The firing voltage is set automatically by the Sellenis software every time it reads a cartridge. The user can then change the firing voltage by +/- 1 volt. The user can do this from the Print Configuration section.
- Page 32 300 dpi or less To know more about the alphanumeric keypad and the numeric keypad, refer to Onscreen Keypads section in Appendix 7. Registered Office: 29 High Street, Harston, Cambridge, England, CB22 7PX, Page 32 Copyright © Sellenis Ltd 2020...
- Page 33 The Group Print Offsets section enables you to align the print from the cartridges or pens in a group. The S-Jet 600 series printers support horizontal and vertical alignment. You can access the Group Print Offsets section of the Sellenis Printer Control software by clicking the icon from the Print Configuration header bar.
- Page 34 Perform this procedure for all the Groups that you have created. To know more about the alphanumeric keypad and the numeric keypad, refer to the Onscreen Keypads in Appendix 7 Registered Office: 29 High Street, Harston, Cambridge, England, CB22 7PX, Page 34 Copyright © Sellenis Ltd 2020...
- Page 35 This ensures that there are no dark or white lines printed in the output. Note: The vertical alignment is applicable only if you have multiple cartridges present in a group. Registered Office: 29 High Street, Harston, Cambridge, England, CB22 7PX, Page 35 Copyright © Sellenis Ltd 2020...
- Page 36 Enter the required Photocell Mask value in millimeters (mm). To know more about the alphanumeric keypad and the numeric keypad, refer to the Onscreen Keypads section in Appendix 7 Registered Office: 29 High Street, Harston, Cambridge, England, CB22 7PX, Page 36 Copyright © Sellenis Ltd 2020...
- Page 37 Use of Various Shaft Encoders & Friction Wheels The Sellenis printer provides an input/connection for an incremental quadrature shaft encoder. The standard recommended shaft encoder and associated friction wheel are 5000 pulses per revolution (PPR) and 200 mm circumference, respectively. This combination of standard shaft encoder and friction wheel gives a 25 pulses per mm PPM) (which is 5000 pulses/200 mm=25 ppm).
- Page 38 PPM is not known and therefore needs to be calculated automatically by the software given the shaft encoder and wheel specifications (Please see Appendix 12: Shaft Encoder and Friction Wheel Installation) Registered Office: 29 High Street, Harston, Cambridge, England, CB22 7PX, Page 38 Copyright © Sellenis Ltd 2020...
- Page 39 Protocol Mode (printing from client offline pc or other production IT such as ERP) • Sellenis Windows Driver Mode (for use with Windows apps, such as Nicelabel, Bartender, Flexmail) Select the check box adjacent to the Internal Shaft Encoder field to select the internal shaft encoder.
- Page 40 Note: This option is enabled, only if you have selected Repeated Printing as the printing mode. To know more about the alphanumeric keypad and the numeric keypad, refer to Onscreen Keypads section in Appendix 7. Registered Office: 29 High Street, Harston, Cambridge, England, CB22 7PX, Page 40 Copyright © Sellenis Ltd 2020...
- Page 41 Simulated Printing Settings The Simulator associated with the Sellenis Printer Control software enables you to set the print without the aid of a physical shaft encoder or photocell. By setting the Simulator, the printer uses its own electronically generated inputs to provide continuous and constant speed printing.
- Page 42 Select this mode of printing only if the production line (conveyor belt) speed is constant. In this case, the print speed of the conveyor needs to be measured and set manually on the configuration screen. Figure 12-17, Printer configuration Registered Office: 29 High Street, Harston, Cambridge, England, CB22 7PX, Page 42 Copyright © Sellenis Ltd 2020...
- Page 43 External Serial Devices Printing (see Appendix 2 for more details) Figure 12-19, External devices Barcode reader error free data entry (see appendix 3 for more details) Figure 12-20, barcode reader Registered Office: 29 High Street, Harston, Cambridge, England, CB22 7PX, Page 43 Copyright © Sellenis Ltd 2020...
- Page 44 Track & trace printing mode (see Appendix 4 for more details) Figure 12-21, Track and Trace set up Protocol Mode (see Appendix 5 & separate Sellenis External Protocol Instruction Manual) Figure 12-22, Remote mode Registered Office: 29 High Street, Harston, Cambridge, England, CB22 7PX, Page 44 Copyright ©...
- Page 45 To know more about the alphanumeric keypad and the numeric keypad, refer to Onscreen Keypads section in Appendix 7. Registered Office: 29 High Street, Harston, Cambridge, England, CB22 7PX, Page 45 Copyright © Sellenis Ltd 2020...
-
Page 46: Section 8: Editing Labels, Layouts, Or Templates
You can also select the layout, include text, barcodes, QR codes, and so on, from this section. From the Home screen of the Sellenis Printer Control software, you can click the icon to access the Labels, Layout, and Templates section. - Page 47 (left, right, top, bottom etc..). then press Select font properties Zoom to 100% Plus zoom Minus zoom Clockwise rotation Anti-clockwise rotation Copy & paste Setting of local template properties Registered Office: 29 High Street, Harston, Cambridge, England, CB22 7PX, Page 47 Copyright © Sellenis Ltd 2020...
- Page 48 If four cartridges and two groups are selected and the grouping option is 2:2, the template will be as follows: Figure 13-4, Two Group one four cartridges Registered Office: 29 High Street, Harston, Cambridge, England, CB22 7PX, Page 48 Copyright © Sellenis Ltd 2020...
- Page 49 For more information, refer to Updating Font Information section below Registered Office: 29 High Street, Harston, Cambridge, England, CB22 7PX, Page 49 Copyright © Sellenis Ltd 2020...
- Page 50 For example, “mfg “or “exp” or create your own prefix by clicking the empty space next to Timestamp Prefix. The screen shown in figure below appears. Figure 13-6, Time stamp Registered Office: 29 High Street, Harston, Cambridge, England, CB22 7PX, Page 50 Copyright © Sellenis Ltd 2020...
- Page 51 Now select your preferred date and time format by clicking on the space next to “Date & Time Format,” see screenshot above. Then tick the Real Date & Time box if you would like the date and Registered Office: 29 High Street, Harston, Cambridge, England, CB22 7PX, Page 51 Copyright © Sellenis Ltd 2020...
- Page 52 “Date & Time Format,” the screenshot shown below appears. Click the down arrow of the space next to “Local\Location” to open a drop-down list of languages. Select the desired language. Figure 13-11,Best Before Registered Office: 29 High Street, Harston, Cambridge, England, CB22 7PX, Page 52 Copyright © Sellenis Ltd 2020...
- Page 53 Date & Time Format is now added to the list, as shown in screenshot below. Now press OK if you would like the date and time to be displayed on your template in this new format. Registered Office: 29 High Street, Harston, Cambridge, England, CB22 7PX, Page 53 Copyright © Sellenis Ltd 2020...
- Page 54 Click the text box adjacent to the Step field to enter the value of the multiplier, using a numeric keypad. Select the value of the Direction from the drop-down list. The available values are Increase and Decrease. Registered Office: 29 High Street, Harston, Cambridge, England, CB22 7PX, Page 54 Copyright © Sellenis Ltd 2020...
- Page 55 Click the Delete button to remove the Counter. To know more about the alphanumeric keypad and the numeric keypad, refer to the Onscreen Keypads section in Appendix 7 Registered Office: 29 High Street, Harston, Cambridge, England, CB22 7PX, Page 55 Copyright © Sellenis Ltd 2020...
- Page 56 Name and click the Delete button to remove the same. To know more about the alphanumeric keypad and the numeric keypad, refer to the Onscreen Keypads section in Appendix 7 Registered Office: 29 High Street, Harston, Cambridge, England, CB22 7PX, Page 56 Copyright © Sellenis Ltd 2020...
- Page 57 Delete button. To know more about the alphanumeric keypad and the numeric keypad, refer to Onscreen Keypads section in Appendix 7 Registered Office: 29 High Street, Harston, Cambridge, England, CB22 7PX, Page 57 Copyright © Sellenis Ltd 2020...
- Page 58 Labels, Layout, and Templates section and click Magnetic Card Reader menu item. The selected information is imported and printed in the template. Registered Office: 29 High Street, Harston, Cambridge, England, CB22 7PX, Page 58 Copyright © Sellenis Ltd 2020...
- Page 59 The selected database is displayed in the Databases List pane. You can load multiple databases in this manner. Figure 13-18, Database Registered Office: 29 High Street, Harston, Cambridge, England, CB22 7PX, Page 59 Copyright © Sellenis Ltd 2020...
- Page 60 Figure 13-20, Field type To print from a given record, enter the starting record number in the Starting Record field, using the numeric keypad. Registered Office: 29 High Street, Harston, Cambridge, England, CB22 7PX, Page 60 Copyright © Sellenis Ltd 2020...
- Page 61 (use CTRL key to select multiple rows) and click the Print only selected row button to print the selected row or Print from selected row button to print the values starting from the selected row. Registered Office: 29 High Street, Harston, Cambridge, England, CB22 7PX, Page 61 Copyright © Sellenis Ltd 2020...
- Page 62 Adding Single Dimensional (1D) Barcode You can develop barcode information and add it to the template with the aid of Sellenis Printer Control software. To create barcodes by providing detailed information, perform the following procedure: Figure 13-23, Adding barcode Click the icon on the right margin of the Labels, Layout, and Templates section.
- Page 63 Click the OK button to save the details and exit the Creating Barcode section. The barcode with selected details is displayed in the template. Registered Office: 29 High Street, Harston, Cambridge, England, CB22 7PX, Page 63 Copyright © Sellenis Ltd 2020...
- Page 64 Adding Two-Dimensional (2D) Barcode You can develop 2D barcode information and add it to the template with the aid of Sellenis Printer Control software. To create 2D barcodes by providing detailed information, perform the following procedure: Click the icon on the right margin of the Labels, Layout, and Templates section.
- Page 65 Click the OK button to save the details and exit the Creating Barcode section. The barcode with selected details is displayed in the template Registered Office: 29 High Street, Harston, Cambridge, England, CB22 7PX, Page 65 Copyright © Sellenis Ltd 2020...
- Page 66 Navigate, locate, and click on the template. The template is open for edit. Click button to save the template once edit operation is complete. Registered Office: 29 High Street, Harston, Cambridge, England, CB22 7PX, Page 66 Copyright © Sellenis Ltd 2020...
- Page 67 “not set” box in front of vertical. The following screen with dropdown selections is then displayed. Select the desired template resolution, then press ok. Figure 13-27, Local resolution Registered Office: 29 High Street, Harston, Cambridge, England, CB22 7PX, Page 67 Copyright © Sellenis Ltd 2020...
- Page 68 2 screenshots. Select the desired horizontal resolution, then click OK. Figure 13-28, Resolution Figure 13-29, Resolution Registered Office: 29 High Street, Harston, Cambridge, England, CB22 7PX, Page 68 Copyright © Sellenis Ltd 2020...
- Page 69 50mm, then the actual print delay is 30 + 50 = 80 mm. Please note that the global delay is, by default, set to zero, also. Figure 13-31, Delay settings Registered Office: 29 High Street, Harston, Cambridge, England, CB22 7PX, Page 69 Copyright © Sellenis Ltd 2020...
- Page 70 Click on the warning message to remove the selected element from the template. Additional Options Following additional options are present in the Labels, Layout, and Templates section. These options help you in editing the template. Registered Office: 29 High Street, Harston, Cambridge, England, CB22 7PX, Page 70 Copyright © Sellenis Ltd 2020...
- Page 71 There are options for positioning a field in the left, centre, and right justification too as shown in the above scree as well as anchoring. Registered Office: 29 High Street, Harston, Cambridge, England, CB22 7PX, Page 71 Copyright © Sellenis Ltd 2020...
- Page 72 . Once clicked, the icon changes to Click icon to change the font style to . Once clicked, the icon changes to Subscript Registered Office: 29 High Street, Harston, Cambridge, England, CB22 7PX, Page 72 Copyright © Sellenis Ltd 2020...
- Page 73 Click OK button to save the details and exit from the Font Information section. To know more about the alphanumeric keypad and the numeric keypad, refer to Onscreen Keypads section in Appendix 7. Registered Office: 29 High Street, Harston, Cambridge, England, CB22 7PX, Page 73 Copyright © Sellenis Ltd 2020...
-
Page 74: Section 9: Printing
14.0 SECTION 9: PRINTING From the Home screen of the Sellenis Printer Control software, you can click icon to access the Printing Process section. The Printing Process section is displayed as follows:... - Page 75 Click on the cartridge 1, 2, 3, 4, or ALL to initiate purging of the cartridge nozzles 1, 2, 3, 4, or ALL, respectively Registered Office: 29 High Street, Harston, Cambridge, England, CB22 7PX, Page 75 Copyright © Sellenis Ltd 2020...
- Page 76 Hardware version, Job name, Print start name, Run time, Product count, Product speed, Line Speed, and the Ink level of all the cartridges. Click the icon to close the Print Statistics section. Registered Office: 29 High Street, Harston, Cambridge, England, CB22 7PX, Page 76 Copyright © Sellenis Ltd 2020...
- Page 77 Print Event section. Additionally, from the Printing Process section, you can perform the following functions: Click the icon to minimize the Sellenis Printer Control software to the task bar. Click the icon to navigate back to the Sellenis Printer Control software Home screen.
-
Page 78: Section 10: Import Files And Folders
15.0 SECTION 10: IMPORT FILES AND FOLDERS The Import Files and Folders section enables you to import files or folders from hard disk, USB 2storage devices, network, or CD ROM though an interface to the Sellenis Printer Control software directory. - Page 79 Sellenis Printer Control software directory. Additionally, from the Import Files and Folders section, you can perform the following functions: You can also select the folders/files from the Sellenis Printer Control software directory and export the files/folders by clicking the icon or icon.
-
Page 80: Section 11: Event Log
The Event Log section enables you to view the event log on a daily basis. This section also enables you to save the daily event log and filter the event log display. From the Home screen of the Sellenis Printer Control software, click the icon to access the Event Log section. - Page 81 Click the icon to minimize the Sellenis Printer Control software to the task bar. Click the icon to navigate back to the Sellenis Printer Control software Home screen. Selecting Event Logs You can choose to view the event log types, in the Event Log section.
-
Page 82: Section 12: Ink Cartridge Information
#1. It also shows that the automatic reading of cartridge 2 is in progress. For details on the inks to be used with the S-Jet 600 Printer, refer to Sellenis ink price list. Figure 17-2, Ink cartridge information... -
Page 83: Section 13: Logout Out And Power Off
18.0 SECTION 13: LOGOUT OUT AND POWER OFF This section details you on how to logout from the Sellenis Printer Control software Home screen and how to close the Sellenis Printer Control software. From the Home screen of the Sellenis Printer Control software, you can click the icon to logout from your account and navigate back to the Welcome screen. -
Page 84: Appendix 1.0 : Printer Dimensions
19.0 APPENDIX 1.0 : PRINTER DIMENSIONS Printer dimensions Registered Office: 29 High Street, Harston, Cambridge, England, CB22 7PX, Page 84 Copyright © Sellenis Ltd 2020... - Page 85 Figure 19-1, Controller dimensions Registered Office: 29 High Street, Harston, Cambridge, England, CB22 7PX, Page 85 Copyright © Sellenis Ltd 2020...
- Page 86 Appendix 2.0 : EXTERNAL SERIAL DEVICES Creating a template/label to include data from connected External Serial Device(s) Registered Office: 29 High Street, Harston, Cambridge, England, CB22 7PX, Page 86 Copyright © Sellenis Ltd 2020...
- Page 87 LOT:126, then the user needs to click the #External Device object in the template, as shown on the screenshot below. Registered Office: 29 High Street, Harston, Cambridge, England, CB22 7PX, Page 87 Copyright © Sellenis Ltd 2020...
- Page 88 Output Format then enter: {3,3},{6,1} kg {3,3} - means take string with 3 chars long starting from 3rd of the output string (w03238L) Registered Office: 29 High Street, Harston, Cambridge, England, CB22 7PX, Page 88 Copyright © Sellenis Ltd 2020...
- Page 89 6 above. Alternatively, it can be added and saved in the Editor screen, as shown in figure 7. In this example, “Net weight:” was added as a leading text. Registered Office: 29 High Street, Harston, Cambridge, England, CB22 7PX, Page 89 Copyright © Sellenis Ltd 2020...
- Page 90 “Remote Text” was created. It will be replaced by the data sent from the External Device once it starts operating and sending data to be printed Figure 19-8 Registered Office: 29 High Street, Harston, Cambridge, England, CB22 7PX, Page 90 Copyright © Sellenis Ltd 2020...
-
Page 91: Appendix 3.0 : Barcode Data Entry
20.0 APPENDIX 3.0 : BARCODE DATA ENTRY Barcode Scanner Data Entry Software script specifications Database content selection barcode hand scanner Registered Office: 29 High Street, Harston, Cambridge, England, CB22 7PX, Page 91 Copyright © Sellenis Ltd 2020... - Page 92 The USB barcode scanner function allows job selection via barcode scanning with no operator intervention and no human error Figure 20-1 Registered Office: 29 High Street, Harston, Cambridge, England, CB22 7PX, Page 92 Copyright © Sellenis Ltd 2020...
- Page 93 Barcode on operator’s worksheet Print Field types 1. DATABASE_text1 2. DATABASE_text2 3. FIXED_TEXT 4. DATABASE_art.nr 5. DATABASE_logo 6. FIXED_TEXT 7. VARIABLE_FIELD 8. DATABASE_barcode Registered Office: 29 High Street, Harston, Cambridge, England, CB22 7PX, Page 93 Copyright © Sellenis Ltd 2020...
- Page 94 Sellenis’ Scanner software instructions for use For an administrator (once at the start of new job only): In configuration screen, select “barcode reader” print mode Figure 20-2 In Editor screen, create empty template by opening new/blank template; Figure 20-3 Click the add code icon and click the "Barcode Scanner" control; add “barcode scanner” to the blank template;...
- Page 95 ; the barcode scanner dialog screen appears; Select “Open Database >>” in the screen and then select the database you want to upload. Registered Office: 29 High Street, Harston, Cambridge, England, CB22 7PX, Page 95 Copyright © Sellenis Ltd 2020...
- Page 96 In the dropdown list of the barcode scanner dialog, select the field that contains the codes for the scanner, then click your selection; Registered Office: 29 High Street, Harston, Cambridge, England, CB22 7PX, Page 96 Copyright © Sellenis Ltd 2020...
- Page 97 Configuration” and select “Printing mode settings” tab; Click “Templates Filter” and put the name of the template “Scanner” that has just been created; Registered Office: 29 High Street, Harston, Cambridge, England, CB22 7PX, Page 97 Copyright © Sellenis Ltd 2020...
- Page 98 Open Print screen and load template that was created by an Administrator (if template filter was set, then the only template will be in the list). Scan barcode and necessary template should open automatically. Start Print. Registered Office: 29 High Street, Harston, Cambridge, England, CB22 7PX, Page 98 Copyright © Sellenis Ltd 2020...
-
Page 99: Appendix 4.0 : Camera Vision System
21.0 APPENDIX 4.0 : CAMERA VISION SYSTEM Track & Test Camera & printer configuration Settings Registered Office: 29 High Street, Harston, Cambridge, England, CB22 7PX, Page 99 Copyright © Sellenis Ltd 2020... - Page 100 Introduction Please note that most of the Cognex Dataman camera settings are carried out automatically by the Sellenis printer software. The settings that are automatically set or are configured through the Sellenis printer software are: Camera IP address Camera port iii.
- Page 101 Default port is 23 but if necessary, it can be changed by the user to any convenient port as long as the port number of the camera is set the same as that of the Sellenis printer software and vice versa.
- Page 102 Next click on “light and imager settings” and set exposure to Automatic Figure 21-4Automatic exposure Data validation Warning: Data validation is set automatically by the Sellenis software. Please check it only on the camera if there are problem reading the codes. Click on the data validation icon and check that “pattern-matching validation”...
- Page 103 Figure 21-7, Output delay & decode timeout Once these are set, please click on the camera icons to turn these green and lock the settings Figure 21-8, Cameras ON Registered Office: 29 High Street, Harston, Cambridge, England, CB22 7PX, Page 103 Copyright © Sellenis Ltd 2020...
- Page 104 40+10+40= 90 mm and photocell mask is set at 95 mm. In this example the photocell mask should not be set at more than 50 mm and preferably should be set at 45 mm. Figure 21-10, Photocell Mask Registered Office: 29 High Street, Harston, Cambridge, England, CB22 7PX, Page 104 Copyright © Sellenis Ltd 2020...
- Page 105 • Reports screen is displayed The Sellenis Software creates shortcuts on the desktop and in the Start Menu called “Track&Trace Reports” so you need to open this to see all the generated reports. The folders inside these shortcuts can be deleted manually to clean up the folders and retain required reports.
- Page 106 Warning: please do not install any Microsoft application software in our printer controller. To view the report, save to USB memory stick and then copy and open these in your PC. Figure 21-15, Report Registered Office: 29 High Street, Harston, Cambridge, England, CB22 7PX, Page 106 Copyright © Sellenis Ltd 2020...
-
Page 107: Appendix 5.0 : Protocol Remote Printing
22.0 APPENDIX 5.0 : PROTOCOL REMOTE PRINTING Protocol Mode Printing Sellenis S-Jet 600 series Remote communication & Printing Registered Office: 29 High Street, Harston, Cambridge, England, CB22 7PX, Page 107 Copyright © Sellenis Ltd 2020... - Page 108 There are three main ways of connecting, communicating and sending printing data from an External Serial Device, a remote host PC or a PLC to the Sellenis printer: These 3 main ways are: Mode 1: External Device mode -This must be connected to Sellenis controller through RS232- >USB cable.
- Page 109 There are 3 commands to send data through the protocol. These are designated NEEDDATA, CTRLDATA and CTRLDATA2 which are described in Sellenis Remote Protocol document In the case of using TCP/IP interface mode the host PC and the Sellenis controller must be in the same network.
- Page 110 “Remote data” as shown on the screen below. Every time, the “Remote Data” is clicked, a an additional “Remote Text [n]” will appear. Figure 22-4 Remote Data Registered Office: 29 High Street, Harston, Cambridge, England, CB22 7PX, Page 110 Copyright © Sellenis Ltd 2020...
- Page 111 The barcode data for 1D and 2D can also be sent via the protocol by selecting Remote Data as shown on below picture. Registered Office: 29 High Street, Harston, Cambridge, England, CB22 7PX, Page 111 Copyright © Sellenis Ltd 2020...
- Page 112 Figure 22-8 If the desired barcode needs to represent GS1 data, then Remote Data GS1 option must be selected instead. Registered Office: 29 High Street, Harston, Cambridge, England, CB22 7PX, Page 112 Copyright © Sellenis Ltd 2020...
-
Page 113: Appendix 6.0 : Variable Data & Gs1 Wizards
23.0 APPENDIX 6.0 : VARIABLE DATA & GS1 WIZARDS Setting up Variable data Registered Office: 29 High Street, Harston, Cambridge, England, CB22 7PX, Page 113 Copyright © Sellenis Ltd 2020... - Page 114 (variable wizard, GS1 wizard, or database) you would like to add (as displayed in the following screen). Figure 23-2 Registered Office: 29 High Street, Harston, Cambridge, England, CB22 7PX, Page 114 Copyright © Sellenis Ltd 2020...
- Page 115 Click OK button to save the details and exit the Variable Wizard section. The selected details are displayed in the Barcode Data field. Registered Office: 29 High Street, Harston, Cambridge, England, CB22 7PX, Page 115 Copyright © Sellenis Ltd 2020...
- Page 116 Edit the details and click the Change button to update the details. Click the Delete button to remove the selected type. Registered Office: 29 High Street, Harston, Cambridge, England, CB22 7PX, Page 116 Copyright © Sellenis Ltd 2020...
-
Page 117: Appendix 7.0: On Screen Keyboards
24.0 APPENDIX 7.0: ON SCREEN KEYBOARDS On screen keyboards Registered Office: 29 High Street, Harston, Cambridge, England, CB22 7PX, Page 117 Copyright © Sellenis Ltd 2020... - Page 118 Onscreen Keypads This section provides details about the keypads available in the Sellenis Printer Control software. The following are the two types of keypads present: • Onscreen Alphanumeric Keypad • Onscreen Numeric Keypad Onscreen Alphanumeric Keypad The Onscreen Alphanumeric Keypad displays a QWERTY keypad along with numbers and symbols.
- Page 119 • Use the button to close the Onscreen Numeric Keypad. Registered Office: 29 High Street, Harston, Cambridge, England, CB22 7PX, Page 119 Copyright © Sellenis Ltd 2020...
-
Page 120: Appendix 8.0: Printer Firmware Version
25.0 APPENDIX 8.0: PRINTER FIRMWARE VERSION Connection to Printer & Display of Firmware Version Registered Office: 29 High Street, Harston, Cambridge, England, CB22 7PX, Page 120 Copyright © Sellenis Ltd 2020... - Page 121 Scroll down to the latest date and time (Picture 2) and click the correct last time of the last date to open the last event log. Registered Office: 29 High Street, Harston, Cambridge, England, CB22 7PX, Page 121 Copyright © Sellenis Ltd 2020...
- Page 122 In the top box, enter the following printer IP address, 192.168.100.200, then enter in the box below this the subnet address 255.255.255.0, then click ok j. Now open the printer software . Registered Office: 29 High Street, Harston, Cambridge, England, CB22 7PX, Page 122 Copyright © Sellenis Ltd 2020...
- Page 123 (Windows 10) and select “Properties,” then select “Device manager” on the next screen, as shown in Figure 25-3 Figure 25-3, Device set up Registered Office: 29 High Street, Harston, Cambridge, England, CB22 7PX, Page 123 Copyright © Sellenis Ltd 2020...
- Page 124 Now, please restart the printer software. It should now connect to the printer and should display the firmware version in the start-up screen. Registered Office: 29 High Street, Harston, Cambridge, England, CB22 7PX, Page 124 Copyright © Sellenis Ltd 2020...
-
Page 125: Appendix 9.0: Print Stitching
26.0 APPENDIX 9.0: PRINT STITCHING Print Stitching messages of heights more than 12.7 mm Registered Office: 29 High Street, Harston, Cambridge, England, CB22 7PX, Page 125 Copyright © Sellenis Ltd 2020... - Page 126 Alignment of prints on the Sellenis S-jet 600 series between 2 or more cartridges is accomplished with the head mount fixture MC300143, refer to Figure 26-1 Figure 26-1 Print head bracket To align vertical printing and to “stitch”...
- Page 127 Observe the print samples, then loosen screw#1 as shown in the drawing below, refer to Figure 26-2 Figure 26-2, Swathe print head adjustment Registered Office: 29 High Street, Harston, Cambridge, England, CB22 7PX, Page 127 Copyright © Sellenis Ltd 2020...
- Page 128 Once the prints from the printheads do not show either black lines or white lines and the print appears as if it is being printed from 1 head, then lock screw 1, as shown in Figure 26-5 below. Figure 26-5 Registered Office: 29 High Street, Harston, Cambridge, England, CB22 7PX, Page 128 Copyright © Sellenis Ltd 2020...
- Page 129 Sometimes it is not even necessary to use software vertical adjustment. Software vertical alignment is for very fine tuning of print stitching. Figure 26-6 Registered Office: 29 High Street, Harston, Cambridge, England, CB22 7PX, Page 129 Copyright © Sellenis Ltd 2020...
-
Page 130: Appendix 10.0: Internal Shaft Encoder
27.0 APPENDIX 10.0: INTERNAL SHAFT ENCODER Internal Shaft Encoder & Print Speed Settings Registered Office: 29 High Street, Harston, Cambridge, England, CB22 7PX, Page 130 Copyright © Sellenis Ltd 2020... - Page 131 There are four methods that can be used to determine the product or conveyor speed. Note: Simulated print mode is also used when test printing a sample message. Figure 27-1 Registered Office: 29 High Street, Harston, Cambridge, England, CB22 7PX, Page 131 Copyright © Sellenis Ltd 2020...
- Page 132 (see below screen shots) to determine the number of products per minute, and then calculate the line speed as described in section 4 above. Registered Office: 29 High Street, Harston, Cambridge, England, CB22 7PX, Page 132 Copyright © Sellenis Ltd 2020...
- Page 133 The signals from the shaft encoder and from the photocell ensure that the print is always positioned in the same place on the product independent of conveyor belt speed variation. Registered Office: 29 High Street, Harston, Cambridge, England, CB22 7PX, Page 133 Copyright © Sellenis Ltd 2020...
-
Page 134: Appendix 11.0: Pens Offset Settings
28.0 APPENDIX 11.0: PENS OFFSET SETTINGS Pens Configuration and Offset Settings Registered Office: 29 High Street, Harston, Cambridge, England, CB22 7PX, Page 134 Copyright © Sellenis Ltd 2020... - Page 135 (see picture and diagram below). For example, the cable for pen#1 must be connected to port and pen#2 to port etc. Pen#3 Pen#2 Pen#4 Pen#1 Registered Office: 29 High Street, Harston, Cambridge, England, CB22 7PX, Page 135 Copyright © Sellenis Ltd 2020...
- Page 136 Pen Numbering Convention Figure 28-1, Pen Numbering shown in photo Registered Office: 29 High Street, Harston, Cambridge, England, CB22 7PX, Page 136 Copyright © Sellenis Ltd 2020...
- Page 137 Figure 28-2 Figure 28-3 Registered Office: 29 High Street, Harston, Cambridge, England, CB22 7PX, Page 137 Copyright © Sellenis Ltd 2020...
- Page 138 Figure 28-4, Conveyor direction Registered Office: 29 High Street, Harston, Cambridge, England, CB22 7PX, Page 138 Copyright © Sellenis Ltd 2020...
- Page 139 Group 2 is always the distance from photocell to Pen#2 Group 3 is always the distance from photocell to Pen#3 Group 4 is always the distance from photocell to Pen#4 Figure 28-5 Registered Office: 29 High Street, Harston, Cambridge, England, CB22 7PX, Page 139 Copyright © Sellenis Ltd 2020...
- Page 140 Figure 28-6 Registered Office: 29 High Street, Harston, Cambridge, England, CB22 7PX, Page 140 Copyright © Sellenis Ltd 2020...
-
Page 141: Appendix 12.0: Shaft Encoder Ppr & Ppm
29.0 APPENDIX 12.0: SHAFT ENCODER PPR & PPM Shaft Encoder Installation, Set up & Configuration Registered Office: 29 High Street, Harston, Cambridge, England, CB22 7PX, Page 141 Copyright © Sellenis Ltd 2020... - Page 142 If the preload is too high, it can damage the product being measured. It can also apply excess load to the encoder shaft bearing, resulting in increased wear and, potentially, premature failure. Registered Office: 29 High Street, Harston, Cambridge, England, CB22 7PX, Page 142 Copyright © Sellenis Ltd 2020...
- Page 143 Alternatively, if the direction of rotation is counter clockwise, the “SENC direction” should be toggled to BA. Note: It is to be noted that the printer will not print if the “SENC direction” is set incorrectly. Registered Office: 29 High Street, Harston, Cambridge, England, CB22 7PX, Page 143 Copyright © Sellenis Ltd 2020...
- Page 144 Note: if the PPM box is ticked, the PPR and wheel dimensions boxes will be greyed out. The values in those boxes will be those of a previous setting and not necessarily relevant to the value of PPM just entered. Registered Office: 29 High Street, Harston, Cambridge, England, CB22 7PX, Page 144 Copyright © Sellenis Ltd 2020...
- Page 145 If the standard setting is clicked, then the below screen appears and the shaft encoder specifications are those of the standard Sellenis-supplied shaft encoder, which has a PP of 5,000 and a wheel circumference of 200. Therefore, the PPM in these standard settings is 25 pulse per...
- Page 146 Shaft Encoder Wiring Specification Figure 29-5, Shaft encoder Figure 29-6 Registered Office: 29 High Street, Harston, Cambridge, England, CB22 7PX, Page 146 Copyright © Sellenis Ltd 2020...
-
Page 147: Appendix 13.0: Troubleshooting
30.0 APPENDIX 13.0: TROUBLESHOOTING TROUBLESHOOTING Registered Office: 29 High Street, Harston, Cambridge, England, CB22 7PX, Page 147 Copyright © Sellenis Ltd 2020... - Page 148 The printer controller and associated printhead must not be dissembled, opened, altered, or tampered with to ensure guaranteed functionality and performance, as specified. Please use the Sellenis S- jet600 series per Sellenis’ specification, instructions, and information.
- Page 149 • Go to the drop-drown list and double click on than Landscape “Landscape” • Most likely cause is • Set printer IP per the Sellenis note entitled Firmware Version “connecting to printer & firmware version printer IP is not set does not appear display Ver 4”...
- Page 150 • Ensure shaft encode wheel is rotating or that internal shaft encoder is set Not printing on Same as above Same as above products in repeat printing mode Registered Office: 29 High Street, Harston, Cambridge, England, CB22 7PX, Page 150 Copyright © Sellenis Ltd 2020...
- Page 151 • cannot read interference Ensure adequate grouinding of system as well as of conveyor. one or more cartridges Registered Office: 29 High Street, Harston, Cambridge, England, CB22 7PX, Page 151 Copyright © Sellenis Ltd 2020...
- Page 152 Return board to Sellenis • Faulty main board ASIC of that pen displays 255 number • Printhead failure...
- Page 153 • Make sure printhead #1 is the printhead furthest from you as you look to the front of the printheads (i.e., the printhead at the back – See Appendix 11). Registered Office: 29 High Street, Harston, Cambridge, England, CB22 7PX, Page 153 Copyright © Sellenis Ltd 2020...
- Page 154 WARNING: The Sellenis S-Jet 600 series are Windows touch screen based printer systems. The S-Jet 600 printer controller MUST be used as a printer controller and no more. It must not be used as a personnel PC for surfing the internet and/or downloading other software applications. It is recommended that the printer controllernot be connected to the internet if not necessary for its functionality unless it is using nicelabel or external protocol.
- Page 155 IP) • Uninsall light colored adapters Printing stops Incorect main USB hub See Appendix 8 automatically while green print icon is still on. Registered Office: 29 High Street, Harston, Cambridge, England, CB22 7PX, Page 155 Copyright © Sellenis Ltd 2020...
-
Page 156: Support Information
Unit 1, Saxon Way Melbourn, South Cambridge SG8 6DN, England, UK Email: mailto:info@sellenis.com Tel: +44 (0) 1763 269554 Website: http://www.sellenis.com/ Copyright © 2020. Sellenis Limited Registered Office: 29 High Street, Harston, Cambridge, England, CB22 7PX, Page 156 Copyright © Sellenis Ltd 2020...
Need help?
Do you have a question about the S-JET 600 Series and is the answer not in the manual?
Questions and answers