Sellenis S-JET 600 SERIES User Manual
Thermal inkjet printer
Hide thumbs
Also See for S-JET 600 SERIES:
- Troubleshooting manual (24 pages) ,
- User manual (156 pages)

Related Manuals for Sellenis S-JET 600 SERIES


Summary of Contents for Sellenis S-JET 600 SERIES
- Page 1 S-JET 600 S ERIES HERMAL NKJET RINTER USER MANUAL V5 Page 1 of 91 Sellenis | User Manual S -Jet 600...
- Page 2 Page 2 of 91 Sellenis | User Manual S -Jet 600...
-
Page 3: Safety Information
Audience This User Manual is intended for the users of the S-Jet 600 Printer. This Manual guides you through the process to installing the print head, configuring the S-Jet 600 Printer, and also the usage of Sellenis Printer Control Software. -
Page 4: Table Of Contents
Setting Template Properties Deleting Elements in a Template Additional Options Loading Template Print Controls Print Status Print Statistics Print Event Creating Event Log Reports Selecting Event Log Filters Ink Configuration Page 4 of 91 Sellenis | User Manual S -Jet 600... - Page 5 Appendix A Onscreen Keypads Onscreen Alphanumeric Keypad Onscreen Numeric Keypad User Privileges Adding Variable Data Variable Wizard GS1 Wizard Support Information TROUBLESHOOTING Page 5 of 91 Sellenis | User Manual S -Jet 600...
-
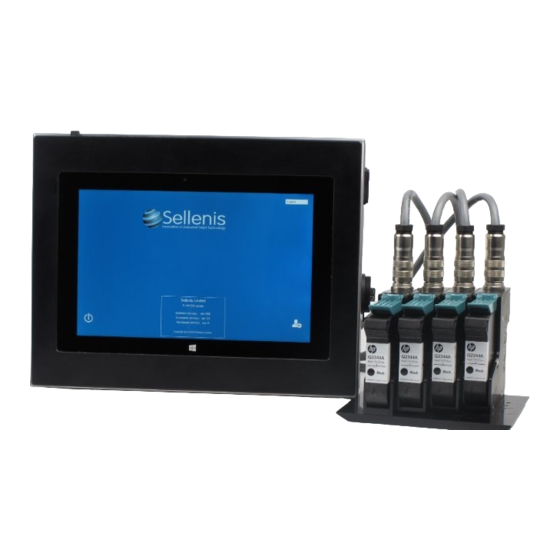
Page 6: S-Jet 600 Printer Hardware
S-Jet 600 Printer Hardware Overview The S-Jet 600 Printer Printers are high-speed range industrial digital printers from Sellenis Limited. These printers use the HP TIJ 2.5 ink jet technology. The S-Jet 600 Printers are designed to meet your Online, Live, Hands-Free Coding, and Marking applications. -
Page 7: Installation
Please ensure the switch is set to off (zero) before connecting the mains cable. The ethernet and the USB connections are situated at the bottom right hand side of the controller as shown below: Page 7 of 91 Sellenis | User Manual S -Jet 600... - Page 8 (0) position so as to prevent any electrical damage to the printer system electronics. Page 8 of 91 Sellenis | User Manual S -Jet 600...
- Page 9 Line Stop 1 Printhead 4 Shaft Encoder Printhead 1 Camera 1 trigger Photocell 1 Lampstack 2 Line Stop 2 Printhead 3 Shaft Encoder Printhead 2 Camera 2 trigger Photocell 2 Page 9 of 91 Sellenis | User Manual S -Jet 600...
-
Page 10: Installing A Printhead Cartridge
3. Pull the tab at the end remove protective film which covers the nozzle plate and electrical contacts. 4. Insert the cartridge into the printhead at a 45° angle Note: Ensure that the print nozzle extension passes through the square hole in the printhead faceplate. Page 10 of 91 Sellenis | User Manual S -Jet 600... - Page 11 7. To remove the cartridges push down slowly on the cartridge holding lever as shown below (1). Please do not use excessive force. Then hold the cartridge as shown below (2) ready to pull it up Page 11 of 91 Sellenis | User Manual S -Jet 600...
- Page 12 8. Now lift the cartridge while rotating it forward to free it from the base plate. 9. Rotate the cartridge forward then pull it out Page 12 of 91 Sellenis | User Manual S -Jet 600...
-
Page 13: Operating The Printer Hardware
If you encounter this problem, leave the unit plugged in and turned on for 15-30 minutes. Page 13 of 91 Sellenis | User Manual S -Jet 600... -
Page 14: List Of Parts
The S-Jet 600 Printer has the following voltage specifications: Item Value Voltage 85 – 264 VAC Frequency 47 – 63 Hz Power 225 W MAX Controller Weight 5 Kg (11 lbs.) Page 14 of 91 Sellenis | User Manual S -Jet 600... -
Page 15: Sellenis Printer Control Software
Sellenis Printer Control Software Overview The S-Jet 600 Printer is also associated with the Sellenis Printer Control software, which aids in presetting the printer functions before operating the same. Key Features The following are the key features of S-Jet 600 Printer Control Software: ... - Page 16 2. Click Next button. The Select Installation Folder screen is displayed. 3. Click Next button, once you have selected the installation location. The Confirm Installation screen is displayed. 4. Click Next button. The installation is progressed. Page 16 of 91 Sellenis | User Manual S -Jet 600...
- Page 17 5. Click Close button. The S-Jet 600 installation is initiated. Note: The subsequent steps are performed, only during your first installation or during an installation after which you have removed the Sellenis Printer Control software folder and associated files from your computer.
- Page 18 Once the installation is completed, the application Welcome screen with Login icon is displayed. Page 18 of 91 Sellenis | User Manual S -Jet 600...
-
Page 19: Login To The Application
English, US English, Chinese, Russian, German, French, Polish, Spanish, Portuguese, Turkish, and Arabic. Login to the Application You can access the application functionalities by logging into the application. To login to the Sellenis Printer Control software, perform the following procedure: 1. - Page 20 Printer Configuration Printing Process Import Files and Folders Event Log Labels, Layout, and Templates Ink Configuration Logout and Power Off Track & Trace Page 20 of 91 Sellenis | User Manual S -Jet 600...
-
Page 21: Adding Users
The Account Manager section enables you to control all the user accounts. Users with Administrator privileges can create new users, change users, delete users, and edit the access privileges of users. From the Home screen of the Sellenis Printer Control software, you can click icon to access the Account Manager section. - Page 22 While at the Account Manager section, at any point of time, click Cancel button to go back to previous account manager screen then press exit button to go back to the application Home screen. Page 22 of 91 Sellenis | User Manual S -Jet 600...
-
Page 23: Changing Users
While at the Account Manager section, at any point of time, click Cancel button to go back to previous account manager screen then press exit button to go back to the application Home screen. Page 23 of 91 Sellenis | User Manual S -Jet 600... - Page 24 Therefore, this section completely handles the hardware operation. From the Home screen of the Sellenis Printer Control software, you can click icon to access the Printer Configuration section. The Printer Configuration section is displayed as follows: From the Printer Configuration screen, you can access the following functionalities: ...
-
Page 25: Group Combinations
Group Combinations The Sellenis S-Jet 600 series printer operates on various combinations of printheads. One printhead (one group) of four pens are stitched together to provide a maximum print height of 50.8 mm. You can preset the number of groups, edit the grouping options, toggle orientation, and toggle the direction of production line/conveyor belt from this section. - Page 26 Note: The grouping options are enabled only if the number of printheads selected are more than the number of groups created. Example: If you have selected four printheads and three groups, the Grouping Options available are as follows: Option 1: Option 2: Option 3: Page 26 of 91 Sellenis | User Manual S -Jet 600...
-
Page 27: Firing Voltage
The direction selection is available for each group you have created. Firing Voltage The firing voltage is set automatically by the Sellenis software every time it reads a cartridge. The user can then change the firing voltage by +/- 1 volt. The user can do this from the Print Configuration section. -
Page 28: Print And Verify
Print and Verify The S-Jet 600 series printers come with the option of the necessary software and hardware to integrate with external Camera Vision Systems, magnetic strip readers, or other scanners. Such a system enables you to perform Read-Match-Print-Verify functions of OCR, OCV, 1D, and 2D barcodes. These also help the Track and Trace and print error prevention applications. -
Page 29: Group Print Offsets
Jet 600 series printers support horizontal and vertical alignment. You can access the Group Print Offsets section of the Sellenis Printer Control software by clicking the icon from the Print Configuration header bar. The Group Print Offsets section is displayed as follows: The number of group displayed on this screen depends upon the number of groups created in Group Combinations section. - Page 30 Note: The vertical alignment is applicable, only if you have multiple cartridges present in a group. To know more about the alphanumeric keypad and the numeric keypad, refer to Onscreen Keypads section in Appendix A. Page 30 of 91 Sellenis | User Manual S -Jet 600...
-
Page 31: Printer Resolution Settings
The Numeric keypad is enabled. 8. Enter the required Photocell Mask value is millimeter. To know more about the alphanumeric keypad and the numeric keypad, refer to Onscreen Keypads section in Appendix A. Page 31 of 91 Sellenis | User Manual S -Jet 600... -
Page 32: Printing Mode Setting
Note: This option is enabled, only if you have selected Repeated Printing as the printing mode. To know more about the alphanumeric keypad and the numeric keypad, refer to Onscreen Keypads section in Appendix A. Page 32 of 91 Sellenis | User Manual S -Jet 600... -
Page 33: Simulator Settings
Simulator Settings The Simulator associated with the Sellenis Printer Control software enable you to set the print without the aid of a physical shaft encoder or photocell. By setting the Simulator, the printer uses its own electronically generated inputs to provide continuous and constant speed printing. -
Page 34: Standard Printing Settings
Select this mode of printing only if the production line (conveyor belt) speed is constant. In this case, the print speed of the conveyor needs to be measured and set manually on the configuration screen. Page 34 of 91 Sellenis | User Manual S -Jet 600... -
Page 35: Repeat Printing Settings
Repeat Printing Settings Track & trace printing mode (refer to separate instruction manual) External Serial Devices Printing Mode (see separate instruction manual) Page 35 of 91 Sellenis | User Manual S -Jet 600... - Page 36 Barcode reader error free data entry (see separate instruction manual) Protocol Mode (see separate instruction manual) Page 36 of 91 Sellenis | User Manual S -Jet 600...
-
Page 37: Cartridge Purge Settings
Appendix A. Additionally, from the Printer Configuration screen, you can perform the following actions: Click icon to go back to the Sellenis Printer Control software Home window. Click icon to minimize the software window. Click icon to restore factory settings. - Page 38 You can also select the layout, include text, barcodes, QR codes, and so on, from this section. From the Home screen of the Sellenis Printer Control software, you can click icon to access the Labels, Layout, and Templates section.
- Page 39 Add images Edit selected element or field of a template Template field justification Select font properties Zoom to 100% Plus zoom Minus zoom Clockwise rotation Anti-clockwise rotation Load database Page 39 of 91 Sellenis | User Manual S -Jet 600...
-
Page 40: Creating A New Template
If four cartridges and two groups are selected and the grouping option is 3:1, the template will be as follows: If four cartridges and two groups are selected and the grouping option is 2:2, the template will be as follows: Page 40 of 91 Sellenis | User Manual S -Jet 600... - Page 41 1. To create a new prefix click the text field adjacent to the Prefix Name field and enter the prefix name using the alphanumeric keypad. Page 41 of 91 Sellenis | User Manual S -Jet 600...
- Page 42 5. Alternatively, create your own desired Date & Time format by pressing the New Format button. The following screen will be displayed. Now create your own date and time format then press Add button Page 42 of 91 Sellenis | User Manual S -Jet 600...
- Page 43 14. Click OK button to save the changes and exit from the Creating Clock section. You can also select an existing clock and click Delete button to remove the same form the list. You cannot remove the Default Clock. Page 43 of 91 Sellenis | User Manual S -Jet 600...
- Page 44 Edit the values and click Change button to update the counter information. Click Delete button to remove the Counter. To know more about the alphanumeric keypad and the numeric keypad, refer to Onscreen Keypads section in Appendix A. Page 44 of 91 Sellenis | User Manual S -Jet 600...
- Page 45 User Code, perform the following procedure: 1. Click the icon on the right margin of the Labels, Layout, and Templates section and click Add User Codes. The User Code section is displayed: Page 45 of 91 Sellenis | User Manual S -Jet 600...
- Page 46 Labels, Layout, and Templates section and click Magnetic Card Reader menu item. The selected information is imported and printed in the template. Page 46 of 91 Sellenis | User Manual S -Jet 600...
- Page 47 5. Click Add Field in the database list space then click the drop down arrow in the Field space. The Database fields are displayed in the list pane as follows: Page 47 of 91 Sellenis | User Manual S -Jet 600...
- Page 48 10. Click OK button to save the values. You can also click Database button to navigate back to the list of databases and View Database button to view the database details. The View Database section is displayed as depicted in the following sample image: Page 48 of 91 Sellenis | User Manual S -Jet 600...
- Page 49 Print from selected row button to print the values starting from the selected row. Adding Single Dimensional (1D) Barcode You can develop barcode information and add it to the template with the aid of Sellenis Printer Control software. To create barcodes by providing detailed information, perform the following procedure: 1.
- Page 50 Adding Two Dimensional (2D) Barcode You can develop 2D barcode information and add it to the template with the aid of Sellenis Printer Control software. To create 2D barcodes by providing detailed information, perform the following procedure: 1. Click the icon on the right margin of the Labels, Layout, and Templates section.
-
Page 51: Editing An Existing Template
To set these properties, perform the following procedure: 1. Click icon from the left margin of the Labels, Layout, and Templates section. The Template Properties section is displayed. Page 51 of 91 Sellenis | User Manual S -Jet 600... -
Page 52: Deleting Elements In A Template
: Align centered of the template. : Align centered right of the template. : Align bottom left of the template. : Align bottom centered of the template. : Align bottom right of the template. Page 52 of 91 Sellenis | User Manual S -Jet 600... - Page 53 Click OK button to save the details and exit from the Font Information section. To know more about the alphanumeric keypad and the numeric keypad, refer to Onscreen Keypads section in Appendix A. Page 53 of 91 Sellenis | User Manual S -Jet 600...
- Page 54 Through the Printing Process section, you can load a template, initiate print process, and view the print process related information. From the Home screen of the Sellenis Printer Control software, you can click icon to access the Printing Process section. The Printing Process section is displayed as follows: From the Printing Process section, you can access the following functionalities: ...
-
Page 55: Loading Template
Click on the cartridge 1, 2, 3, 4, or ALL to initiate purging of the cartridges nozzles 1, 2, 3, 4, or ALL respectively. Page 55 of 91 Sellenis | User Manual S -Jet 600... -
Page 56: Print Status
The Print Status section is displayed as follows: The Print Status section displays the details related to the Printer status, cartridges, and so on. Click icon to close the Print Status section. Page 56 of 91 Sellenis | User Manual S -Jet 600... -
Page 57: Print Statistics
Additionally, from the Printing Process section, you can perform the following functions: Click icon to minimize the Sellenis Printer Control software to the task bar. Click icon to navigate back to the Sellenis Printer Control software Home screen. - Page 58 The Import Files and Folders section enables you to import files or folders from hard disk, USB storage devices, network, or CD ROM though an interface to the Sellenis Printer Control software directory. From the Home screen of the Sellenis Printer Control software, you can click icon to access the Import Files and Folders section.
-
Page 59: Creating Event Log Reports
The Event Log section enables you to view the event log in a daily basis. This section also enables you to save the daily event log and filter the event log display. From the Home screen of the Sellenis Printer Control software, you can click icon to access the Event Log section. -
Page 60: Selecting Event Log Filters
Additionally, from the Printing Process section, you can perform the following functions: Click icon to minimize the Sellenis Printer Control software to the task bar. Click icon to navigate back to the Sellenis Printer Control software Home screen. -
Page 61: Ink Configuration
From the Home screen of the Sellenis Printer Control software, you can click icon to access the Ink Configuration section. -
Page 62: Page 4 Of 91 Sellenis | User Manual S -Jet
This image displays the values read from cartridge 1 and cartridge 2. Logout and Power Off This section details you on how to logout from the Sellenis Printer Control software Home screen and how to close the Sellenis Printer Control software. -
Page 63: Onscreen Keypads
Appendix A Onscreen Keypads This section details about the keypads available in the Sellenis Printer Control software. The following are the two types of keypads present in the Sellenis Printer Control software: Onscreen Alphanumeric Keypad Onscreen Numeric Keypad Onscreen Alphanumeric Keypad The Onscreen Alphanumeric Keypad displays a QWERTY keypad along with numbers and symbols. -
Page 64: Onscreen Numeric Keypad
User Description Privilege ADMIN User Account Create and manage User accounts. Manage the files in the Sellenis Printer Control File Manager software. Operating Setting Manage the operating settings. PRINT USB Import Import files from USB drive. -
Page 65: Adding Variable Data
(variable wizard; GS1 wizard or database) you would like to add (as displayed in the following screen). Page 65 of 91 Sellenis | User Manual S -Jet 600... -
Page 66: Variable Wizard
Source field. For more information, refer to Adding Shift Codes section. 3. Click OK button to save the details and exit the Variable Wizard section. The selected details are displayed in the Barcode Data field. Page 66 of 91 Sellenis | User Manual S -Jet 600... -
Page 67: Gs1 Wizard
Additionally, from the GS1 Barcode Wizard section, you can select an added item from the list and perform the following: Edit the details and click Change button to update the details. Click Delete button to remove the selected type. Page 67 of 91 Sellenis | User Manual S -Jet 600... -
Page 68: Support Information
For assistance or support, you can contact at: Unit 1, Saxon Way Melbourn, South Cambridge SG8 6DN, England, UK Email: mailto:info@sellenis.com Tel: +44 (0) 1763 269554 Website: http://www.sellenis.com/ Copyright © 2017. Sellenis Limited Page 68 of 91 Sellenis | User Manual S -Jet 600... -
Page 69: Troubleshooting
TROUBLESHOOTING Page 69 of 91 Sellenis | User Manual S -Jet 600... - Page 70 WARNING : The Sellenis S-Jet 600 printers are built, assembled and tested to Sellenis’ standard of quality and specification to ensure reliable, trouble free operation of the printers. The Printer controller and associated printhead must not be dissembled, opened, altered or tempered with to ensure guaranteed functionality and performance as specified.
- Page 71 “connecting to printer & firmware version display after starting Ver 4” – see appendix 1 Software needs /running printer Exit Sellenis software wait 30 secs to 1 minute then restarting software re-launch the software again Least likely cause is ...
- Page 72 Switch power off …wait 1 or 2 cannot read one or possible electrical minutes then switch power back on. Restart more cartridges interference printer software. Ensure adequate earthing of system as well as conveyor. Page 72 of 91 Sellenis | User Manual S -Jet 600...
- Page 73 ASIC of controller is unable to then it is likely the a printhead channel in the main that pen displays communicate with board has failed. Return board to sellenis 255 number printhead Faulty main board Printhead failure...
- Page 74 Clean nozzle face using lint free wipe and cleaning Missing dots/lines (in a print from a dirty fluid (which you can order from Sellenis) Dried ink on cartridge one pen) Check product is running flat under the printhead nozzle face ...
- Page 75 WARNING: The Sellenis S-Jet 600 series are Windows touch screen based printer systems. The S-Jet 600 printer controller MUST be used as a printer controller and no more. It must not be used as a personnel PC for surfing the internet and/or downloading other software applications. It is recommended that the printer controller not be connected to the internet if not necessary for its functionality unless it is using nicelabel or external protocol.
- Page 76 APPENDIX 1 Connection to Printer & Display of Firmware version Page 76 of 91 Sellenis | User Manual S -Jet 600...
- Page 77 If the log contains errors, these will be shown in red text and can explain why the printer was not connecting. Below are explanations of all possible error lines associated with the software not being able to connect to the printer: Page 77 of 91 Sellenis | User Manual S -Jet 600...
- Page 78 To resolve this issue, please open “Device Manager”. To do this, please right click on “My Computer” or on “This PC” (Windows 10) and select “Properties” and then select “Device manager” on the next screen as shown on picture 3. Page 78 of 91 Sellenis | User Manual S -Jet 600...
- Page 79 “Microsoft TCP/IP” should not appear this time.. Now, please restart the printer software. It should now connect to the printer and should display the firmware version in the startup screen. Page 79 of 91 Sellenis | User Manual S -Jet 600...
- Page 80 APPENDIX 2 Printing messages having heights more than 12.7 mm Page 80 of 91 Sellenis | User Manual S -Jet 600...
- Page 81 Alignment of prints on the Sellenis S-jet 600 series between 2 or more cartridges is accomplished with the head mount fixture MC300143 (see picture 1 below) Picture 1 To align the vertical and to “stitch”...
- Page 82 5. Once the prints from the printheads do not show either black line or white lines and the print appears as if it is being printed from 1 head then lock screw 1 as show in figure 5 below. Picture 5 Page 82 of 91 Sellenis | User Manual S -Jet 600...
- Page 83 The vertical software adjustment is carried out after the above detailed mechanical alignment has been completed. Sometimes it is not even necessary to use software vertical adjustment. Software vertical alignment is for very fine tuning of print stitching. Figure 6 Page 83 of 91 Sellenis | User Manual S -Jet 600...
- Page 84 APPENDIX 3 Pens Configuration and Offset Settings Page 84 of 91 Sellenis | User Manual S -Jet 600...
- Page 85 Page 85 of 91 Sellenis | User Manual S -Jet 600...
- Page 86 Please ensure that the printhead cables are connected to the correct ports at the back of the controller (see picture and diagram below. For example, the cable for pen#1 must be connected to port And pen#2 to port etc..Pen#3 Pen#2 Pen#1 Pen#4 Page 86 of 91 Sellenis | User Manual S -Jet 600...
- Page 87 Pen Numbering Convention Page 87 of 91 Sellenis | User Manual S -Jet...
- Page 88 However, if you observe that the print from on pen is not exactly aligned with other then please try to change this value very slightly. Page 88 of 91 Sellenis | User Manual S -Jet 600...
- Page 89 Page 89 of 91 Sellenis | User Manual S -Jet 600...
- Page 90 Group 2 is always the distance from photocell to Pen#2 Group 3 is always the distance from photocell to Pen#3 Group 4 is always the distance from photocell to Pen#4 Page 90 of 91 Sellenis | User Manual S -Jet 600...
- Page 91 Page 91 of 91 Sellenis | User Manual S -Jet 600...
Need help?
Do you have a question about the S-JET 600 SERIES and is the answer not in the manual?
Questions and answers
sellenis s jet600 restart problem not solf restar problem plez help me
For troubleshooting a restart problem with the Sellenis S-JET 600 Series printer, follow these steps:
1. Exit the Sellenis software.
2. Wait for 30 seconds to 1 minute.
3. Relaunch the software.
4. Check the Ethernet cable connection if the problem persists.
5. If the controller was opened and the issue began afterward, open the controller and verify that all cables are reconnected correctly to their respective positions on the Sellenis board.
Reference Appendix 1 for firmware version display and further details if needed.
This answer is automatically generated