HIKOKI DH 18DPA Handling Instructions Manual
Hide thumbs
Also See for DH 18DPA:
- Handling instructions manual (228 pages) ,
- Handing instructions (89 pages) ,
- Handling instructions manual (21 pages)

Related Manuals for HIKOKI DH 18DPA


Summary of Contents for HIKOKI DH 18DPA
- Page 1 充电式锤钻 Cordless Rotary Hammer DH 18DPA 保留备用 Keep for future reference 使用说明书 Handling instructions...
-
Page 2: Table Of Contents
中文 目次 电动工具通用安全警告.......2 电池的拆卸/安装法.........11 充电式锤钻安全警告........4 充电..............11 其它安全警告...........5 作业之前............14 电池和充电器的使用注意事项....6 使用方法............19 锂离子电池使用注意事项......6 怎么样使用取心钻具 (轻载用) 锂离子电池运输..........8 (另售) .............23 符号...............8 操作上的注意事项........24 零件名称.............9 反作用力控制..........24 规格..............10 维护和检查.............25 标准附件............10 故障排除............27 用途..............11 选择附件............29 电动工具通用安全警告 警告! 阅读所有警告和所有说明。 不遵照以下警告和说明会导致电击、着火和/或严重伤害。 保存所有警告和说明书以备查阅。 在所有下列的警告中术语 “电动工具” 指市电驱动 (有线) 电动工具或电池驱动 (无 线)电动工具。 1) 工作场地的安全 a) 保持工作场地清洁和明亮。... - Page 3 中文 d) 不得滥用电线。绝不能用电线搬运、拉动电动工具或拔出其插头。 使电线远离热源、油、锐边或运动部件。 受损或缠绕的软线会增加电击危险。 e) 当在户外使用电动工具时,使用适合户外使用的外接软线。 适合户外使用的软线将减少电击危险。 f) 如果在潮湿环境下操作电动工具是不可避免的,应使用剩余电流动作保 护器(RCD) 。 使用RCD可减小电击危险。 3) 人身安全 a) 保持警觉,当操作电动工具时关注所从事的操作并保持清醒。 当你感到疲倦,或在有药物、酒精或治疗反应时,不要操作电动工具。 在操作电动工具时瞬间的疏忽会导致严重人身伤害。 b) 使用个人防护装置。始终佩戴护目镜。 安全装置,诸如适当条件下使用防尘面具、防滑安全鞋、安全帽、听力 防护等装置能减少人身伤害。 c) 防止意外起动。确保开关在连接电源和/或电池盒、拿起或搬运工具时 处于关断位置。 手指放在已接通电源的开关上或开关处于接通时插入插头可能会导致危险。 d) 在电动工具接通之前,拿掉所有调节钥匙或扳手。 遗留在电动工具旋转零件上的扳手或钥匙会导致人身伤害。 e) 手不要伸展得太长。时刻注意立足点和身体平衡。 这样在意外情况下能很好地控制电动工具。 f) 着装适当。不要穿宽松衣服或佩戴饰品。让衣服、手套和头发远离运动 部件。 宽松衣服、佩饰或长发可能会卷入运动部件中。 g) 如果提供了与排屑、集尘设备连接用的装置,要确保它们连接完好且使 用得当。 使用这些装置可减少尘屑引起的危险。...
-
Page 4: 充电式锤钻安全警告
中文 e) 保养电动工具。检查运动件是否调整到位或卡住,检查零件破损情况和 影响电动工具运行的其他状况。如有损坏,电动工具应在使用前修理好。 许多事故由维护不良的电动工具引发。 f) 保持切削刀具锋利和清洁。 保养良好的有锋利切削刃的刀具不易卡住而且容易控制。 g) 按照使用说明书,考虑作业条件和进行的作业来使用电动工具、附件和 工具的刀头等。 将电动工具用于那些与其用途不符的操作可能会导致危险。 5) 电池式工具使用和注意事项 a) 只用制造商规定的充电器充电。 将适用于某种电池盒的充电器用到其他电池盒时会发生着火危险。 b) 只使用配有特制电池盒的电动工具。 使用其他电池盒会发生损坏和着火危险。 c) 当电池盒不用时, 将它远离其他金属物体, 例如回形针、 硬币、 钥匙、 钉子、 螺钉或其他小金属物体,以防一端与另一端连接。 电池端部短路会引起燃烧或火灾。 d) 在滥用条件下,液体会从电池中溅出 ; 避免接触。如果无意间碰到了, 用水冲洗。如果液体碰到了眼睛,还要寻求医疗帮助。 从电池中溅出的液体会发生腐蚀或燃烧。 6) 维修 a) 将你的电动工具送交专业维修人员,使用同样的备件进行修理。 这样将确保所维修的电动工具的安全性。 注意!... -
Page 5: 其它安全警告
中文 其它安全警告 1. 长时间连续使用本电钻,可能会导致机体过热,对马达及开关造成损害,因 此使用本机请勿连续超过 15 分钟。 2. 对墙壁、天花板和地板进行钻孔或钻碎作业时,应彻底查明里面是否敷设电 缆或导管。 3. 确认电源开关已切断。若电源开关接通,则安装电池后,电动工具将出其不 意地立刻转动,从而导致严重事故。 4. 作业之后的钻头仍处在高热状态下,切不可摸触,以免灼伤。 5. 使用锤钻时,应牢牢握住工具的操作柄和侧柄。否则,所产生的反作用力会 将孔钻歪,甚至会造成危险。 6. 佩戴防尘口罩 不要吸入在钻凿操作过程中产生的有害粉尘。粉尘会危机到自身和旁观者的 身体健康。 7. 确保电池已牢固安装到位。如果电池松动,则会脱落出来,导致意外。 8. 为避免意外事故,请务必关闭开关,并在更换附件、存储、搬运前或不使用 工具时取出电池。 9. 安装钻头 ○ 为避免意外事故,请务必关闭开关并取出电池。 ○ 当使用尖钻、钻头等工具时,请务必使用本公司原装配件。 ○ 清洁钻头的柄部分。 ○ 拉拽钻头以检查是否完全插紧。 10. 仅在电机完全停止时操作选择杆。如果在电机运行时操作选择杆,可能会导 致钻头工具出其不意地旋转,从而导致事故。 11. -
Page 6: 电池和充电器的使用注意事项
中文 15. 请清除工具端子(电池安装部位)上的削屑和灰尘。 ○ 使用前请确保电池上没有堆积削屑和灰尘。 ○ 在使用过程中,请尽量避免工具上的削屑或灰尘掉落在电池上。 ○ 暂时不使用工具时或使用后,应将工具存放在不会掉落削屑或灰尘的地方。 否则可能短路,造成冒烟或起火。 电池和充电器的使用注意事项 1. 请始终在 0 至 40℃的环境温度下对电池进行充电。温度低于 0℃将导致危险 的过充电。不得在高于 40℃的温度下对电池进行充电。 最适于充电的温度是 20 至 25℃。 2. 请勿连续使用充电器。 充电结束后,在下次充电之前请将充电器放置约 15 分钟。 3. 勿让杂质进入可充电电池的连接口内。 4. 切勿拆卸可充电电池或充电器。 5. 切勿使可充电电池短路。 使电池短路将会造成很大的电流和过热,从而烧坏电池。 6. 请勿将电池丢入火中。 电池受热将会爆炸。 7. 使用耗尽的电池会损坏充电器。 8. - Page 7 中文 1. 确保电池上没有堆积削屑及灰尘。 ○ 在工作时确定削屑及灰尘没有掉落在电池上。 ○ 确定所有工作时掉落在电动工具上的削屑和灰尘没有堆积在电池上。 ○ 请勿将未使用的电池存放在曝露于削屑和灰尘的位置。 ○ 在存放电池之前,请清除任何可能附着在上面的削屑和灰尘,并请切勿将它 与金属零件(螺丝、钉子等)存放在一起。 2. 请勿以钉子等利器刺穿电池、 以铁锤敲打、 踩踏、 丢掷电池, 或将其剧烈撞击。 3. 切勿使用明显损坏或变形的电池。 4. 请依规定方式使用电池,切勿移作他用。 5. 如果已过了再充电时间,电池仍无法完成充电,请立即停止继续再充电。 6. 请勿将电池放置于高温或高压处,例如微波炉、烘干机或高压容器内。 7. 在发觉有渗漏或异味时,请勿接近远离火源。 8. 请勿在会产生强烈静电的地方使用。 9. 如有电池渗漏、异味、发热、褪色或变形,或在使用、充电或存放时出现任 何异常,请立即将它从装备或电池充电器拆下,并停止使用。 10. 请勿浸泡电池或让任何液体流入电池内部。导电液体进入(如水) ,可能造 成电池损坏,甚至可导致火灾或爆炸。将电池存放在阴凉、干燥的地方,远 离易燃物品。必须避免将电池置于腐蚀性气体环境中。 注意! 1. 若电池渗漏出的液体进入您的眼睛,请勿搓揉眼睛,并以自来水等干净清水 充分冲洗,立刻送医。...
-
Page 8: 锂离子电池运输
中文 锂离子电池运输 当运输一个锂离子电池,请注意以下预防措施。 警告! 告知运输公司,包装内包含一个锂离子 输出功率 电池,告知该公司其功率输出并且要按 照运输公司的指引安排运输。 2 至 3 位数 ○ 功率输出超过 100Wh 的锂离子电池 被视作危险物品运输分类并且需要特 别申请程序。 图 2 ○ 对于境外运输,您必须遵守国际法以 及输入国的规章和条例。 符号 警告! 如下所示的符号用于本机。使用前请务必理解其含意。 为降低伤害风险,用户必须阅 空载转速 读使用说明书 /min 每分钟的振动次数 直流电 额定电压 警告... -
Page 9: 零件名称
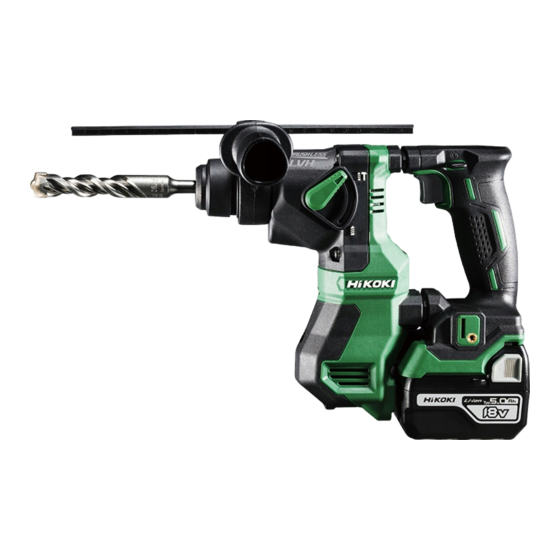
中文 零件名称 1. 电动工具 选择杆 开关扳机 标牌 钻头 按钮 深度尺 显示面板 指示灯 把手 前帽 夹卡 自停指 切换开关 显示灯 外壳 示灯 LED 灯 电池 侧柄 电机 图 3 2. 电池(另售) 3. 电池充电器(另售) 电线 指示灯 电池盖 通风口 端子 导轨 插销 铭牌 电池 <UC18YFSL>... -
Page 10: 标准附件
中文 规格 电动工具 型式 DH18DPA 电压 无负荷速度 0-1080/min 满载锤击率 0-5500/min 混凝土 3.4-18mm 能力 金属 13mm 木材 18mm 类型 锂电池多伏或 BSL18 系列电池 电池 * 电压 DC 18V 重量 2.1-2.7kg * 视安装的电池定。装入 BSL36B18(另售)时最重。 充电器(另售) UC18YFSL 型式 充电电压 14.4V-18V 0.5kg 重量 标准附件 除了主机(1 台)外,产品包中还包括表中所列的附件。 表... -
Page 11: 电池的拆卸/安装法
中文 用途 旋钻与锤钻 单纯旋钻 ○ 钻开锚栓孔 ○ 对钢材或木材钻孔 ○ 对混凝土钻孔 ( 与选购附件匹配使用) ○ 对瓷砖钻孔 ○ 旋紧机械螺丝、木螺丝 ( 与选购附件匹配使用) 电池的拆卸/安装法 1. 电池的拆卸法 请先紧抓住把手,然后再推压电池插销以拆下电池(参照图 6) 。 注意! 切勿使电池短路。 2. 电池的安装法 按 将电池对准工具操作柄内的凹槽,使其 滑入到位。 插销 请务必一直插到底, 直至随着轻微的“咔 插入 按 哒”一声电池锁定到位,否则,电池可 拉出 电池 能会从工具中意外掉出,对您或您周围 图... - Page 12 中文 ● 指示灯显示 根据充电器或充电式电池的情况,指示灯的显示如表 2 所示。 表 2 指示灯的显示 点亮 0.5 秒钟,不点亮 0.5 秒钟 充电前 闪烁 (熄灭 0.5 秒钟) 连续点亮 充电时 点亮 点亮 0.5 秒钟,不点亮 0.5 秒钟 充电完成 闪烁 (熄灭 0.5 秒钟) 指示灯 (红色) 电池过热。无 点亮 1 秒钟,不点亮 0.5 秒钟 法充(电池冷...
- Page 13 注意! ○ 如果电池长时间放置在阳光直接照射的地方或者刚刚使用完毕时,电池会变 热。如果此时对电池充电,充电器上的指示灯会点亮 1 秒钟,不点亮 0.5 秒 钟(熄灭 0.5 秒钟) 。 在此情况下,先让电池冷却下来,然后再充电。 ○ 指示灯闪动时(以 0.2 秒钟的间隔) ,请检查并取出充电器电池接口处的任 何异物。若无异物,则可能电池或充电器发生故障。请带去经授权的维修中 心检查。 ○ 由于内置的微型计算机需要大约 3 秒钟来确认使用充电器充电的电池已取 出,所以请等待至少 3 秒钟后再将电池重新插入继续充电。如果电池在 3 秒内重新插入,电池可能无法正常充电。 ○ 如果指示灯未以红色闪烁(每秒一次) ,但充电池电源线已连接至电源,表 明充电器的保护电路可能已激活。 拔下电源线或插座,然后等待 30 秒左右再次连接。如果指示灯仍未以红色 闪烁(每秒一次) ,请将充电器送还至 HiKOKI 授权服务中心。...
-
Page 14: 作业之前
确认工作场所条件合适,且符合规定的预防措 施。 3. 安装侧柄(图 8) (1) 拧松侧手柄的夹卡,然后将其推压至触碰到外 罩。 拧松 旋紧 (2) 将侧柄调整至最便于使用的角度,然后旋紧侧 图 8 柄的夹卡,将其锁紧。 4. 安装钻头(SDS-plus 长柄) 注意! 对于例如钻头和尖钻等工具,请仅使用 HiKOKI 原装配件。 (1) 清洁后,在钻头的柄部涂抹润滑油或机油。 夹卡 钻头 (2) 安装钻头(SDS-plus 长柄)时,请将其插入 至孔的最底部,如图 9 所示。 轻轻压入钻头的同时加以转动,将钻头的 润滑油 凹槽卡住,这样钻头可以钻入更深,直至 前帽 完全插入。 图 9 (3) 拉动钻头,确保完全锁定。... - Page 15 中文 5. 选择螺丝钻头 为了避免螺丝头或钻头被损坏,旋螺丝时一定要 使用与螺丝直径相配的钻头。 按钮 6. 检查钻头的旋转方向(图 11) 按按钮的 R (右) 侧, 钻头会顺时针转 (从后方看) 。 按按钮的 L(左)侧,钻头会逆时针转。 注意! 在电动工具运转期间,无法切换按钮。要切换按 钮时,先停止电动工具运转,然后再设定按钮。 图 11 7. 选择操作模式 按下切换开关时,转数和吹气数在两个级别间切换。 (图 12) 注 : 如在电机旋转时按下切换开关,则切换开关不工作。 切换开关 显示灯 图 12 表 4 低速模式速度 正常模式速度 转速 0-800 0-1080 冲击率...
- Page 16 中文 8. 自停功能 本产品具有支持连续钻孔作业的自停功能。本功能具有用于存储钻孔作业时 间(从开到关)的记忆模式,以及打开时若作 自停指示灯 业超时(超过存储的作业时间) ,将从第二次钻 切换开关 孔起自动停止电机的自停模式。 (1) 用切换开关选择转数或吹气数。 (2) 长按切换开关两秒以上,即会进入记忆模式。 (自停指示灯将同时闪烁。 ) (图 13) (3) 自停指示灯闪烁时进行钻孔。开 / 关切换的时 图 13 间存储于工具中。 ( 存储后, 自停指示灯将点亮。 ) (图 14) 图 14 (4) 本工具会记录记忆存储时间,因此可连续钻孔,直至取消自停模式为止。 (5) 再次按下切换开关两秒以上,即可取消自停功能。 (自停指示灯将同时熄灭。 ) 注意! ○...
- Page 17 中文 9. 关于保护功能 切换开关 本工具具有内置的保护电路,可防止在异常情况下 损坏本装置。显示灯和指示灯将根据以下情况闪 烁,并且本装置将停止操作。检查显示灯和指示灯 闪烁所指示的问题,并采取必要的步骤予以纠正。 ( 图 15、表 5) 显示灯 指示灯 按切换开关时,请勿拉动开关扳机。 图 15 表 5 显示灯闪烁 原因 解决方法 因内部温度超限,操作停止。 让装置冷却 15 至 30 分钟。 (高温保护功能) 当温度下降且显示灯和指示灯 停止闪烁时,请拉动开关扳机 以恢复操作。 工具刀头突然的负担过重激活 松开开关扳机,直至显示灯停 了 RFC,从而停止了工具进一 止闪烁为止。再次拉动开关扳 步的操作。 机以恢复操作。 RFC(请参阅第 24 页的“反 在继续操作前,请排除负担过...
- Page 18 中文 表 6 指示灯状态 电池剩余电量 点亮 ; 电池剩余电量超过 75% 点亮 ; 电池剩余电量为50%-75% 点亮 ; 电池剩余电量为25%-50% 点亮 ; 电池剩余电量不到 25% 闪烁 ; 电池剩余电量即将耗尽。请尽快对电池进行充电。 闪烁 ; 因高温暂停输出从电动工具中取下电池,让电池完全冷 却。 闪烁 ; 因失败或故障暂停输出。电池可能出现故障,请与经销 商联系。 环境温度和电池特性不同,则所显示的电池剩余电量也会有些许不同,以上 内容仅供参考。 指示灯 11. 剩余电量指示灯(主机) 使用中,当电池剩余电量不足时,指示 灯将点亮。( 图 17) 注 : 请勿对开关面板施加强烈冲击或将其损...
-
Page 19: 使用方法
中文 使用方法 警告! 为避免意外事故, 请务必关闭开关, 并在安装或卸下钻头和其他零件时取出电池。 工作休息和停止工作期间,应断开电源开关。 注意! 为延长使用期限,锂离子电池配备停止输出的保护功能。因此,如果工具过 载,马达可能停止。不过,这只是保护功能作用的结果,而不是故障。在此 情况下,松开工具的开关,消除造成过载的原因。 1. 开关操作 ○ 压下开关扳机,钻机钻动。松开开关扳机,钻机停止。 ○ 扳机拉出的量可以控制锤钻钻动速度。开关扳机拉出少许时,速度低,拉出 多时,速度快。 ○ 松开开关扳机时,制动会即刻开始。 2. 旋钻+锤钻 当选择杆停在 记号处时,可以将锤钻设置为旋钻 加锤击模式(图 19) 。 (1) 安装钻头。 (2) 将 钻 头 尖 端 放 在 钻 孔 位 置, 然 后 拉 动 开 关 扳 机。 选择杆... - Page 20 中文 安装钻头夹盘和夹盘附加器∶(图 22) 前帽 钻头夹盘 (1) 将钻头夹盘装配在夹盘附加器上。 (2) SDS-plus 长柄与钻头相同。 因此, 装配时, 请参照“安装钻头” (第 14 页)的说明。 夹盘附加器 夹卡 注意! SDS-plus 长柄部 图 22 ○ 过分用力不仅无助於作业,而且会损坏 钻头的刃尖,缩短钻头的寿命。 ○ 从钻孔中抽出钻头时,锤钻可能会折断,所以抽出时必须小心。 ○ 不要在单旋钻的功能下用锤钻钻锚孔或在混凝土上钻孔。 ○ 装有钻头夹盘和夹盘附加器时,不要在旋钻加锤击的功能下使用锤钻,这会 严重缩短机器各个部件的寿命。 4. 旋机械螺丝时(图 23) 头 首先把钻头插入夹盘附加器 (D) 端部的夹紧器 夹紧器...
- Page 21 中文 注意! 在为木螺丝准备先导孔时,应特别注意木板的硬度。如果孔极小或极浅,用 较大的力将螺丝旋进孔的话,有时会损坏木螺丝的螺纹。 6. 使用深度计(图 24) 安装孔 (1) 旋松侧柄的圆头螺丝,把深度计插进侧柄 深度计 上的安装孔。 (2) 按孔深调节深度计的位置,然后旋紧圆头 螺栓。 7. 钻头(锥柄)和锥柄附加器的使用(另售) (1) 把锥柄附加器安装在电动锤钻上。 (图 25) 侧柄 (2) 把 钻 头( 锤 柄 ) 安 装 在 锤 柄 附 加 器 上。 (图 25) 图...
- Page 22 中文 ○ 集尘器(B)的安装方法 集尘器(B) 使用集尘器(B)时,请将集尘器(B)与夹卡上 的槽对准后,将集尘器(B)从钻头的顶端插进去 (图 28) 。 前帽 注意! ○ 集尘杯和集尘器(B)是专门用于混凝土的钻孔, 请勿用于金属、木材的钻孔。 ○ 请将集尘器(B)完全插入主机的夹盘部。 图 28 当集尘器(B)与混凝土表面有一段距离的状态 下,打开电动锤钻开关进行工作时,集尘器(B) 会跟钻头同时旋转。因此,请务必将集尘杯紧压在混凝土表面上后再打开 开关进行钻孔工作。 (如将集尘器(B)用于全长 190mm 以上的钻头时,集 尘器(B)便无法贴紧混凝土表面而旋转。因此,请将集尘器(B)与全长 166mm,160mm,110mm 的钻头配套使用。 ) ○ 每钻 2-3 个孔后,请将粉尘丢掉。 ○ 更换钻头时,请卸下集尘器(B)以后再进行。 9. 使用挂钩(另售) 挂钩用于在工作时将电动工具挂到腰带上。 注意! ○ 使用挂钩时,请从电动工具中取出电池。 ○...
- Page 23 中文 怎么样使用取心钻具 (轻载用) (另售) 镗穿大孔时,可使用取心钻具 ( 轻载用 ) 进行作业。这时候,必需使用选购件 的中间销和取心钻柄。 1. 安装 警告! 为避免意外事故,请务必关闭开 取心钻具 关并断开电池。 螺纹 (1) 把取心钻具安装於取心钻柄 ( 图 30)。 润滑取心钻柄的螺纹,可使拆解 取心钻柄 更加容易。 (2) 把取心钻柄安装於锤钻 ( 图 31)。 图 30 图 31 (3) 把中间销插入於导板上直到受挡 阻为止。 导板 (4) 把导板和取心钻具拼装起来,往右向或左 向转动导板,直到朝下也不掉落...
-
Page 24: 操作上的注意事项
中文 3. 拆卸 ( 图 34) 亦可从锤钻拆下取心钻柄,然后拿稳取心钻具, 用锤子强力锤击取心钻柄二至三次,让螺纹部松 开,把取心钻具拆下。 取心钻柄 图 34 操作上的注意事项 连续作业后须让电动工具休息片刻 (1) 电动工具带有温度保护电路以保护马达。 长时间连续作业可能会导致机器温度升高、触发温度保护电路并自动停止作业。 如果发生这种情况,请让电动工具冷却后再使用。 (2) 请在长时间连续作业后或更换电池后,使使机器静止 15 分钟。如果在更换 电池后立刻开始作业,马达和开关等的温度将会升高,结果导致烧毁。 反作用力控制 本产品拥有反作用力控制 (RFC) 功能,可减轻机器震颤。 如果工具的刀头突然负载过重,可通过触发滑动离合器或用机器内安装的传感 器来停止电机,以此来减轻机身震颤。 如果电机因控制器检测到负载过重而停止, 则拉下开关时, RFC 指示灯将变为闪烁状态。 此外,松开此开关后,指示灯将继续闪烁约 三秒钟。在灯闪烁时电机将保持停止状态。 ( 图 35) 由于 RFC 功能可能未触发或因作业环境和条 件而导致性能不足,因此操作时请勿使工具... -
Page 25: 维护和检查
中文 维护和检查 警告! 检查或维护前,请务必关闭开关并取出电池。 1. 检查工具 由于使用已经钝化的工具会降低效率并可能引起马达故障,因此一旦注意到 磨损情况,就应及早磨快或更换工具。 2. 检查安装螺钉 要经常检查安装螺钉是否紧固妥善。若发现螺钉松了,应立即重新扭紧,否 则会导致严重的事故。 警告! 使用螺钉松动的电动锤钻会导致危险。 3. 电动机的维护 电动机绕线是电动工具的“心脏部”应仔细检查有无损伤,是否被油液或水 沾湿。 4. 更换滑脂 此一手提电动锤钻应使用低粘度滑脂。这样, 可长时间使用而无需更换滑脂。 若滑脂从松动的螺丝中泄漏出来,请与最邻近的服务站联系,更换滑脂。 如果在滑脂缺少的状态下继续使用,手提电动锤钻就会卡住,并因而缩短使 用寿命。 注意! 此手提电动锤钻使用指定的滑脂,因此使用其他滑脂可能会对机器性能带来 不利影响。请一定让服务站为你更换滑脂。 5. 检查端子(工具和电池) 确保端子上没有堆积削屑和灰尘。 在操作前、操作时和操作后需要时常检查。 注意! 请清除端子上的削屑或灰尘。 否则可能导致故障。 6. 清理外部 电动工具沾污时,用干软布或沾肥皂水的布擦拭。切勿使用氯溶液、汽油或 稀释剂,以免塑胶部分溶化。... - Page 26 中文 气枪 7. 清洁电池安装槽 在混凝土上钻孔后,如果混凝土的灰 尘积累在电池端子处或电池安装槽的 滑动区域内,请用干布清洁累积的灰 尘。( 图 36) 此外,请在清洁后确保可以顺畅地安 装电池或从工具中取出电池。 端子 电池滑槽 图 36 注意! 如果电池上面覆盖有混凝土灰尘,则使用工具时可能会导致事故,如电池在 使用期间掉落等。 此外,这可能会导致故障,或致使电池与端子接触不良。 8. 电力耗尽的电池的处理方法 警告! 请勿将用过的电池乱丢。如果焚烧电池,将引起爆炸。您所购买的产品中包 含可充电电池。该电池可回收利用。根据各国家和地区的法令法规,将电力 耗尽的电池丢弃到城市垃圾中属于违法行为。请向当地的固体废弃物负责人 员咨询具体回收事宜或妥善的处理方法。 9. 收藏 电动工具应收藏于温度低于 40℃和小孩拿不到的地方。 注 : 存放锂离子电池 在存放前请确保锂离子电池已完全充电。 电池在低电量的状态下长时间存放(3 个月或更长) ,可能会导致电池性能 劣化,使用时间明显减少或无法进行充电。 但是,即使是使用时间明显减少的电池,通过反复充电和使用 2 ~ 5 次,有 时也可恢复使用时间。...
-
Page 27: 故障排除
中文 关于 HiKOKI 牌无线电动工具的重要通知 : 请确保始终使用我们指定的正版电池。如果使用我们指定以外的电池,或对电 池进行拆卸和改动(例如拆卸和更换电池组件或其他内部部件) ,那么我们无 法保证我们无线电动工具的安全性和使用性能。 故障排除 如果工具操作不正常,请使用下表中的检查步骤。如果未能解决问题,请向经 销商或 HiKOKI 公司授权服务中心咨询。 1. 电动工具 现象 可能的原因 解决办法 工具无法运行 没有剩余电池电量 为电池充电 电池没有牢固安装 按压电池直到听到咔嗒声 电池安装槽的端子上以及电 请用干布清洁积聚的灰尘。 池滑槽上积聚了混凝土灰尘。 工具突然停止 工具过度负重 避免因负载过重而引发的 问题。 反作用力控制已经启动 电池过热。 让电池冷却。 钻头 安装部分的形状不匹配 对于 SDS-plus 长柄型号, - 无法安装... - Page 28 解决办法 充电指示灯快速闪 电池未完全插入。 请紧紧插入电池。 动紫色,电池未开 电池端部或电池的连接处有 将异物清除。 始充电。 异物。 充电指示灯闪烁红 电池未完全插入。 请紧紧插入电池。 色,电池未开始充 电池过热。 如果继续放置,电池将在温 电。 度降低后自动开始充电,但 此种情况可能会缩短电池使 用寿命。建议将电池放置在 通风良好的位置,在充电前 避免阳光直射。 即使电池完全充 电池的使用寿命已耗尽。 请更换新电池。 电,电池的使用寿 命也会逐渐缩短。 电池的充电时间较 电池、充电器或周围环境的 请在室内或温暖的环境中充 长。 温度过低。 电。 充电器的排气孔堵塞,导致 请勿堵塞排气孔。 其内部部件过热。 冷却扇未运转。 请联系 HiKOKI 授权服务中 心进行维修。...
-
Page 29: 选择附件
中文 选择附件 根据特定作业选择适合的附件。 有关详细信息请联系 HiKOKI 授权服务中心。 产品编号 : 324548 产品编号 : 303709 侧柄 深度计 BSL36..18 BSL18.. UC18YFSL (14.4 V-18 V) 电池 充电器 产品编号 : 329897 产品编号 : 336471 产品编号 : 376557 电池盖 外壳(可堆叠) 内托盘 产品编号 : 337357 产品编号 : 372200... - Page 30 中文 工具和适配器 详情请联系授权维修中心。 注 : 如有规格变动,HiKOKI 概不负责。 工具 转接器 ⦁ 在混凝土或瓷砖 面朝上作业时使用 上钻孔 集尘杯 集尘器 (B) 钻头 ⦁ 钻锚孔 锥柄转 楔子 钻头(锥柄) 按器 ⦁ 在混凝土上钻孔 13mm 电锤卡盘 (冲钻用直柄钻头) (SDS-plus 柄 ) ⦁ 大孔钻 引导盘 中央销 钻心 钻心轴 ⦁ 锚栓底座 锚栓底座转按器...
- Page 31 中文 ● 在混凝土或瓷砖上钻孔 SDS-plus 钻头 SDS-plus 钻头 外径 全长 有效长度 外径 全长 有效长度 160mm 85mm 16.0mm 4.0mm 110mm 50mm 260mm 186mm 110mm 50mm 16.5mm 160mm 85mm 5.0mm 160mm 100mm 160mm 85mm 17.0mm 5.5mm 110mm 50mm 260mm 185mm 110mm 50mm 160mm 90mm 6.0mm 17.5mm...
-
Page 32: General Power Tool Safety Warnings
English CONTENTS GENERAL POWER TOOL SAFETY WARNINGS ........32 CORDLESS ROTARY HAMMER SAFETY WARNINGS ......35 ADDITIONAL SAFETY WARNINGS ............. 35 PRECAUTIONS FOR BATTERY AND CHARGER ........37 CAUTION ON LITHIUM-ION BATTERY ............37 REGARDING LITHIUM-ION BATTERY TRANSPORTATION ...... 39 SYMBOL ....................... - Page 33 English Electrical safety a) Power tool plugs must match the outlet. Never modify the plug in any way. Do not use any adapter plugs with earthed (grounded) power tools. Unmodifi ed plugs and matching outlets will reduce risk of electric shock. b) Avoid body contact with earthed or grounded surfaces, such as pipes, radiators, ranges and refrigerators.
- Page 34 English Power tool use and care a) Do not force the power tool. Use the correct power tool for your application. The correct power tool will do the job better and safer at the rate for which it was designed. b) Do not use the power tool if the switch does not turn it on and off...
-
Page 35: Cordless Rotary Hammer Safety Warnings
English CAUTION Keep children and infi rm persons away. When not in use, tools should be stored out of reach of children and infi rm persons. CORDLESS ROTARY HAMMER SAFETY WARNINGS Wear ear protectors. Exposure to noise can cause hearing loss. Use auxiliary handle(s), if supplied with the tool. - Page 36 English 11. Rotation + hammering When the drill bit touches construction iron bar, the bit will stop immediately and the rotary hammer will react to revolve. Therefore fi rmly tighten the side handle, hold the body handle and side handles. 12.
-
Page 37: Precautions For Battery And Charger
English PRECAUTIONS FOR BATTERY AND CHARGER Always charge the battery at an ambient temperature of 0–40°C. A temperature of less than 0°C will result in over charging which is dangerous. The battery cannot be charged at a temperature greater than 40°C. The most suitable temperature for charging is that of 20–25°C. - Page 38 English ○ Make sure that any swarf and dust falling on the power tool during work do not collect on the battery. ○ Do not store an unused battery in a location exposed to swarf and dust. ○ Before storing a battery, remove any swarf and dust that may adhere to it and do not store it together with metal parts (screws, nails, etc.).
-
Page 39: Regarding Lithium-Ion Battery Transportation
English REGARDING LITHIUM-ION BATTERY TRANSPORTATION When transporting a lithium-ion battery, please observe the following precautions. WARNING Notify the transporting company that a package contains a lithium-ion battery, inform the company of its power output and follow the instructions of the transportation company when arranging transport. -
Page 40: Name Of Parts
English NAME OF PARTS 1. POWER TOOL Change lever Switch trigger Name plate Drill bit Pushing button Depth gauge Display panel Indicator lamp Handle Front cap Grip Auto stop Changeover Display Housing lamp switch lamp LED light Battery Side handle Motor Fig. -
Page 41: Specifications
English SPECIFICATIONS POWER TOOL Model DH18DPA Voltage 18 V No-load speed 0–1080 /min Full-load impact rate 0–5500 /min Concrete 3.4–18 mm Capacity Steel 13 mm Wood 18 mm Type Li–ion battery Multi volt or BSL18 series Battery* Voltage DC 18 V Weight 2.1–2.7 kg * Depending on attached battery. -
Page 42: Applications
English APPLICATIONS Rotation and hammering function Rotation only function ○ Drilling anchor holes ○ Drilling in steel or wood ○ Drilling holes in concrete (with optional accessories) ○ Drilling holes in tile ○ Tightening machine screws, wood screws (with optional accessories) BATTERY REMOVAL/INSTALLATION Battery removal Hold the handle tightly and push the battery latches to remove the battery (Fig. - Page 43 English ● Pilot lamp indication The indications of the pilot lamp will be as shown in Table 2, according to the condition of the charger or the rechargeable battery. Table 2 Indications of the pilot lamp Lights for 0.5 seconds. Does not light Before Blinks for 0.5 seconds.
- Page 44 Remove the cord or plug from the power and then connect it again after 30 seconds or so. If this does not cause the pilot lamp to blink in red (every second), please take the charger to the HiKOKI Authorized Service Center.
-
Page 45: Prior To Operation
Installing the drill bit (SDS-plus shank) Fig. 8 CAUTION Grip Drill bit For tools such as a drill bit and a bull point, use only HiKOKI genuine parts. Clean, then smear the drill bit shank with grease or Grease Front cap machine oil. Fig. 9... - Page 46 English Confi rm the direction of bit rotation (Fig. 11) The bit rotates clockwise (viewed from the rear side) by pushing the R-side of the push button. Push The L-side of the push button is pushed to turn the bit button counterclockwise.
- Page 47 English Conduct drilling when the auto stop lamp is fl ashing. The time between switching ON and switching OFF is stored by the tool. (After it is stored, the auto stop lamp will light up.) (Fig. 14) Fig. 14 Continuous drilling is possible as the memory storage time will be recorded by the tool until auto stop mode is cancelled.
- Page 48 English Table 5 Display lamp Cause Solution fl ashing Operation has ceased because the Allow the unit to cool for 15 to 30 internal temperature has exceeded minutes. the temperature limit. When the temperature goes down (High temperature protection and the display lamp and the function) indicator lamp blinking stops, pull the switch trigger to recover operation.
- Page 49 English Table 6 State of lamp Battery Remaining Power Lights ; The battery remaining power is over 75% Lights ; The battery remaining power is 50%–75%. Lights ; The battery remaining power is 25%–50%. Lights ; The battery remaining power is less than 25% Blinks ;...
-
Page 50: How To Use
English HOW TO USE WARNING To prevent accidents, make sure to turn the switch off and remove the battery when the drill bits and other various parts are installed or removed. The power switch should also be turned off during a work break and after work. CAUTION To extend the lifetime, the lithium-ion battery equips with the protection function to stop the output. - Page 51 English Installing drill chuck and chuck adapter. (Fig. 22) Front cap Drill chuck Attach the drill chuck to the chuck adaptor. The part of the SDS-plus shank is the same as the drill bit. Therefore, refer to the item Chuck adapter of “Installing the drill bit”...
- Page 52 English CAUTION Exercise care in preparing a pilot hole suitable for the wood screw taking the hardness of the wood into consideration. Should the hole be excessively small or shallow, requiring much power to drive the screw into it, the thread of the wood screw may sometimes be damaged.
- Page 53 English Installation of dust cup or dust collector (B) (Optional accessories) When using a rotary hammer for upward drilling operations attach a dust cup or a dust collector (B) to collect dust or particles for easy operation. Dust cup ○ Installing the dust cup Use the dust cup by attaching to the drill bit as shown in Fig.
-
Page 54: How To Use The Core Bit (For Light Load) (Sold Separately)
English ○ Install securely the hook. Unless the hook is securely installed, it may cause an injury while using. Install securely the hook in the groove of power tool and tighten the screws to fi x the hook fi rmly. (Fig. 29 on page 53) HOW TO USE THE CORE BIT (FOR LIGHT LOAD) (sold separately) When boring penetrating large holes use the core bit (for light loads). -
Page 55: Operational Cautions
English Dismounting (Fig. 34) Remove the core bit shank from the rotary hammer and strike the head of the core bit shank strongly two or three times with a hammer holding the core bit, then the thread becomes loose and the core bit can be removed. -
Page 56: Maintenance And Inspection
English ● When the reactive force control (RFC) is triggered When the RFC is triggered and the motor stops, turn off the tool’s switch and remove the cause of the overburdening before continuing operation. MAINTENANCE AND INSPECTION WARNING Be sure to turned off the switch and remove the battery before maintenance and inspection. - Page 57 English Cleaning on the outside When the power tool is stained, wipe with a soft dry cloth or a cloth moistened with soapy water. Do not use chloric solvents, gasoline or paint thinner, for they melt plastics. Cleaning of the battery installation compartment Air gun After drilling concrete, if concrete dust has accumulated on the terminals or the area...
-
Page 58: Troubleshooting
In the operation and maintenance of power tools, the safety regulations and standards prescribed in each country must be observed. Important notice on the batteries for the HiKOKI cordless power tools Please always use one of our designated genuine batteries. We cannot guarantee the safety and performance of our cordless power tool when used with batteries other than these designated by us, or when the battery is disassembled and modifi... - Page 59 The charger’s vents are blocked, Avoid blocking the vents. causing its internal components to overheat. The cooling fan is not running. Contact a HiKOKI Authorized Service Center for repairs.
-
Page 60: Selecting Accessories
English SELECTING ACCESSORIES Select accessories that are suited to a specifi c task. For details contact HiKOKI Authorized Service Center. Part Number: 324548 Part Number: 303709 Side handle Depth gauge BSL36..18 BSL18.. UC18YFSL (14.4 V–18 V) Battery Charger Part Number: 329897... - Page 61 English Tool and Adapter For details contact HiKOKI Authorized Service Center. NOTE Specifi cations are subject to change without any obligation on the part of the HiKOKI. Tool Adapter ⦁ Drilling holes in Use on jobs facing upwards concrete or tile...
- Page 62 English ⦁ Drilling holes in concrete or tile SDS-plus Drill bit Outer dia. Overall length Eff ective length SDS-plus Drill bit 16.5 mm 160 mm 85 mm Outer dia. Overall length Eff ective length 160 mm 85 mm 4.0 mm 110 mm 50 mm 17.0 mm...
- Page 64 服务中心 高壹工机商业(上海)有限公司 上海市闵行区浦江工业园区三鲁路3585号7幢3楼 制造商 福建高壹工机有限公司 福建省福州市福兴投资区湖塘路 编号: C99738221 F 发行日期: 2021年 10月 中国印刷...
Need help?
Do you have a question about the DH 18DPA and is the answer not in the manual?
Questions and answers