
Subscribe to Our Youtube Channel
Related Manuals for Disc-O-Bed 30002BOEP


Summary of Contents for Disc-O-Bed 30002BOEP
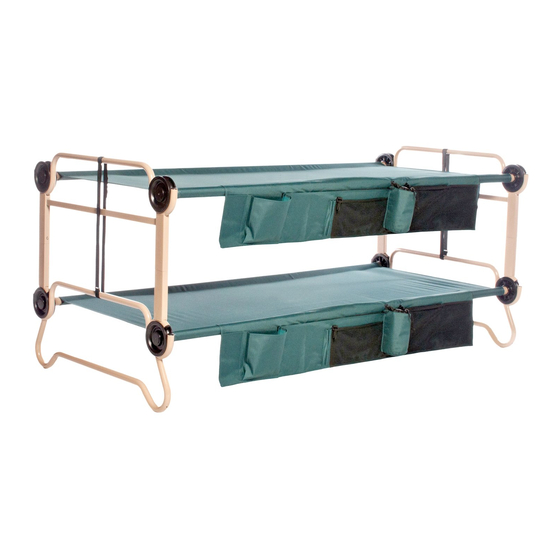
- Page 1 Disc-O-Bed® XL Combo Kit Item 30002BOEP Includes 2 Organizers, 4 Leg Extensions, & 4 Footpads Disc-O-Bed® XL 折疊雙層床 品號 30002BOEP 包含 2 個收納袋、 assembly instructions 個床腳延伸柱,以及 個支架墊 組裝說明 www.discobed.com AI30002BOEP...
- Page 2 IMPORTANT INFORMATION CONCERNING THIS PRODUCT TO PREVENT SERIOUS OR FATAL INJURIES Keep these instructions for future reference 1. Read carefully and fully understand the manufacturer’s assembly. Care and special attention should be used where a warning is indicated. Never allow a child under 6 years of age on the top bed. Only one person allowed on each level. Use the bunk as it is intended –...
- Page 3 PARTS 零件 2x Sleeping Mats 2x 床墊 4x Stack Adapters 4x連接柱 2x Straight End Frames 2x 平直端框 2x Locking Straps 8x Discs 2x固定束帶 8x圓盤固定座 2x Rounded End Frames 2x 圓形端框 4x Straight Side Rails / 4x平直側杆 8x Swaged Side Rails / 8x成型側杆 4x Foot Plugs 4x支架底塞...
- Page 5 rounded frame assembly instructions 圓框組裝說明 www.discobed.com...
- Page 6 STEP 1. SECURING DISC TO SWAGED SIDE RAIL 步驟 1. 將圓盤固定座與成型側杆相接固定 1.1. Holding swaged rail, press pin (A) down and hold. 1.1. 手握成型杆,將定位銷(A)壓住不放。 1.2. Line up pin (B) with hole in disc, insert rail into disc. Let pin (A) go. 1.2.
- Page 7 STEP 2. CONNECTING SWAGED SIDE RAIL TO STRAIGHT SIDE RAIL 步驟 2. 連接成型側杆與平直側杆 2.1. Attach a swaged side rail (completed in step 1) to a straight rail. 2.1. 將步驟 1 組裝完成的成型側杆與直杆安裝固定。 Make sure they slide into one another completely. 確認兩端確實地固定相接 2.2.
- Page 8 STEP 4. SECURING EACH DISC INTO THE END FRAME 步驟 4. 固定圓盤固定座與端框 4.1. Make sure pin (A) is visible, is not covered by the sleeping mat and is facing inwards. Check all four bed posts (see diag. 4.1). 4.2. Loosely place each disc into the loop of the bed end frame, ensure your fingers are not in the way and firmly push down on the side rail (see diag.
- Page 9 THE ASSEMBLY OF YOUR DISC-O-BED® XL ROUND FRAME SINGLE COT IS NOW COMPLETE. DISC-O-BED® XL 單鋪圓形框現已完成組裝。 STEP 5. STRAIGHT FRAME ASSEMBLY 步驟 5. 組裝平直框 5.1. Follow steps 1 - 4 to complete the assembly of the straight frame single cot.
- Page 11 bunk assembly instructions 雙鋪組裝說明 www.discobed.com...
- Page 12 STEP 1. REMOVE FOOT PLUGS 步驟 1. 拆除支架底塞 1.1. Remove the 4 foot plugs from the straight bed end frame. 1.1. 由床鋪平直端框處將 4 個支架底塞拆下。 STEP 2. ATTACH STACK ADAPTERS TO STRAIGHT LEG BED END FRAME 步驟 2. 安裝連接柱與平直床腳端框 2.2. Line pin (A) with hole in leg of straight bed end frame. 2.1.
- Page 13 STEP 3. STACK STRAIGHT END FRAME ONTO ROUNDED END FRAME 步驟 3. 平直端框與圓形端框相接疊放 3.1. Place straight end frame (fitted with stack adapters completed in step 2) onto rounded end frame. 3.1. 平直端框(已完成步驟 2 連接柱的安裝)放置於圓形端框上。 STEP 4. CORRECT STACK ADAPTER FITMENT 步驟...
- Page 14 Make sure strap is pulled tight 確認有拉緊束帶 YOU HAVE NOW SUCCESSFULLY COMPLETED THE ASSEMBLY OF YOUR DISC-O-BED® XL BUNK. DISC-O-BED® XL 雙鋪現已順利完成組裝 We hope that you are completely happy with our product and it is exactly what you expected 希望我們的產品能為您的生活帶來無比樂趣,而它也正如您所期盼的讓您感到滿意...
- Page 15 bench setup 裝配長凳 www.discobed.com...
- Page 16 STEP 1. SETTING UP BACK REST 步驟 1. 安裝靠背 1.1. Lift disc 1 and 2 out of bed end frame of top cot. 1.1. 由上鋪的端框抬起圓盤固定座 1 與 2。 1.2. Place disc 1 and 2 on bed end rail of bottom cot. 1.2.
- Page 17 1.3 Let disc rest between bed end rail and stack adapter. The disc should not be able to roll forward. 1.3 將圓盤固定座置於床鋪尾杆與連接柱之間。圓盤固定座應該無法向前滾動。 YOU HAVE NOW SUCCESSFULLY COMPLETED THE ASSEMBLY OF YOUR DISC-O-BED® XL BENCH. DISC-O-BED® XL長凳現已順利完成組裝...
- Page 18 IMPORTANT TO NOTE WHEN CONVERTING YOUR DISC-O-BED® XL BENCH BACK TO A BUNK CONFIGURATION DISC-O-BED® XL 長 凳 恢 復 成 雙 鋪 設 置 時 的重要注意事項 Make sure pin (A) is facing inwards and not covered by sleeping mat.
- Page 19 assembly instructions 收納袋組裝說明 www.discobed.com...
- Page 20 STEP 1. SETTING UP SIDE-ORGANIZER 步驟 1. 安裝側邊收納帶...
- Page 21 assembly instructions 床腳延伸柱組裝說明 single cot, straight frame assembly instructions 單鋪、平直框組裝說明 bunk assembly instructions 雙鋪組裝說明...
- Page 22 assembly instructions 支架墊組裝說明...
- Page 23 package instructions 包裝說明...
- Page 24 5 POINT CHECK LIST Make sure that these simple checks are followed PRIOR TO EACH use of your Disc-O-Bed® XL. 1. The pin (B) is securely locked in to the disc. STEP 1 page 5. 2. Side rails fit into one another completely. Should feel smooth to the touch. STEP 3 page 6.
-
Page 27: Limited Warranty
LIMITED WARRANTY DISC-O-BED® (“MANUFACTURER”) warrants only that this product shall be free from defects in materials and workmanship for a period of one year after the date of delivery. If within the applicable warranty period, (i) the purchaser discovers any defects in the materials or workmanship of this product and (ii) notifies MANUFACTURER in writing of such defects and returns the defective product to MANUFACTURER, MANUFACTURER shall repair or replace the defective product, or, at MANUFACTURER’s sole option, refund the purchase price for the defective product. -
Page 28: Important Safety Warning
If you have any questions, comments or concerns, please don’t hesitate to contact us: Disc-O-Bed® Retail, Inc. 2408 Tech Center Pkwy STE 100, Lawrenceville, GA 30043 USA Toll Free: +1 800.613.0910 Monday – Friday 8:30 to 5:00pm (EST) cs@discobed.com...
Need help?
Do you have a question about the 30002BOEP and is the answer not in the manual?
Questions and answers