TERMA MOA User Manual
Electric heating element
Hide thumbs
Also See for MOA:
- User manual (141 pages) ,
- User manual (204 pages) ,
- User manual (208 pages)

Related Manuals for TERMA MOA


Summary of Contents for TERMA MOA
- Page 1 photo: chrome, straight cable www.termaheat.pl page 1 of 3 20170913 WOŁOSIUK KACPER...
- Page 2 Intelligent Building Systems Design MOA offers 5 temperature settings rang- In the event of a power failure the MOA MOA is supplied with a straight cable and ing from 30°C to 60°C. It is equipped with remembers it’s previous settings there-...
- Page 3 Straight cable without plug with masking cover (42 ÷ 77) (42 ÷ 77) Straight cable with plug Spiral cable with plug G 1/2" G 1/2" [mm] Power 1000 1200 www.termaheat.pl 20170913 WOŁOSIUK KACPER page 3 of 3...
-
Page 4: Electric Heating Element
Mode d’emploi — Kit résistance électrique | Manuale d'istruzioni — Elemento elettrico riscaldante | Instrukcja Obsługi — Grzałka elektryczna | Инструкция по применению — Электронагреватель | Návod na obsluhu — Elektrické vykurovacie teleso MEG · DRY · MOA · MOA IR · REG 2 · REG 3... - Page 6 User Manual Our products have been designed and manufactured in such a way to ensure that all quality, functionality and aesthetic requirements are met. We would like to congratulate you on the purchase of this great product and wish you a pleasant experience with it.
- Page 7 9. All installations to which the device is connected should comply with reg- ulations applicable in the country of installation and use. 10. Extension leads or electric plug adapters should not be used in order to supply power to the heater. User manual MEG, DRY, MOA, REG 2, REG 3...
- Page 8 11. While connecting the radiator to electric installation ensure that the cur- cuit has a 30 mA residual-current circuit breaker and an appropriate over- current circuit breaker. With the permanent installation (cable connec- tion without plug) it is also mandatory to provide an omnipolar cut-off switch with a minimum contact opening of 3 mm for disconnecting the device on all poles.
- Page 9 Zone 1 Zone 2 User manual MEG, DRY, MOA, REG 2, REG 3...
- Page 10 Electric Heating Element Safety requirements — installation 1. Fitting and connection of the heating element should only be performed by a qualified installer. 2. Connect the unit to a sound electrical installation (see the ratings on the heater). 3. Switching on the heating element in the open air to test the device is per- mitted for a maximum of 3 seconds.
- Page 11 4. Do not allow flooding into the heating element casing. 5. Do not use the heating element in heating systems where the water tem- perature exceeds 82° C . User manual MEG, DRY, MOA, REG 2, REG 3...
- Page 12 6. The heating element and radiator can heat up to high temperatures. Please be cautious — avoid direct contact with the hot parts of the equipment. 7. Do not open the heating element casing. 8. In the central heating system, always make sure that one valve of the ra- diator remains open.
-
Page 13: Technical Information
Towel rail connection thread: G 1/2" Casing protection class [IP]: IPx4: MEG IPx5: REG 2, REG 3, MOA, MOA IR, DRY Length of heating element: 120 200 300 400 600 800 1000 1200 [W] 315 275 300 335 365 475 565 660 [mm] * Device intended to be connected permanently to the system User manual MEG, DRY, MOA, REG 2, REG 3... -
Page 14: Installation Or Removal
Installation or removal Detailed information demonstrating the dif- Before installation or first use: ferent ways of installing or removing a radi- ator heating element is available from the 1. Read the chapter Safety requirements manufacturer or importer (see footnotes at —... -
Page 15: Product Disposal
12. The temperature of the heating agent in the central heating system must not exceed 82° C! 13. For detailed installation hints — see the last pages of this manual. User manual MEG, DRY, MOA, REG 2, REG 3... -
Page 16: Maintenance
Maintenance • Before performing maintenance, always unplug the unit from the mains system. • Periodically check the fluid level in the radiator and ensure the heating element is completely submerged. • Clean the product with a dry or damp cloth. If necessary, use a very small amount of detergent, ensuring that it contains no solvents or abrasives. - Page 17 Activating required; the right number of diodes will Anti-freeze mode is indicated by winking of start blinking. The last blinking diode indi- the middle diode. cates the set temperature, whilst the last. User manual MEG, DRY, MOA, REG 2, REG 3...
-
Page 18: Problem Solving
Problem solving Problem Possible cause Solution Check the connection of The device is plugged in, Problem with the the power wire, the plug no diodes are on. connection. and the socket. Disconnect the device Temperature sensor has completely, wait until the been damaged. - Page 19 After this time, the heater will turn off The heater is turned on by pressing the on/off automatically. button. The LED diode at the on/off button lights up when the heater is on and the regu- User manual MEG, DRY, MOA, REG 2, REG 3...
- Page 20 Modification of radiator heating It is useful to know that: temperature • Longer pressing of the button will au- tomatically set the timer to 5 hours or, The default temperature of the heater is turn off the TIMER function, 48° C. The user can modify the heating tem- perature by following these steps: •...
- Page 21 The product manufacturer. alert signals that temperature of the User manual MEG, DRY, MOA, REG 2, REG 3...
- Page 22 Problem solving Problem Possible cause Problem solution The heater is signalling Follow the steps speci- malfunction alert (out- See description of mal- fied in the paragraph re- er diodes shine constant- functions alerts. lating to “Device malfunc- ly, while the middle one tion alerts”.
-
Page 23: Anti-Freeze Function
When the device is off and the temperature start blinking. The last blinking diode indi- surrounding the temperature sensor drops cates the set temperature, whilst the last di- User manual MEG, DRY, MOA, REG 2, REG 3... -
Page 24: Dryer Function
to below 6° C, the device will switch on au- stays unchanged). This allows the user to tomatically. This is to prevent the heating achieve a maximum temperature which is agent inside the radiator from freezing. The higher than the standard or to effectively activation of Anti-freeze mode is indicated heat a space with the device during lower by the blinking of the middle diode. - Page 25 The device is heating de- completely, wait until the spite turning it off with the Damaged electronics. radiator cools down and button. re-connect it. If the problem continues please contact Your local Distributor. User manual MEG, DRY, MOA, REG 2, REG 3...
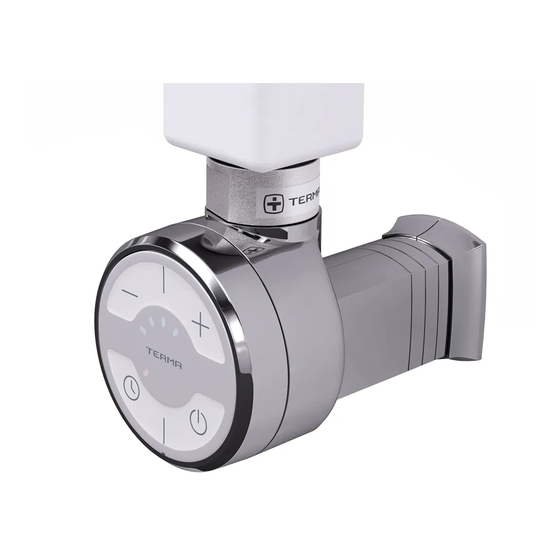
- Page 26 MOA IR temperature regulation dryer On/Off switch IR sensor Turning the device on with the button will ode which shines constantly, indicates the result in the radiator heating up to the set current temperature. The remaining diodes temperature. After reaching the set temper-...
- Page 27 Switch it on by pressing and same as MOA holding button. After 2 hrs heater will switch off automatically. Problem solving Press button at any time to interrupt the same as MOA dryer mode. User manual MEG, DRY, MOA, REG 2, REG 3...
-
Page 28: Emergency Situations
REG 2 Ring indicating that the device is operating After the device is turned on, it heats the ator) may be lower than the temperature of radiator up to 65° C. Having reached that the remaining parts of the radiator — this temperature, the device will turn on and is a normal phenomenon. - Page 29 (especially the two located at the very bottom of the radiator) may be lower than the temperature of the remaining parts of the radiator — this is a normal phenomenon. User manual MEG, DRY, MOA, REG 2, REG 3...
-
Page 30: Warranty Terms And Conditions
Warranty terms & conditions 1. The subject of this warranty is a Terma — unqualified persons tampering with electric heating element with control the product, head. The product name and charac- — customers after the purchase. teristics are specified on the packaging. - Page 32 EMC DIRECTIVE, 2014/30/EU Terma Sp. z o.o. MANUFACTURER / PRODUCENT / Czaple 100, PL 80-298 Gdańsk, POLAND FABRICANT: MOA (PW, PB, SW) TYPE- MODEL AND VERSION / RODZAJ- MODEL I WERSJA / 120W - 1200W TYPE- MODÈLE ET VERSION: THE PRODUCT COMPLIES WITH FOLLOWING...
Need help?
Do you have a question about the MOA and is the answer not in the manual?
Questions and answers