TERMA MOA BLUE User Manual
Electric heating element
Hide thumbs
Also See for MOA BLUE:
- User manual (141 pages) ,
- User manual (33 pages) ,
- User manual (204 pages)
Table of Contents
Advertisement
Quick Links
User Manual
EN
EN
Electric Heating Element
Electric Heating Element
DE Gebrauchsanweisung – Elektroheizpatrone
DE
Gebrauchsanweisung – Elektroheizpatrone
ES ES Manual de instrucciones – Resistencia eléctrica
Manual de instrucciones – Resistencia eléctrica
FR FR Mode d'emploi – Kit résistance électrique
Mode d'emploi – Kit résistance électrique
IT IT Manuale d'istruzioni – Elemento elettrico riscaldante
Manuale d'istruzioni – Elemento elettrico riscaldante
NL
NL Gebruikershandleiding – Elektrisch verwarmingselement
Gebruikershandleiding – Elektrisch verwarmingselement
PL PL Instrukcja Obsługi – Grzałka elektryczna
Instrukcja Obsługi – Grzałka elektryczna
RU Инструкция по применению – Электронагреватель
RU
Инструкция по применению – Электронагреватель
MOA BLUE
EN DE
ES
FR
IT
NL
PL
RU
Advertisement
Table of Contents

Related Manuals for TERMA MOA BLUE


Summary of Contents for TERMA MOA BLUE
- Page 1 Manuale d'istruzioni – Elemento elettrico riscaldante NL Gebruikershandleiding – Elektrisch verwarmingselement Gebruikershandleiding – Elektrisch verwarmingselement PL PL Instrukcja Obsługi – Grzałka elektryczna Instrukcja Obsługi – Grzałka elektryczna RU Инструкция по применению – Электронагреватель Инструкция по применению – Электронагреватель MOA BLUE EN DE...
- Page 3 User Manual Our products have been designed and manufactured in such a way to ensure that all quality, functionality and aesthetic requirements are met. We would like to congratulate you on the purchase of this great product and wish you a pleasant experience with it.
- Page 4 4. Electric heater is not a toy. Children under the age of 3 should not be al- lowed within close proximity of the device without the supervision of an adult. Children aged 3 to 8 should only be allowed to operate the heater when it has been properly installed and connected.
- Page 5 11. While connecting the radiator to electric installation ensure that the cir- cuit has a 30 mA residual-current circuit breaker and an appropriate over- current circuit breaker. With the permanent installation (cable connec- tion without plug) it is also mandatory to have an omnipolar cut-off for disconnecting the device on all poles, by points of contact with the clear- ance of 3 mm.
- Page 6 Zone 1 Zone 2...
-
Page 7: Electric Heating Element
Electric Heating Element Safety requirements – installation 1. Fitting and connection of the heating element should only be performed by a qualified installer. 2. Connect the unit to a sound electrical installation (see the ratings on the heater). 3. Switching on the heating element in the open air to test the device is per- mitted for a maximum of 3 seconds. - Page 8 9. The pressure in the radiator must not exceed 1 MPa (10 bar). Ensure that an air cushion is preserved in electric radiators. In central heating sys- tems, leave one valve open to prevent pressure build up due to the ther- mal expansion of the liquid.
- Page 9 6. The heating element and radiator can heat up to high temperatures. Please be cautious – avoid direct contact with the hot parts of the equipment. 7. Do not open the heating element casing. 8. When operating the heating element in a radiator connected to a central heating system, always leave one of the valves open.
-
Page 10: Technical Information
Intended use of device The heating element is an electric device Heating element power output should be intended solely for installation in radiators matched with radiator output for parame- (standalone or connected to the central ters of 75/65/20° C. heating system) to serve as space heaters, or clothes and towels dryer. -
Page 11: Installation Or Removal
Installation or removal Detailed information demonstrating the dif- Before installation or first use: ferent ways of installing or removing a radi- ator heating element is available from the 1. Read the chapter Safety requirements manufacturer or importer (see footnotes at –... -
Page 12: Maintenance
8. Follow the subsequent guidelines when 3. Before disassembly, close the appropriate connecting the electrical installation: valves and drain the radiator completely- to avoid causing any damage. a. Brown wire – live connection to the circuit (L). Product disposal b. Blue wire – connect to neutral (N) c. -
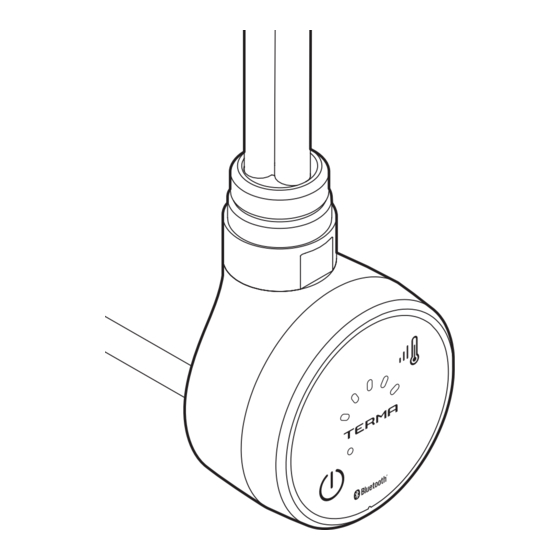
Page 13: Manual Operation
Bluetooth pairing RGB LED – TIMER, schedule and Bluetooth communication indicator On/Off button and TIMER switch MOA Blue electric heating element is The device is equipped with a thermal fuse, equipped with a radiator temperature sensor which in emergency situations protects... - Page 14 Use the key to set the required temper- ature level. It is possible to set 5 tempera- ture levels that correspond to a tempera- ture range of 30 ... 60° C when measuring the internal radiator temperature or a range of 15 ... 30° C when measuring the room temperature.
- Page 15 Remote Control TIMER mode The MOA Blue has a built-in and continu- The control application allows the Timer to ously active Bluetooth Low Energy commu- be set for a period of 1 ... 240 minutes in nication module for remote control of the...
- Page 16 When the schedule is activated, the RGB LED lights up in green. ANTI-FREEZE protection Please go to Manual Operation section. A mes- sage informing about activation of the anti- freeze protection will appear on your mo- bile device screen.
-
Page 17: Troubleshooting
TROUBLESHOOTING Problem Possible cause Solution Device is connected to Check the power wire Power connection electricity, LEDs don’t connection, plug and problem. light up. the socket. Heating element is not Disconnect the device heating, outermost LEDs Temperature sensor completely, wait until the are flashing alternately. -
Page 18: Warranty Terms And Conditions
Warranty terms & conditions 1. The subject of this warranty is a Terma — unqualified persons tampering with electric heating element with control the product, head. The product name and character- — customers after the purchase. istics are specified on the packaging. - Page 19 EN Dual Fuel Radiator DE Kombi-Heizkörper ES Radiador mixto FR Le radiateur de chauffage central avec le thermostat IT Radiatore misto NL Radiator aangesloten op een C.V. installatie, met een elektrisch verwarmingselement PL Grzejnik c.o. z grzałką elektryczną RU Радиатор водно-электрический EN NEVER OPERATE THE HEATING ELEMENT WITH BOTH VALVES CLOSED.
- Page 20 230 V 50 Hz OPEN OPEN OPEN CLOSE OTWÓRZ OTWÓRZ OTWÓRZ ZAMKNIJ...
- Page 21 EN Electric only Radiator DE Elektrischer Heizkörper ES Radiador eléctrico FR Radiateur électrique IT Radiatore elettrico NL Elektrische radiator PL Grzejnik elektryczny RU Электрический радиатор...
- Page 22 230 V 50 Hz 0,5 h...
- Page 23 à Bluetooth SIG, Inc. et toute utilisa- RU Словосочетание и логотипы Bluetooth® являют- tion de ces marques par TERMA Sp. z o.o. est soumise à li- cence. Les autres marques et noms commerciaux sont la ся зарегистрированными товарными знаками, при- propriété...
Need help?
Do you have a question about the MOA BLUE and is the answer not in the manual?
Questions and answers