Furuno FM-8800D Installation Manual
Vhf radiotelephone
Hide thumbs
Also See for FM-8800D:
- Service manual (268 pages) ,
- Operator's manual (137 pages) ,
- Installation manual (69 pages)
Table of Contents
Advertisement
Installation Manual
VHF RADIOTELEPHONE
FM-8800D/8800S
System Configuration .......................................................................................................................... ii
Equipment Lists ................................................................................................................................ iii
1. Mounting .....................................................................................................................................1-1
2. Connections................................................................................................................................2-1
3. Assembling console kit ...............................................................................................................3-1
PACKING LISTS.............................................................................................................................. A-1
Outline Drawings ............................................................................................................................. D-1
Interconnection DiagramS ............................................................................................................... S-1
www.furuno.co.jp
Advertisement
Table of Contents

Related Manuals for Furuno FM-8800D


Summary of Contents for Furuno FM-8800D
-
Page 1: Table Of Contents
Installation Manual VHF RADIOTELEPHONE FM-8800D/8800S System Configuration ... ii Equipment Lists ... iii 1. Mounting ...1-1 2. Connections...2-1 3. Assembling console kit ...3-1 PACKING LISTS... A-1 Outline Drawings ... D-1 Interconnection DiagramS ... S-1 www.furuno.co.jp... - Page 2 Nishinomiya, 662-8580, JAPAN Telephone : +81-(0)798-65-2111 : +81-(0)798-65-4200 All rights reserved. Printed in Japan Pub. No. IME-56420-H (TATA ) FM-8800D/S The paper used in this manual is elemental chlorine free. ・FURUNO Authorized Distributor/Dealer A : SEP H : SEP . 01, 2008...
- Page 3 0.11 m FM-8800S 10 W/m 0.33 m 2 W/m 0.9 m 100 W/m 0.11 m FM-8800D 10 W/m 0.33 m 2 W/m 0.9 m (MPE: Minimum Permissible Exposure) Turn off the power at the mains switch- board before beginning the installation.
-
Page 4: System Configuration
Category of units Unit Antenna Exposed to weather All other units Protected from weather CH 70 RX Antenna Antenna VHF console RC-8800 Transceiver Unit FM-8800D FM-8800S Printer IF+UTP-80FK IF+UTP-58E External Speaker SEM-21Q 24 VDC Category Wing handset 2 sets T/R AF output for VDR... -
Page 5: Equipment Lists
Others FP05-05511 For F-type Microphone DM-2003-F — For A-type Power cable 05S9371, CP05-09901 Remarks D: Duplex FM-8800D S: Simplex DM-8800S N: No printer A: With printer UTP-80FK B: With printer UTP-58E Handset HS-2003 & Handset hanger FP05-05510 HS-2003, FP05-05510, Thermal paper TP058-30CL... -
Page 6: Optional Equipment
EQUIPMENT LISTS Optional Equipment Name Flush Mount Kit OP05-102 Junction Box IF-8810 DMC Interface IF-8820 RB-8800-15 (W/ 1.5 m Cable) RB-8800-20 (W/ 2 m Cable) Remote Station RB-8810-15 (W/ 1.5 m Cable) RB-8810-20 (W/ 2 m Cable) RB-8810-W-15 HS-8800-15 HS-8800-20 HS-8800-W-15 HS-2003-15 Handset... - Page 7 Name AP05-01100 AP05-01200 Antenna Material AP05-01210 05S0309 *10M* 05S0309 *20M* 05S0309 *30M* Signal Cable 05S0309 *40M* 05S0309 *50M* CO-SPEVV-SB-C Twisted Cable 0.2x2P RC-8800-N-75BG VHF Console Kit RC-8800-A-75BG RC-8800-B PP-8800 Printer PP-8800A Emergency lamp EMG-1T Cable 05S9509-L500 Type Code No. 000-054-224 000-054-232 000-054-233 000-106-043...
- Page 8 EQUIPMENT LISTS...
-
Page 9: Mounting
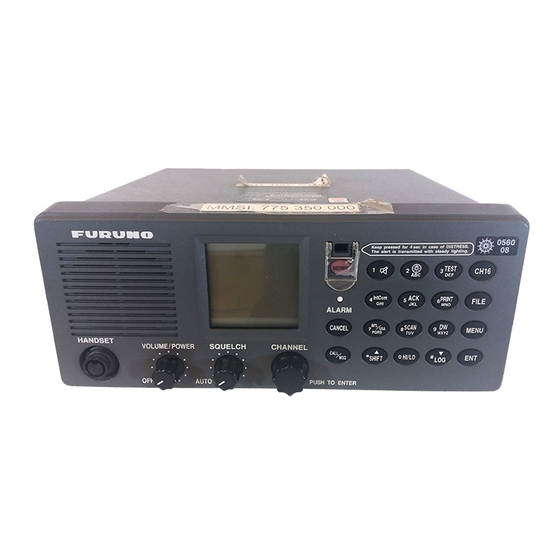
Observe the compass safe distance to prevent deviation of a magnetic compass, referring to page “ i ”. Note: Take great care not to press the DISTRESS switch during the installation. If you accidentally press the switch, immediately turn off the equipment and contact appropriate authority by telephone. - Page 10 1. MOUNTING Overview of mounting methods Keep pressed for 4 s in case of DISTRESS. The alert is transmitted with steady lighting. DISTRESS IntCom INTL CANCEL ALM STOP PQRS CALL SHIFT Overhead Flush Mount TEST CH16 PRINT FILE SCAN MENU WXYZ HI/L0 Keep pressed for 4 s in case of DISTRESS.
- Page 11 Mounting procedure for tabletop, overhead and bulkhead mounting 1. Using the hanger as a template, mark fixing holes in the mounting location. 2. Fix the hanger to the mounting location with self-tapping screws and washers (supplied). (For added support, use nuts, bolts and washers instead of self-tapping screws.) 3.
-
Page 12: Mounting Considerations
The higher the antenna is mounted above the horizon, the further the communications range. Mounting procedure The basic mounting procedure for antennas supplied by FURUNO is as follows, however consult appropriate outline drawing for details. 1. Fasten the antenna bracket to the stanchion. - Page 13 50 cm of the unit. (Longer cables are available optionally.) Power Supply (option) For Convention vessels, both AC and DC power must be fed to the FM-8800D/8800S, via an AC-DC power supply. When AC input fails, DC power is supplied. FURUNO can supply an AC-DC power supply unit, the PR-240.
- Page 14 Printer Interface (option) The printer interface IF-8500 is required for the printer PP-510 which is commonly used with the FM-8800D/S and other MF/HF radio communication equipment. To mount the unit, see the outline drawing at the back of this manual.
- Page 15 Install the junction box near the transceiver unit. Approx. 3 m cable is preattached to the junction box to connect to the transceiver unit. To connect Furuno’s distress message controller DMC-5, the DMC interface IF-8820 (option) is required. 1. Open the cover.
- Page 16 1. MOUNTING Remote station RB-8800/RB-8810 (option) Up to four remote stations can be connected in a daisy chain. Note: For the remote station RB-8800, there are two method of cable entry: bottom-side entry and rear-side entry. For rear-side entry, make one or two holes of more than 12 mm diameter.
- Page 17 Outdoor mounting of waterproof-type remote station RB-8810-W Remote station RB-8810-W (with waterproof-type handset HS-8800-W) can be mounted outdoors if it is set in a waterproof box. The hanger should be coated as directed below with silicone sealant for waterproofing. Note 1: Be sure to use a waterproof box to mount the RB-8810-W outdoors. The waterproofing category of the RB-8810-W is IEC60529 IP56, however this should be protected from the weather (IEC 60945).
- Page 18 1. MOUNTING VHF console Install the rack console where the equipment can be easily operated, checked and serviced. Consult with shipyard personnel and ship's officer-in-charge to determine best location. The location must satisfy the following points: • Select a location where controls can be easily operated. •...
-
Page 19: Connections
Connection of Power Supply Convention vessels, 100/220 VAC ship’s mains Convention vessels must supply both AC and DC power to the FM-8800D/8800S, via an AC-DC power supply unit. Both AC and DC are supplied by the AC-DC power supply unit, and when AC input fails DC power is activated. - Page 20 2. CONNECTIONS Connection of VHF Antenna The VHF antenna is connected to the transceiver unit with a 50 ohm coaxial cable, type 5D-2V. Be sure to leave some slack in the cable for future service and maintenance. Lay the coaxial cable and attach an M-type plug to the cable (if necessary) as follows. 1.
- Page 21 Connection of DSC Antenna The DSC antenna is connected to the transceiver unit with a 50 ohm coaxial cable, type 5D-2V. Attach an M-type plug to the cable (if necessary) as shown an page 2-2. Screw the plug into the CH70 RX ANT connector at the rear of the transceiver unit. Connection of Handset Connect the handset cable to the HANDSET connector on the front panel.
- Page 22 2. CONNECTIONS Connecting the Remote Station without the Junction The remote station (or DMC Interface, Mic. Receptacle box, etc) can be connected directly to the transceiver unit, using the D-sub connector supplied as installation materials. Attach the connector to the cable as follows. Connector XM2A-3701 &...
- Page 23 Connection of AC-DC Power Supply Unit PR-240 The power supply PR-240 is shipped ready for connection to a 200-230 VAC ship’s mains. If the ship’s mains is 100 VAC – 115 VAC, change the tap connection and terminal board connection as below. Attach label supplied as accessories to the punch mark in the front panel according to the ship’s mains.
- Page 24 2. CONNECTIONS Protective earth Connect IV-2.0sq wire between ship’s superstructure and the ground terminal on the PR-240. PR-240 Front panel CAUTION Attach protective earth securely to the ship's body. The protective earth (grounding) is required for the AC/DC power supply unit to prevent electrical shock.
- Page 25 Jumper Setting for Termination Note: DMC interface is not used for Russian version. It is necessary, for termination, to change the jumper setting for remote station or DMC interface. Open the unit(s) terminated and change the jumper plugs J2 and J3 to ON position (#2-#3). (Default setting is OFF position.) Transceiver Junction...
- Page 26 2. CONNECTIONS Set jumper plug to ON (#1-2). 05P0778 RS-485 TERMINATION Remove four screws to open the unit. DMC Interface IF-8820...
- Page 27 2.10 Wire connection of VHF console 1. Remove the cover assembly and printer assembly (or concealing lid) form the console. For the printer assembly, remove the cables connected at the Transceiver Unit and the terminal board. Cover assembly 2. Connect the power cable from the ship to the terminal block 1 (+) and 2 (-). Power cable from the ship 3.
- Page 28 2. CONNECTIONS This page is intentionally left blank. 2-10...
-
Page 29: Assembling Console Kit
ASSEMBLING CONSOLE KIT A VHF console kit is required to mount the Transceiver Unit in the field. There are two types as shown below. Type RC-8800-N-75BG RC-8800-A-75BG Assembling the Console Kit 1. Remove the cover assembly, the panel assembly and the printer assembly (or concealing lid) from the console. - Page 30 2. Fix the panel assembly to the Transceiver Unit with binding screws (use original binding screws of the Transceiver Unit). Refer to the figure below. 3. Screw in hex bolts M8x16 and flat washers loosely at both sides of the Transceiver Unit. 4.
- Page 31 6. Replace the cable attached to junction box with the cable (55 cm, 37-pin D sub) supplied with the console kit. 7. Connect the cable (37-pin D sub) attached to the junction box to the Transceiver Unit and then mount the junction box on the console. ±Binding screw F M4X8 4 places ±Screw B...
- Page 32 Grommets 2 places 8. For the console w/printer, connect the printer cable for data transmission to the PRINTER port of the Transceiver Unit and fix the power cable to the terminal board as before. Then, fix the printer assembly to the console. For no printer, fasten the concealing lid to the console.
- Page 43 A-16...
- Page 44 A-17...
- Page 45 A-18...
- Page 46 A-19...
- Page 50 Y. Hatai...
- Page 53 Y. Hatai...
- Page 54 Y. Hatai...
- Page 56 D-10...
- Page 57 D-11 Feb.02'05...
- Page 58 D-12...
- Page 59 D-13 Nov.28'03...
- Page 60 D-14...
- Page 61 D-15 Dec.19,'06 R.Esumi...
- Page 62 D-16 Y. Hatai...
- Page 63 D-17 Dec.19'06 R.Esumi...
- Page 64 D-18...
- Page 65 D-19 Dec.26'03...
- Page 66 D-20 Dec.26'03...
- Page 67 D-21...
- Page 68 D-22...
-
Page 69: Interconnection Diagrams
TITLE FM-8800D/S T.YAMASAKI May 15 '07 名称 国際VHF無線電話装置 T.TAKENO May 15 '07 相互結線図 May 17'07 R.Esumi MASS NAME VHF RADIOTELEPHONE INTERCONNECTION DIAGRAM C5642-C01- M FURUNO ELECTRIC CO., LTD. リモートステーション REMOTE STATION RB-8800/8810/8810W <No.3/No.4> ハンドセット HANDSET HS-8800/8800W リモートステーション REMOTE STATION RB-8800/8810/8810W... - Page 70 RC-8800D/S-A (FM-8800D/S) T.YAMASAKI Jan. 29 '07 名称 国際VHF無線電話装置(ラック組込) T.TAKENO Jan. 29 '07 相互結線図 Feb.2'07 R.Esumi MASS NAME VHF RADIOTELEPHONE (RACK CONSOLE) INTERCONNECTION DIAGRAM C5642-C02- F FURUNO ELECTRIC CO., LTD. リモートステーション REMOTE STATION RB-8800/8810/8810W <No.3/No.4> ハンドセット HANDSET HS-8800/8800W リモートステーション REMOTE STATION RB-8800/8810/8810W...
- Page 71 RXD-C RXD-C F.GND F.GND ハンドセット HANDSET HS-6000FZ-11 HS-6000FZ-5 Wing Mic TITLE FM-8800D/S T.YAMASAKI May 15 '07 名称 国際VHF無線電話装置(接続箱なし) T.TAKENO May 15 '07 相互結線図 May 17'07R.Esumi MASS NAME VHF RADIOTELEPHONE (W/O JUNCTION BOX) INTERCONNECTION DIAGRAM C5642-C03- E FURUNO ELECTRIC CO., LTD.
- Page 72 RXD-C RXD-C F.GND F.GND TITLE RC-8800D/S-B (FM-8800D/S) T.YAMASAKI 名称 国際VHF無線電話装置(ラック組込) T.TAKENO 相互結線図 Feb.2'07 R.Esumi MASS NAME VHF RADIOTELEPHONE (RACK CONSOLE) INTERCONNECTION DIAGRAM C5642-C04- A FURUNO ELECTRIC CO., LTD. リモートステーション REMOTE STATION RB-8800/8810/8810W <No.3/No.4> ハンドセット HANDSET HS-8800/8800W リモートステーション REMOTE STATION RB-8800/8810/8810W...
Need help?
Do you have a question about the FM-8800D and is the answer not in the manual?
Questions and answers