
Related Manuals for INVENTOR M3GHP290-12


Summary of Contents for INVENTOR M3GHP290-12
- Page 1 AIR CONDITIONING SYSTEMS REMOTE CONTROLLER • USER’S MANUAL • ΕΓΧΕΙΡΙΔΙΟ ΧΡΗΣΗΣ • MANUAL UTILIZATORULUI MODELS: M3GHP290-12 M3GHP290-12BS ENGLISH | ΕΛΛΗΝΙΚΑ | ROMANA...
-
Page 4: Table Of Contents
CONTENTS Handling the remote controller ............Remote controller Specifications........... Function buttons ................Indicators on LCD ................How to use the buttons ..............Auto operation................. Cooling/Heating/Fan operation............Dehumidifying operation ............... Swing operation................Timer operation................ECONOMY operation .............. -
Page 5: Handling The Remote Controller
Handling the remote controller Location of the remote controller. Use the remote controller within a distance of 8 meters from the appliance, pointing it towards the receiver. Reception is confirmed by a beep. CAUTIONS The air conditioner will not operate if curtains, doors or other materials block the signals from the remote controller to the indoor unit. -
Page 6: Remote Controller Specifications
CAUTIONS Do not mix old and new batteries or batteries of a different type. Do not leave the batteries in the remote controller if it is not going to be used for 2 or 3 months. Dispose of the old batteries in the special containers to be found in the sales outlets. -
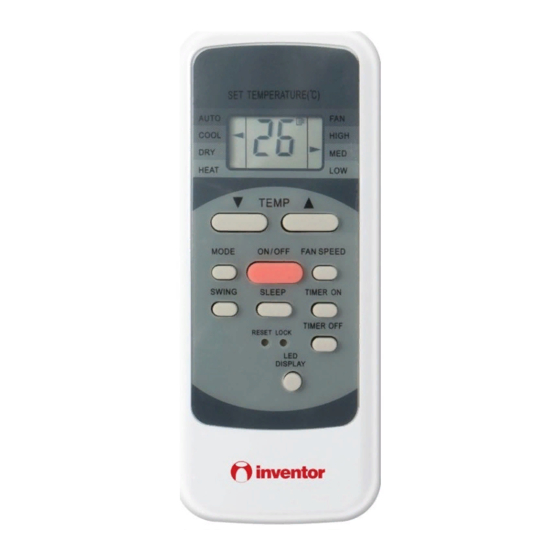
Page 7: Function Buttons
Function buttons TEMP DOWN Button Push this button to decrease the indoor temper- ature setting in 1 C(2 F) increments to 17 C(62 F). TEMP UP Button Push this button to increase the indoor temper- ature setting in 1 C(2 F) increments to 30 C(88 F). ON/OFF Button Operation starts when this button is pressed and stops when the button is pressed again. - Page 8 Function buttons(continued) SHORT CUT Button: Push this button to set and activate your favorite pre-settings. TIMER OFF Button Press this button to activate the Auto-off time setting. Each press will increase the time setting in 30 minutes increments, up to 10 hours, then at 1 hour increments up to 24 hours.
-
Page 9: Indicators On Lcd
Remote Screen Indicators Information are displayed when the remote controller is power up. Mode display COOL AUTO HEAT AUTO (some units) Displayed when data transmitted. COOL HIGH Displayed when remote controller is ON. HEAT Displayed when TIMER ON time is set Displayed when TIMER OFF time is set Shows set temperature or room temperature, or time under TIMER setting... -
Page 10: How To Use The Buttons
How to use the buttons Auto operation Ensure the unit is plugged in and power is available. The OPERATION indicator on the display panel of the indoor unit illuminates. 1. Press the MODE button to select Auto. 2. Press the TEMP button to set the desired temperature. -
Page 11: Dehumidifying Operation
Dehumidifying operation Ensure the unit is plugged in and power is available. The OPERATION indicator on the display panel of the indoor unit illuminates. 1. Press the MODE button to select DRY mode. 2. Press the TEMP button to set the desired temperature. -
Page 12: Timer Operation
Timer operation press the TIMER ON button can set the auto-on time of the unit. And press the TIMER OFF button can set the auto-off time of the unit. To set the Auto-on time. 1. Press the TIMER ON button. The remote controller shows TIMER ON, the last Auto-on setting time and the signal "h"... - Page 13 IMPORTANT The effective operation time set by the remote controller for the timer function is limited to the following settings: 0.5, 1.0, 1.5, 2.0, 2.5, 3.0, 3.5, 4.0, 4.5, 5.0, 5.5, 6.0, 6.5, 7.0, 7.5, 8.0, 8.5, 9.0, 9.5, 10, 11, 12, 13, 14, 15,16,17, 18, 19, 20, 21, 22, 23 and 24.
- Page 14 TIMER OFF (Auto-off Operation) The TIMER OFF feature is useful when you want TIMER OFF the unit to turn off automatically after you go to bed. The air conditioner will stop automatically at the set time. Example: Stop To stop the air conditioner in 10 hours. 1.
-
Page 15: Economy Operation
TIMER ON TIMER OFF (Off Start Stop operation) This feature is useful when you want to start TIMER ON OFF the air conditioner before you wake up and stop it after you leave the house. Example: To start the air conditioner 2 hours after setting, and stop it 5 hours after setting. - Page 16 I SENSE operation: The I SENSE operation enables the remote control to measure the temperature at its current location and send this signal to the air conditioner every 3 minutes interval. NOTE: Press this button for seven seconds to start/ stop memory feature of I SENSE function.
- Page 17 NOTE: -Buttons design is based on typical model and might be slightly different from the actual one you purchased, the actual shape shall prevail. -All the functions described are accomplished by the unit, if the unit has no this feature, there is no corresponding operation happened when press the relative button on the remote controller.
- Page 18 ΠΕΡΙΕΧΟΜΕΝΑ Χειρισµός του τηλεχειριστηρίου .................19 Χειρισµός του τηλεχειριστηρίου............2 Προδιαγραφές του τηλεχειριστηρίου..............20 Λειτουργίες των πλήκτρων.................21 Προδιαγραφές του τηλεχειριστηρίου............3 Ενδείξεις στην οθόνη LCD ...................23 Λειτουργίες των πλήκτρων..............4 Η χρήση των πλήκτρων ..................24 Ενδείξεις στην οθόνη LCD..............6 Αυτόµατη λειτουργία ...................24 Η χρήση των πλήκτρων.................7 Ψύξη/Θέρµανση/ Λειτουργία...
- Page 19 Χειρισµός του τηλεχειριστηρίου Η θέση του τηλεχειριστηρίου. Χρησιµοποιήστε το τηλεχειριστήριο σε απόσταση εντός 8 µέτρων από τη συσκευή, κατευθύνοντας το προς το δέκτη της συσκευής. Η λήψη εντολής επιβεβαιώνεται µε ηχήτική ειδοποίηση. ΠΡΟΣΟΧΗ • Το κλιµατιστικό δεν θα λειτουργήσει εάν το σήµα από το τηλεχειριστήριο...
- Page 20 ΠΡΟΣΟΧΗ • Μην χρησηµοποιείτε νέες µπαταρίες µαζί µε παλιές ή µε µπαταρίες άλλου τύπου. Μην αφήνετε τις µπαταρίες στο τηλεχειριστήριο εάν δεν πρόκειται να το χρησιµοποιήσετε για 2-3 µήνες. • Απορρίψτε τις παλίες µπαταρίες στους ειδικούς κάδους που βρίσκονται στα περισσότερα καταστήµατα ηλεκτρικών ειδών. Προδιαγραφές...
- Page 21 1. Πλήκτρο Temp UP Πιέστε αυτό το πλήκτρο για να αυξήσετε τη θερµοκρασία κατά 1°C έως τους 30°C. 2. Πλήκτρο Temp DOWN Πιέστε αυτό το πλήκτρο για να µειώσετε τη θερµοκρασία κατά 1°C έως τους 17°C. 3. Πλήκτρο ON/OFF Όταν πιέσετε αυτό το πλήκτρο ενεργοποιείται ή απενεργοποιείται...
- Page 22 9. SHORT CUT Button: Πιέστε απο το πλήκτρο για να ρυθµίσετε και να ενεργοποιήσετε τις αγαπηµένες σας λειτουργίες. 10. Πλήκτρο TIMER OFF Πιέζοντας το πλήκτρο αυτό ενεργοποιείται η λειτουργία αυτόµατης απενεργοποίησης της συσκευής µε τον χρονοδιακόπτη. Κάθε πάτηµα του πλήκτρου αυξάνει τον χρόνο...
- Page 23 ΕΝΔΕΙΞΕΙΣ ΣΤΗΝ ΟΘΟΝΗ Οι παρακάτω πληροφορίες θα εµφανίζονται στο τηλεχειριστήριο όταν είναι ενεργοποιηµένο. ΕΝΔΕΙΞΗ ΛΕΙΤΟΥΡΓΙΑΣ COOL AUTO AUTO HEAT (σε ορισµένα µοντέλα) (some units) COOL Εµφανίζεται όταν πραγµατοποιείται HIGH µετάδοση δεδοµένων. Εµφανίζεται όταν το τηλεχειριστήριο είναι ενεργοποιηµένο. HEAT Εµφανίζεται όταν η ρύθµιση του χρονοδια- κόπτη...
- Page 24 Η ΧΡΗΣΗ ΤΩΝ ΠΛΗΚΤΡΩΝ ΑΥΤΟΜΑΤΗ ΛΕΙΤΟΥΡΓΙΑ Βεβαιωθείτε ότι η µονάδα είναι συνδεδεµένη στη πρίζα και ότι η πρίζα είναι ενεργή. Θα ανάβει η ένδειξη λειτουργίας στην εσωτερική µονάδα. 1. Πιέστε το πλήκτρο MODE για να επιλέξετε την αυτόµατη λειτουργία. 2. Πιέστε το πλήκτρο TEMP για να επιλέξετε την επιθυµητή...
- Page 25 Η ΧΡΗΣΗ ΤΩΝ ΠΛΗΚΤΡΩΝ ΛΕΙΤΟΥΡΓΙΑ ΑΦΥΓΡΑΝΣΗΣ Βεβαιωθείτε ότι η µονάδα είναι συνδεδεµένη στη πρίζα και ότι η πρίζα είναι ενεργή. Θα ανάβει η ένδειξη λειτουργίας στην εσωτερική µονάδα. 1. Πιέστε το πλήκτρο MODE για να επιλέξετε την λειτουργία αφύγρανσης. 2. Πιέστε το πλήκτρο TEMP για να επιλέξετε την επιθυµητή...
- Page 26 Η ΧΡΗΣΗ ΤΩΝ ΠΛΗΚΤΡΩΝ ΛΕΙΤΟΥΡΓΙΑ ΧΡΟΝΟ∆ΙΑΚΟΠΤΗ Πιέστε το πλήκτρο TIMER ON για να ρυθµίσετε τον χρόνο αυτόµατης ενεργοποίησης. Και πιέστε το πλήκτρο TIMER OFF για να ρυθµίσετε τον χρόνο αυτόµατης απενεργοποίησης της µονάδας. Για να ρυθµίσετε τον χρόνο αυτόµατης ενεργοποίησης. 1.
- Page 27 ΠΡΟΣΟΧΗ Η λειτουργία ορισµού του χρόνου του χρονοδιακόπτη περιορίζεται στις ακόλουθες: 0.5, 1.0, 1.5, 2.0, 2.5, 3.0, 3.5, 4.0, 4.5, 5.0, 5.5, 6.0, 6.5, 7.0, 7.5, 8.0, 8.5, 9.0, 9.5, 10, 11, 12, 13, 14, 15, 16, 17, 18, 19, 20, 21, 22, 23 και...
- Page 28 ΕΝΕΡΓΟΠΟΙΗΣΗ ΤΟΥ ΧΡΟΝΟ∆ΙΑΚΟΠΤΗ (Αυτόµατη απενεργοποίηση) Η λειτουργία αυτόµατης απενεργοποίησης είναι πολύ χρήσιµη όταν θέλετε να απενεργοποιηθεί η µονάδα αφού έχετε κοιµηθεί. Το κλιµατιστικό θα απενεργοποιηθεί αυτόµατα την προγραµµατισµένη ώρα. Παράδειγµα: Απενεργοποίηση του κλιµατιστικού σε 10 ώρες. 1. Πιέστε το πλήκτρο TIMER OFF , η τελευταία ρύθµιση...
- Page 29 (Ενεργοποιηµένο Απενεργοποίηση Εκκίνηση) Αυτή η λειτουργία είναι χρήσιµη όταν θέλετε εκκινήσετε το κλιµατιστικό πρίν ξυπνήσετε και να σταµατήσει αφού έχετε φύγει από το σπίτι. TIMER ON OFF Παράδειγµα: Για να ενεργοποιείσετε το κλιµατιστικό µετά από 2 ώρες και να το απενεργοποιείσετε µετά από 5 ώρες...
- Page 30 I SENSE λειτουργία: Η λειτουργία I SENSE επιτρέπει στο τηλεχειριστήριο να μετράει τη θερμοκρασία στην τρέχουσα θέση του και να στέλνει αυτό το σήμα στο κλιματιστικό κάθε μεσοδιάστημα 3 λεπτών. ΣΗΜΕΙΩΣΗ: Πατήστε αυτό το πλήκτρο για 7 δευτερόλεπτα για έναρξη/διακοπή της λειτουργίας μνήμης της λειτουργίας I SENSE.
- Page 31 ΣΗΜΕΙΩΣΗ: - Ο σχεδιασµός των πλήκτρων βασίζεται σε τυπικό µοντέλο που µπορεί να διαφέρει ελαφρώς από το πραγµατικό που αγοράσατε. Υπερισχύει το πραγµατικό µοντέλο. - Όλες οι λειτουργίες που περιγράφονται συνοδεύονται µε τη µονάδα, αν η µονάδα δεν έχει κάποια λειτουργία δεν θα υπάρχει και η αντίστοιχη λειτουργία όταν πατάτε το σχετικό πλήκτρο...
- Page 32 CUPRINS Manevrarea telecomenzii ...................33 Manevrarea telecomenzii ....................2 Specificații Telecomandă ....................3 Specificaţii Telecomandă ..................34 Funcționalitatea butoanelor ..................4 Indicatorii de pe ecranul LCD ..................6 Funcţionalitatea butoanelor ................35 Modul de utilizare al butoanelor ................... 7 Indicatorii de pe ecranul LCD ................37 Funcționarea automată...
-
Page 33: Manevrarea Telecomenzii
Manevrarea telecomenzii Loca ia telecomenzii Utiliza i telecomanda la o distan ă de 8 • metri de aparat, îndreptată către receptor. Primirea semnalului este confirmată de un sunet de bip. ATEN IE Aparatul de aer condi ionat nu va func iona dacă perdele, •... -
Page 34: Specificații Telecomandă
ATEN IE • Nu amesteca i bateriile vechi cu cele noi sau bateriile de diferite feluri. • Nu l sa i bateriile în telecomand dac nu urmeaz a fi utilizate pentru 2 sau 3 luni. • Nu arunca i bateriile ca i gunoi menajer. Colectarea unor astfel de de euri se face separat deoarece este necesar aplicarea unui tratament special. -
Page 35: Funcționalitatea Butoanelor
Func ionalitatea butoanelor 1) Butonul de CRE TERE TEMPERATUR Ap sa i acest buton pentru a sc dea temperatura interioar cu intervale de câte 1°C (2°F) pân la 17°C (62°F). 2) Butonul de SC DERE TEMPERATUR (TEMP DOWN) Ap sa i acest buton pentru a cre te temperatura interioar cu intervale de câte 1°C (2°F) pân la 30°C (88°F). - Page 36 9) SHORT CUT Button: Apasati tasta pentru a seta si a activa functiile preferate. 10) Butonul OPRIRE TEMPORIZATOR (TIMER OFF) Ap sa i acest buton pentru a ini ia secven a automat de temporizare oprire. Fiecare ap sare va cre te setarea timpului automat cu intervale de 30 de minute pân la 10 ore, dup care la intervale de 1 or pân la 24 ore.
-
Page 37: Indicatorii De Pe Ecranul Lcd
Indicatorii de pe ecranul LCD Urmatoarele informatii vor fi afisate pe telecomanda cand aceasta este pornita. AFISARE MODUL COOL AUTO (la unele modele) AUTO HEAT (some units) Apare atunci cAnd datele sunt transmise. COOL HIGH Apare cand telecomanda este pornita HEAT Apare cand setarea temporizatorului TIMER ON este activata... -
Page 38: Modul De Utilizare Al Butoanelor
Modul de utilizare al butoanelor Func ionarea automat Asigura i-v c aparatul este b gat în priz i alimentat cu energie. Indicatorul de FUNC IONARE de pe panoul de afi aj al unit ii interioare începe s se aprind intermitent. 1. -
Page 39: Operațiunea De Dezumidificare
Opera iunea de dezumidificare Asigura i-v aparatul este în priz i are alimentare cu energie. Indicatorul de func ionare de pe panoul de afi aj al unit ii interioare începe s se aprind intermitent. Ap sa i butonul MODE pentru alege modulul DEZUMIDIFICARE. -
Page 40: Funcționarea Temporizatorului
Func ionarea temporizatorului Ap sa i butonul pornire temporizator (TIMER ON) pentru a seta timpul automat de pornire a aparatului. Ap sa i butonul o prire temporizator (TIMER OFF) pentru a seta timpul automat de oprire a aparatului. Pentru a seta pornirea automat a temporizatorului 1. - Page 41 IMPORTANT Timpul efectiv de func ionare setat de telecomand pentru func ia de temporizare este limitat la • urm toarele set ri:0.5, 1.0, 1.5, 2.0, 2.5, 3.0, 3.5, 4.0, 4.5, 5.0, 5.5, 6.0, 6.5, 7.0, 7.5, 8.0, 8.5, 9.0, 9.5, 10, 11, 12, 13, 14, 15,16,17, 18, 19, 20, 21, 22, 23 i 24. Exemple de setare temporizator PORNIRE TEMPORIZATOR (TIMER ON) (Func ionare automat pornit )
- Page 42 OPRIRE TEMPORIZATOR (TIMER OFF) (Func ionare automat oprit ) Func ia OPRIRE TEMPORIZATOR (TIMER OFF) este util atunci când dori i ca aparatul s se opreasc automat dup ce merge i la culcare. Aparatul de aer condi ionat se va opri automat la ora setat .
- Page 43 TEMPORIZATOR PORNIRE – TEMPORIZATOR OPRIRE (TIMER ON - TIMER OFF_ (Oprire - Pornire - Începere func ionare) TIMER ON OFF Aceast func ie este util atunci când dori i s porneasc aparatul de aer condi ionat înainte s trezi i opreasc dup ce pleca i de acas .
- Page 44 I SENSE operatiunea: Funcționarea I SENSE permite telecomenzii sa masoare temperatura in locatia sa actuala si sa trimita acest semnal catre aparatul de aer conditionat la inter- val de 3 minute. NOTA: Apasati acest buton timp de sapte secunde pentru a porni/opri functia de memorie a funcției I SENSE.
- Page 45 NOT : Proiectarea butoanelor este bazat pe modelul tipic i poate fi u or diferit de cea a butoanelor aparatului dvs. forma real va fi cea care va prevala. Toate func iile descrise sunt îndeplinite de acest aparat, dac aparatul nu are aceast func ie, nu exist nici o opera iune corespunz toare ap s rii butonului respectiv de pe telecomand .
- Page 46 Toate imaginile din acest manual, au scop pur informativ. Forma reala a produsului pe care l-ati cumparat poate fi usor diferita insa functiile si operatiile sunt aceleasi. Compania nu isi asuma nici o responsabilitate pentru greselile de tipar. Aspectul fizic si specificatiile tehnice se pot schimba fara o notificare prealabila datorita imbunatatirii continue a echipamentelor noastre.
- Page 48 AIR CONDITIONING SYSTEMS REMOTE CONTROLLER V:1.0.122021 INVENTOR A.G. S.A. Manufacturer: 24th km National Road Athens - Lamia & 2 Thoukididou Str., Ag.Stefanos, 14565 Tel.: +30 211 300 3300, Fax: +30 211 300 3333 - www.inventor.ac...
Need help?
Do you have a question about the M3GHP290-12 and is the answer not in the manual?
Questions and answers