ProActiv NJ1 Usage Instructions
Hide thumbs
Also See for NJ1:
- Usage instructions (48 pages) ,
- Operating instructions manual (40 pages) ,
- Operating instructions service booklet (36 pages)

Related Manuals for ProActiv NJ1


Summary of Contents for ProActiv NJ1
- Page 1 Usage instructions for NJ1 adaptive bike Usage instructions Service booklet NJ1 adaptive bike...
-
Page 2: Table Of Contents
Usage instructions for NJ1 adaptive bike Contents 1 Preface ............................... 3 2 Legend ..............................3 3 Conformity/other information ......................3 3.1 Classification ..........................3 3.2 Conformity........................... 3 3.3 Manufacturer ..........................3 4 Scope of delivery and testing the product on receipt ................. 3 5 Introduction ............................ - Page 3 The following instructions are intended for and may only be carried out by the rehabilitation specialist dealer or PRO ACTIV. This document is available in PDF format at www.proactiv-gmbh.com for visually impaired people. Using the zoom function, the font can be increased as desired.
-
Page 4: Preface
Classification Dear Customer, Congratulations on purchasing your new The NJ1 adaptive bike (referred to as a "prod- PRO ACTIV product. You have bought a quali- uct" below) is classified as a class I product. ty product that has been specially customised Conformity to meet your requirements. -
Page 5: Introduction
Usage instructions for NJ1 adaptive bike However, please check the product immediate- It is then vital that the advice from doc- ly upon receipt, preferably in the presence of tors, therapists and the rehabilitation specialist the freight company, for any damage which dealer on the necessary safety accessories may have occurred in transit. -
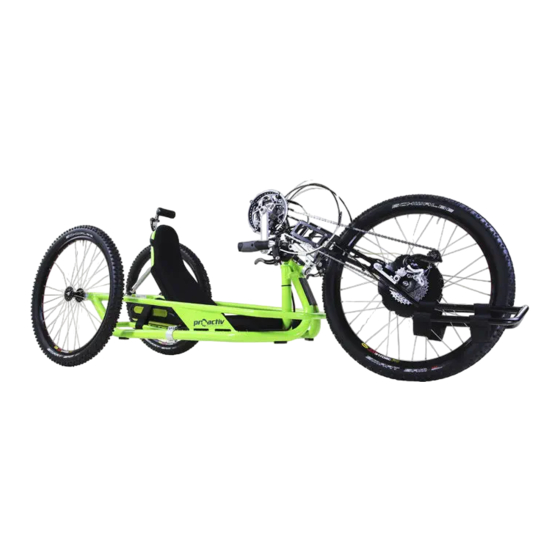
Page 6: Purpose And Indication
Usage instructions for NJ1 adaptive bike Purpose and indication Proper use This product is a manual adaptive bike that is This adaptive bike is designed to be used out- coupled to a human-powered wheelchair with doors on tarmac and adequately paved roads... -
Page 7: Technical Specifications
Usage instructions for NJ1 adaptive bike Obstacle height and turning circle Maximum drive-over/negotiable obstacle height: 10 cm (must be ensured through an appropriate adapter assembly/setting, caster wheels must be removed ( recommended equipment of the wheelchair: caster forks with quick-release axle)) -
Page 8: Rating Plate & Markings On The Product
Usage instructions for NJ1 adaptive bike Rating plate & markings on the the usage instructions and, if necessary, fur- ther accessories for your own use. It is rec- product ommended that you take along an assistant to The rating plate is located on the bottom the training so that, if required, they can assist you later when handling the product. -
Page 9: Safety Instructions - While Driving/Using
Usage instructions for NJ1 adaptive bike Before every trip, check the condition of To minimise the risk of suffering serious the wheels of the wheelchair-product combina- head injuries in the event of a fall, a helmet tion (e.g. visual inspection of the spokes and... - Page 10 Usage instructions for NJ1 adaptive bike controlled by steering and braking of the prod- By performing regular checks, ensure that uct. the safety bolts of the adapter are always in the correct position while driving (see usage Do not stop on a steep slope, otherwise instructions "Adapter and adaptation").
-
Page 11: Safety Instructions Regarding Obstacles
Usage instructions for NJ1 adaptive bike 14 Safety instructions regarding narrow and/or steeply sloping paths along main roads or near cliffs. obstacles routes that are covered in leaves, snow or Driving on steps and escalators with the ice. -
Page 12: Ending The Driving Operation
Usage instructions for NJ1 adaptive bike 16 Ending the driving operation Valve with cap To make getting out of the wheelchair more simple, the product can be disconnected from the wheelchair (see usage instructions "Adapt- er and adaptation"). 17 Adapter and adaptation... -
Page 13: Functional Elements
Usage instructions for NJ1 adaptive bike Clamp lever Valve adapter Figure 5: Valve adapter and clamp lever of the compressor 19 Functional elements Figure 7: Parking stand in the active position 19.1 Parking stand 19.1.1 Active and passive positions By pressing down and turning the operating... -
Page 14: Bottom Bracket Support And Crank
Usage instructions for NJ1 adaptive bike the insertion maul (on the wheelchair side) The height of the parking stand is adjusted should correspond with the dimension from the by unscrewing the M6 oval head screw (AF ground to the upper edge of the insertion bolt 4 mm) with the radius disc and repositioning (on the product side). -
Page 15: Bottom Bracket Position
Usage instructions for NJ1 adaptive bike bottom bracket in this case is selected to be The bottom bracket support can be exchanged slightly higher (chest height or higher). by loosening the four M6 fixing screws (AF 5 mm) on the tip fork bridge and the four M6... -
Page 16: Crank Length And Grip Width
Usage instructions for NJ1 adaptive bike (AF 5 mm) to 7 Nm torque and secure M6 clamp screws on the them with thread lock fluid. bottom bracket support (height adjustment +/- M6 clamp screws on 25 mm) the bottom bracket... -
Page 17: Grips
Usage instructions for NJ1 adaptive bike 19.3 Grips 19.4 Gear shift The grips must be held firmly with both hands 19.4.1 Derailleur whilst driving and always held so that the ca- With the derailleur, the gears can only be bles and lines are oriented upwards. -
Page 18: Hub Gear
Usage instructions for NJ1 adaptive bike In electronic Di2 gearshift, you can shift up or For more information on derailleur gear sys- down by pressing the button. tems, please see the instructions provided by the gear manufacturer. Di2 button for gear 19.4.2 Hub gear... - Page 19 Usage instructions for NJ1 adaptive bike "Thumb shifter" – operation by pressing in the direction of travel with the thumb Small button on the right / Shift up “Index finger shifter” – operation by pulling in the opposite direction of travel with the...
-
Page 20: Bottom Bracket Gearshift
Usage instructions for NJ1 adaptive bike 19.4.3 Bottom bracket gearshift 1. Open the flap The bottom bracket gearshift ("Mountaindrive" gear reduction for hills) is switched on by 2. Press the pressing the control buttons on the left and push button right of the bottom bracket. -
Page 21: Brakes
Usage instructions for NJ1 adaptive bike 19.5 Brakes addition, check the thickness of the brake disc. The minimum thickness is printed on the brake Normally there is one disc and one rim brake disc. In addition, the brake pad thickness must fitted to the product. -
Page 22: Pro Activ Back-Pedalling Brake & Crank Release Function
Usage instructions for NJ1 adaptive bike The braking function via the backward move- ment (crank movement against the direction of acceleration) is always guaranteed – with the crank release function activated or deactivated. The braking force applied is adjusted by the strength of rotating the cranks backwards. -
Page 23: Lights
Usage instructions for NJ1 adaptive bike At regular intervals, check that all of the connections, lines, bleed screws and the sur- face of the transmitter unit do not leak and that all the screw connections on the brake system are tightened securely. -
Page 24: Storage
Usage instructions for NJ1 adaptive bike Rohloff components: 21 Transport www.rohloff.de/en/ 21.1 Securing handling of the product Mountain Drive bottom bracket gearshift: When loading or transporting, the product can www.haberstock- be held on the bottom bracket support and on mobility.com/index.php/home-en.html the wheel. -
Page 25: Malfunctions
Usage instructions for NJ1 adaptive bike 3. Objects that are installed to the product, To avoid corrosion and therefore malfunctions but do not belong to the product, must be or breakages of components, the product may removed and securely stowed. -
Page 26: Service Schedules
Usage instructions for NJ1 adaptive bike For tyres without thread: As soon as there If you should discover any problems dur- is one or more points where the tyre carcass or ing these checks, please immediately contact the accident protection is visible on the product... -
Page 27: Proof Of Maintenance
Usage instructions for NJ1 adaptive bike 24.3 Proof of maintenance 26 Re-use To provide proof of the maintenance, you can If your product has been provided to you by use the inspection lists in chapter 32. Always your funding provider and you no longer re-... -
Page 28: Warranty
Usage instructions for NJ1 adaptive bike 27 Warranty 28 Liability PRO ACTIV guarantees that the product was As the manufacturer of the product, free of any defects at the time it was handed PRO ACTIV is not responsible for its safety if: over. -
Page 29: Appendix: Tightening Torques And Securing Details
Usage instructions for NJ1 adaptive bike 29 Appendix: Tightening torques and securing details The following table shows the torques for shaft screws with a metric control thread (valid providing the drawing, assembly, or usage instructions do not state different values!):... -
Page 30: Appendix: Medical Product Passport/Record Of Training
Usage instructions for NJ1 adaptive bike 30 Appendix: Medical product passport/record of training Product specifications: Serial number: Customer data: Surname, forename: Street: Postcode, city: Phone: Paying organisation: Training carried out by: Rehabilitation specialist dealer PRO ACTIV Field Representative/ Product Adviser... -
Page 31: Appendix: Hand-Over Certificate
Usage instructions for NJ1 adaptive bike 31 Appendix: Hand-over certificate 31.1 Required compliance criteria to authorise use Completed/ Topics Remarks fulfilled The product is suitable for the customer based on their own judgement and the customer information received regarding the disability-related restrictions. -
Page 32: Check List For Training The User
Usage instructions for NJ1 adaptive bike 31.2 Check list for training the user Completed/ Topics fulfilled Advised of the applicable legal regulations when driving on public roads. All mechanical function control elements were explained and their function demonstrated. Adaptation of the adapter to the wheelchair and removing the adapter from the wheelchair have been demonstrated and then performed by the user themselves and/or an assistant. -
Page 33: Appendix: Inspection Lists
Usage instructions for NJ1 adaptive bike 32 Appendix: Inspection lists Initial inspection: After 200 km or 5 months Serial number: ______________________ not OK resolved carried out Kilometre reading: ________________________ Check that all screws/fastening elements are firmly seated Functional and safety check of all lights (if fitted), steering and adapta-... - Page 34 Usage instructions for NJ1 adaptive bike Subsequent inspection: After another 1000 km or 1 year after the last inspection or after heavy OK / Serial number: ______________________ carried not OK resolved Kilometre reading: ________________________ Check that all screws/fastening elements are firmly seated and replace, if...
- Page 35 Usage instructions for NJ1 adaptive bike Subsequent inspection: After another 1000 km or 1 year after the last inspection or after heavy OK / Serial number: ______________________ carried not OK resolved Kilometre reading: ________________________ Check that all screws/fastening elements are firmly seated and replace, if...
- Page 36 Usage instructions for NJ1 adaptive bike Subsequent inspection: After another 1000 km or 1 year after the last inspection or after heavy OK / Serial number: ______________________ carried not OK resolved Kilometre reading: ________________________ Check that all screws/fastening elements are firmly seated and replace, if...
- Page 37 Usage instructions for NJ1 adaptive bike Subsequent inspection: After another 1000 km or 1 year after the last inspection or after heavy OK / Serial number: ______________________ carried not OK resolved Kilometre reading: ________________________ Check that all screws/fastening elements are firmly seated and replace, if...
- Page 38 Usage instructions for NJ1 adaptive bike Subsequent inspection: After another 1000 km or 1 year after the last inspection or after heavy OK / Serial number: ______________________ carried not OK resolved Kilometre reading: ________________________ Check that all screws/fastening elements are firmly seated and replace, if...
- Page 39 Usage instructions for NJ1 adaptive bike Subsequent inspection: After another 1000 km or 1 year after the last inspection or after heavy OK / Serial number: ______________________ carried not OK resolved Kilometre reading: ________________________ Check that all screws/fastening elements are firmly seated and replace, if...
- Page 40 Usage instructions for NJ1 adaptive bike Your rehabilitation specialist dealer: PRO ACTIV Reha-Technik GmbH Im Hofstätt 11 D-72359 Dotternhausen – Germany Phone +49 7427 9480-0 Fax +49 7427 9480-7025 Email: info@proactiv-gmbh.de www.proactiv-gmbh.com...
Need help?
Do you have a question about the NJ1 and is the answer not in the manual?
Questions and answers