Table of Contents
Advertisement
Quick Links
Advertisement
Table of Contents

Subscribe to Our Youtube Channel
Related Manuals for Raidon SAFETank Series


Summary of Contents for Raidon SAFETank Series
- Page 1 SafeTANK GR5640 User Manual...
-
Page 2: Table Of Contents
GR5640 User Manual » SafeTANK GR5640 User Manual .......1 1. Environmental Requirements ..................1 2. Package Contents and Product Views ..............1 3. Hardware Requirements and Precautions ..............3 4. Hardware Installation Procedure ................4 5. Description of Front Panel Operation and LCD Information ........5 6. -
Page 3: Safetank Gr5640 User Manual
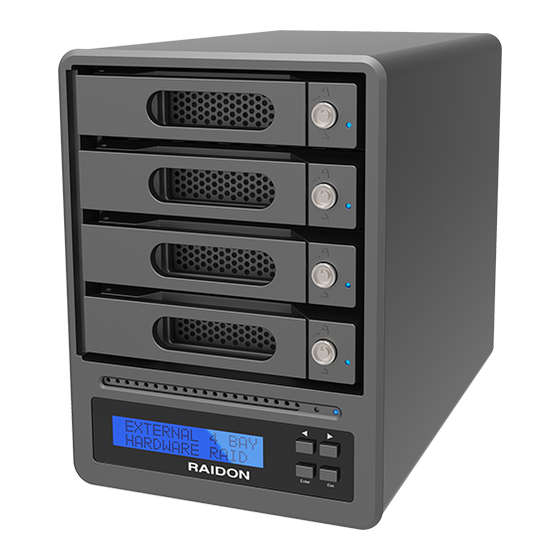
» SafeTANK GR5640 User Manual Introduction Thank you for choosing the RAIDON product. This manual will familiarize you with the RAIDON GR5640 product. We recommend reading through this manual before using the RAIDON GR5640 product. The information provided in this manual was checked before publication, but the actual product specifications may have changed before shipping;... - Page 4 GR5640 User Manual Product View Front View A. HDD access light B. HDD enclosure handle C. HDD tray key lock D. LCM display E. System status light F. Power status light G. UP button H. DOWN button I. ENTER button J.
-
Page 5: Hardware Requirements And Precautions
SBA31 unit on a regular basis or whenever the user feels necessary to a remote or a separate storage device. RAIDON will not be responsible for any lost of data caused during the use of the unit or the recovery of the data lost. -
Page 6: Hardware Installation Procedure
GR5640 User Manual 4. Hardware Installation Procedure Please follow the instructions below to complete the hardware installation. 1. Place the system on a stable surface. Ensure that it is well ventilated without blockage to the vent and kept away from areas near water and damage prone areas. 2. -
Page 7: Description Of Front Panel Operation And Lcd Information
GR5640 User Manual 5. Description of Front Panel Operation and LCD Information Front Panel Operation: Enter: Enter to next level or Confirm Esc: Back to next level or Cancel Up / Down : Select Items • Users can set the RAID mode using the LCM and buttons on the front. The default is JBOD mode. With the “Quick Setup”... - Page 8 GR5640 User Manual The following is the display status set for the first time: Level 0 Level 1 EXTERNAL 4 BAY ═ ═ Main Menu ═ ═ HARDWARE RAID Quick Setup P7~8 ═ ═ Main Menu ═ ═ Disk Manager ═...
- Page 9 Note 2. If user forgot the password, it will not be allowed to access the data from the storage or write new data into it. RAIDON will not be held liable for the damage or loss of data you stored on the storage.
- Page 10 GR5640 User Manual Level 1 Level 2 ═ ═ Main Menu ═ ═ Disk Manager : Disk Manager Identify Disk Disk Manager : Show Disk Info...
- Page 11 GR5640 User Manual Level 2 Level 3 Level 4 Disk Manager : Disk Manager : Identify Disk Disk 1 Disk Manager : Disk 2 Disk Manager : Check Disk LED Disk Manager : Disk 3 Disk Manager : Disk 4 Disk Manager : Select Disk : Show Disk Info...
- Page 12 GR5640 User Manual Level 1 Level 2 ═ ═ Main Menu ═ ═ RAID Manager : RAID Manager Identify RAID RAID Manager : Create RAID RAID Manager : Delete RAID RAID Manager : RAID Info RAID Manager : Change RAID Pwd. RAID Manager : Rebuilding Priority...
- Page 13 Note 2. If user forgot the password, it will not be allowed to access the data from the storage or write new data into it. RAIDON will not be held liable for the damage or loss of data you stored on the storage.
- Page 14 GR5640 User Manual Level 2 Level 3 Level 4 RAID Manager : Select Priority : Select RAID : Rebuilding Priority Medium Level Select Priority : Low Level Select Priority : Lowest Level Select Priority : Highest Level Select Priority : High Level...
- Page 15 GR5640 User Manual Level 1 Level 2 ═ ═ Main Menu ═ ═ System Manager : System Manager System Info. System Manager : Changhe Password System Manager : Logout From Menu System Manager : Alarm Control System Manager : Hardware Monitor...
- Page 16 Note 2. If user forgot the password, it will not be allowed to access the data from the storage or write new data into it. RAIDON will not be held liable for the damage or loss of data you stored on the storage.
- Page 17 GR5640 User Manual Level 3 Level 4 Level 5 System Manager : Hardware Monitor 3.3V/5V/12V Voltage: Hardware Monitor Voltage Monitor xxxxV Hardware Monitor Temperature: Temp. Monitor xx degrees Hardware Monitor FAN Speed: FAN Monitor xxxx RPM FAN Level: LEVEL x...
-
Page 18: Support Displayport
GR5640 User Manual 6. Support DisplayPort 1. The GR5640 offers a DisplayPort support DP1.1a, provides up to 4K@30Hz resolution , and is compatible with monitor and cables with DisplayPort. 2. By using third-party's DisplayPort adapter, it can be connected to the monitor with Mini DisplayPort interface. -
Page 19: Replacement Of Malfunctioning Drive And Data Rebuild Instructions
Check and see if the overall operation environment is well ventilated and make sure there are no blockages to the enclosed fan and then re-power on the system to continue use. If the problem persists, please turn off the system and contact your supplier or the RAIDON tech support for further assistance. -
Page 20: Install The Operation System Into This Device
GR5640 User Manual 10. Install The Operation System Into This Device Install macOS (Use macOS Mojave 10.14 for example) 1. Need to have network online capabilities. If a wireless network is available, you can choose it from the Wi-Fi menu in the menu bar. This menu is also available in macOS Recovery. 2. - Page 21 GR5640 User Manual 4. Install macOS. Choose Reinstall macOS from the Utilities window, and click continue. 5. Follow the onscreen instructions, select agree to the software license agreement, and then select the disk to start the installation. 6. Please allow installation to complete without putting your Mac to sleep or closing its lid. During installation, your Mac might restart and show a progress bar several times, and the screen might be empty for minutes at a time.
- Page 22 GR5640 User Manual Install Windows (Use Windows 10 Home Edition for example) 1. The following content is an example of using the software "WinToUSB Free Edition". For related specifications and copyrights, please refer to the software official website for details. 2.
- Page 23 GR5640 User Manual 5. Select the USB external drive to install. 6. Select the version of the disk partition configuration according to your personal hardware specifications, then execute "Yes" to proceed to the next step. 7. Follow the default and follow the next step.
- Page 24 GR5640 User Manual 8. Windows 10 is installed to an external hard drive. After the installation is complete, click the "End" button, and then confirm to leave. 9. Confirm that the external hard disk is inserted in the USB slot of the computer. After rebooting, enter the BIOS or UEFI adjusts to the USB external hard disk box as the first boot sequence, and saves the settings and leaves.
-
Page 25: Frequently Asked Questions
GR5640 User Manual 11. Frequently Asked Questions Q1. Which drive format should I choose to format the hard drives in the GR5640? A: It depends on the computer system you most often use. See the below suggestions: 1. Use NTFS format for Windows 2000/XP/Vista/7/8/10 system 2. -
Page 26: Safetank Gr5640 產品使用說明
GR5640 User Manual » SafeTANK GR5640 產品使用說明 關於這份手冊 感 謝 您 使 用 RAIDON 的 產 品。 本 手 冊 將 介 紹 RAIDON GR5640 產 品。 在 您 開 始 使 用 RAIDON GR5640 產品前,建議您先閱讀過本手冊。手冊裡的資訊在出版前雖已被詳細確認,實際產品規格仍 www.RAIDON.com.tw 將以出貨時為準;任何產品規格或相關資訊更新請您直接到 網站查詢,本公司 將不另行通知。若您想獲得 RAIDON 最新產品訊息、使用手冊、韌體 , 或對 RAIDON 產品有任何疑問,... - Page 27 GR5640 User Manual 正面與背面示意圖 正面圖 A. 硬碟讀取燈 B. 硬碟抽取盒把手 C. 硬碟抽取盒鑰匙孔 D. 液晶顯示器 E. 系統指示燈 F. 電源指示燈 G. UP 按鍵 H. DOWN 按鍵 I. ENTER 按鍵 J. ESC 按鍵 背面圖 K. 風扇 L. 靜音開關 M. Display 埠 N. e-SATA 連接埠 O.
-
Page 28: 硬體需求與注意事項
5. GR5640-SB31+/GR5640-SBA31+ 的 PD 功能,最多僅能提供 24W ,主要在延長 Notebook 的使 用時間,與原本 Notebook 電源供應器的瓦數有落差,以 Macbook Pro 13" 為例,電源供應器為 60W,假設使用原本的電源供應器充飽電需要 2 小時,透過 GR5640-SB31+/GR5640-SBA31+ 大 約會需要 3 倍的時間。因此如果需要長時間使用 Notebook ,建議先接上 Notebook 原本的電源供 應器後再接上 GR5640-SB31+/GR5640-SBA31+。 6. 當您需要關閉或移除 GR5640 時,務必透過您所操作的作業系統中執行硬碟安全移除後,方進行 電源關閉的動作。 7. 強烈建議除了使用 GR5640 的資料儲存功能外,請針對重要資料備份到另一個儲存裝置上或遠端備 份,雙重備援您重要的資料。若您儲存在 GR5640 的資料損毀或遺失,RAIDON 不負任何的責任。... -
Page 29: 硬體安裝
GR5640 User Manual 4. 硬體安裝 請參照以下步驟完成硬體安裝 1. 將主機置放於平穩空間上,並確認散熱風扇沒有被擋住,且四周有適當的散熱空間。 ( 請避免接近水 源或是其他容易造成產品損傷的環境 ) 2. 請使用零件包內附的鑰匙插入鑰匙孔向左轉 90 度,輕按鎖頭抽取盒門閂將會輕彈開啟,即可將硬碟 抽取盒取出。 Lock Unlock Press 3. 安裝 3.5 吋硬碟,請使用 6 顆零件包內附的大顆螺絲加以固定;安裝 2.5 吋硬碟,請使用 4 顆零件包 內附的小顆螺絲加以固定。 注意:不建議使用不同廠牌,或是同廠牌不同型號的硬碟,避免影響效能。 4. 硬碟安裝完成後,請將抽取盒平移放入主機內,並關上把手。 5. 將電源線與 GR5640 連接,再將電源線與電源插座連接,執行開機。 6 . 透過前方的 LCD 與按鍵來設定您所需求的儲存模式。( 請參考 " 前面板操作及 LCD 訊息說明 ") 7. -
Page 30: 前面板操作及 Lcd 訊息說明
GR5640 User Manual 5. 前面板操作及 LCD 訊息說明 前面板操作 : Enter : 進入下一層 或是 確認 Esc : 跳回上一層 或是 取消 Up / Down 循序選擇項目 使用者可經由 LCM 顯示螢幕進行 RAID 設定,GR5640 預設值為 JBOD ,可進入 Quick Setup 快 • 速設定成其他 RAID 模式使用。 • 如需進行其他設定,則可參考下列 LCD 說明進行操作: Level 0 Level 1 Level 2... - Page 31 GR5640 User Manual 以下為首次設定的顯示流程: Level 0 Level 1 EXTERNAL 4 BAY ═ ═ Main Menu ═ ═ HARDWARE RAID Quick Setup P24~25 ═ ═ Main Menu ═ ═ Disk Manager ═ ═ Main Menu ═ ═ RAID Manager P27~29 ═ ═ Main Menu ═ ═ System Manager P30~32...
- Page 32 Enter Password : Select Level : RAID 5 Are You Sure? Enter :Yes Esc : No Quick Setup : Enter Password : Delete All RAID • 若先前沒有設定密碼,按 ENTER 以進行下一個步驟。 註 1. 可以不設定密碼,按 ENTER 以進行下一個步驟。 註 2. 如果使用者忘記密碼,將無法讀取硬碟上的資料,或是將新資料寫入硬碟。若 使用者儲存在 GR5640 的資料損毀或遺失,RAIDON 將不負任何的責任。...
- Page 33 GR5640 User Manual Level 1 Level 2 ═ ═ Main Menu ═ ═ Disk Manager : Disk Manager Identify Disk Disk Manager : Show Disk Info...
- Page 34 GR5640 User Manual Level 2 Level 3 Level 4 Disk Manager : Disk Manager : Identify Disk Disk 1 Disk Manager : Disk 2 Disk Manager : Check Disk LED Disk Manager : Disk 3 Disk Manager : Disk 4 Disk Manager : Select Disk : Show Disk Info...
- Page 35 GR5640 User Manual Level 1 Level 2 ═ ═ Main Menu ═ ═ RAID Manager : RAID Manager Identify RAID RAID Manager : Create RAID RAID Manager : Delete RAID RAID Manager : RAID Info RAID Manager : Change RAID Pwd. RAID Manager : Rebuilding Priority...
- Page 36 Enter :Yes Esc : No RAID Manager : Select RAID : Information RAID Information 註 RAID Manager : < Password > Select RAID : Change RAID Pwd for RAID Setup 註 1. 可以不設定密碼,按 ENTER 以進行下一個步驟。 註 2. 如果使用者忘記密碼,將無法讀取硬碟上的資料,或是將新資料寫入硬碟。若 使用者儲存在 GR5640 的資料損毀或遺失,RAIDON 將不負任何的責任。...
- Page 37 GR5640 User Manual Level 2 Level 3 Level 4 RAID Manager : Select Priority : Select RAID : Rebuilding Priority Medium Level Select Priority : Low Level Select Priority : Lowest Level Select Priority : Highest Level Select Priority : High Level...
- Page 38 GR5640 User Manual Level 1 Level 2 ═ ═ Main Menu ═ ═ System Manager : System Manager System Info. System Manager : Changhe Password System Manager : Logout From Menu System Manager : Alarm Control System Manager : Hardware Monitor...
- Page 39 System Manager : Are You Sure? Logout From Menu Enter : Yes Esc : No System Manager : Mute The Buzzer? Alarm Control Enter : Yes Esc : No 註 1. 可以不設定密碼,按 ENTER 以進行下一個步驟。 註 2. 如果使用者忘記密碼,將無法讀取硬碟上的資料,或是將新資料寫入硬碟。若 使用者儲存在 GR5640 的資料損毀或遺失,RAIDON 將不負任何的責任。...
- Page 40 GR5640 User Manual Level 3 Level 4 Level 5 System Manager : Hardware Monitor 3.3V/5V/12V Voltage: Hardware Monitor Voltage Monitor xxxxV Hardware Monitor Temperature: Temp. Monitor xx degrees Hardware Monitor FAN Speed: FAN Monitor xxxx RPM FAN Level: LEVEL x...
-
Page 41: 支援 Display 埠
GR5640 User Manual 6. 支援 Display 埠 1. GR5640 提供一個 Display 埠支援 DP1.1a,最高可支援 4K@30Hz 畫質,相容於具有 Display 埠 的螢幕及連接線。 2. 透過第三方 Display 埠轉接器或轉接線,可以連接具備 Mini Display 埠的螢幕。 3. 透過第三方主動式 Display 埠轉接器或轉接線,可以連接具備 VGA、DVI 或 HDMI 的螢幕。 ★ 對於 DisplayPort (PD 1.1a) 和 USB Power Delivery (PD) 功能,需要與 USB Type-C to C cable 一起使用, 且主機必需支援這些功能... -
Page 42: 故障硬碟更換步驟及資料重建功能說明
8. 故障硬碟更換步驟及資料重建功能說明 1. 取出故障硬碟所存放的抽取盒,再將硬碟從抽取盒上拆解下來。 2. 將新的硬碟安裝至抽取盒後,再將新硬碟的抽取盒插回 GR5640 空的硬碟槽位置,並將抽取盒門鎖 上,確認硬碟已完全插入。 3. RAID 5 模式下,將電源打開時,您將會看到所更換的新硬碟抽取盒旁的指示燈號呈現閃爍紅藍燈 的狀態,表示更換上的硬碟資料正在進行重建;此時,您仍可正常使用 GR5640 工作;待資料重建 指示燈號停止,即代表資料重建完成。RAID 0 模式下,因單顆硬碟故障會造成所有資料損毀,更 換新硬碟後,請重新將系統內的硬碟格式化。 9. 系統過熱與風扇故障狀況排除 GR5640 內建故障警示功能,若 GR5640 內部溫度超過 55℃,或 GR5640 風扇發生故障時,內建的 蜂鳴器會發出警告聲響,前面板的紅色警示燈號也會亮起;此時您可選按系統背面的靜音按鈕,先將 警示聲關閉,並在允許的狀況下關閉 GR5640 電源讓系統降溫;同時,請先確認積體擺放環境是否通 風良好,沒有任何物體擋住風扇孔,一併檢查 GR5640 的風扇是否停止運轉;待上述檢查確認後,再 將電源開啟繼續使用本系統。若問題還是無法獲得解決,請與供應商或 RAIDON 聯絡,以便取得進一 步的支援。... -
Page 43: 外接磁碟安裝作業系統
GR5640 User Manual 10. 外接磁碟安裝作業系統 安裝 macOS (以 10.14 Mojave 為例) 1. 需具備網路連線能力。若有無線網路可用,可以從選單列的 Wi-Fi 選單中選擇該網路。「macOS 復原」也提供這份選單使用。 2. 開啟 Mac 並立即按住 Command( ⌘ )-R,持續按住這些按鍵,直到出現 Apple 標誌或旋轉的地球。 看到工具程式視窗,即表示完成啟動: 3. 若必須在安裝 macOS 之前清除磁碟, 請從 「工具程式」 視窗選擇 「磁碟工具程式」 , 然後按一下 「繼 續」。您可能不需要清除磁碟,除非要將 Mac 賣或送給別人,或是有問題需要清除磁碟。... - Page 44 GR5640 User Manual 4. 安裝 macOS,在「工具程式」視窗中,選擇「重新安裝 macOS」,按一下「繼續」。 5. 按照螢幕上的指示,選擇同意軟體許可協議,然後選擇磁碟,開始安裝。 6. 請不要讓 Mac 進入睡眠或闔上上蓋,以利安裝程序順利完成。安裝期間,Mac 可能會重新啟動並 顯示進度列好幾次,而螢幕畫面也可能會一次空白幾分鐘時間。...
- Page 45 GR5640 User Manual 安裝 Windows (以 Windows 10 家庭版為例) 1. 以下內容為使用工具軟體「WinToUSB 免費版」作為範例,相關規範與版權請到軟體官網詳閱說明。 2. 軟體安裝後,連續按兩下桌面的捷徑圖示,開啟 Hasleo WinToUSB。 3. 在界面左方選擇「鏡像到 USB」,再點選右方資料夾圖示來選擇 Windows 10 的 ISO 檔。 4. 選擇要安裝的 Windows 版本,執行下一步。 註:WinToUSB 免費版不支援 Windows 專業版與企業版。...
- Page 46 GR5640 User Manual 5. 選擇要安裝的 USB 外接硬碟。 6. 依照個人硬體規格選擇磁碟分割配置的版本,之後執行「是」進行下一個的步驟。 7. 依照預設值,執行下一步。...
- Page 47 GR5640 User Manual 8. Windows 10 安裝到外接硬碟,待安裝完成後點選「結束」按鈕,之後再確認離開。 9. 確認外接硬碟插在電腦的 USB 插槽,重新開機後,進入 BIOS 或是 UEFI 調整成 USB 外接硬碟盒 為第一開機順序,儲存設定後離開。 註:截圖僅為示意,實際情況依各家主機板而有所不同。 10. 接著開始進入 Windows 10 的安裝過程,請依系統指示以及個人需求完成設定。...
-
Page 48: 常見問題
GR5640 User Manual 11. 常見問題 Q1. 我應該選擇何種模式來格式化 GR5640 產品內的硬碟 ? A:這將取決於您平常所使用的電腦系統,我們有以下建議: 1. Windows 2000 / XP / Vista / 7 / 8 / 10 使用 NTFS 2. Mac OS X 使用 HFS+ (Mac OS Extended) 3. 如必須同時使用於 PC 或 Mac,請使用 FAT32 ( 單一檔案的最大限制是 4GB) Q2. - Page 49 GR5640 User Manual www.raidon.com.tw...
Need help?
Do you have a question about the SAFETank Series and is the answer not in the manual?
Questions and answers