Table of Contents
Advertisement
Quick Links
Owner's Manual
Manual del Propietario
Manuel d'utilisation
Benutzerhandbuch
KICKER PowerBar
KPB1 | KPB2
Amplified Weatherproof Bar-Mount Speaker System with Bluetooth
Sistema de alto-falantes Amplificado à prova de intempéries com Bluetooth
Système d'enceintes Amplifiées étanches à Montage sur Barre avec Bluetooth
Verstärktes Wetterfestes Bar-Mount-Lautsprechersystem mit Bluetooth
select language
seleccione el idioma
choisir la langue
sprache auswählen
Advertisement
Table of Contents

Related Manuals for Kicker PowerBar KPB1


Summary of Contents for Kicker PowerBar KPB1
- Page 1 Owner’s Manual Manual del Propietario Manuel d’utilisation Benutzerhandbuch KICKER PowerBar KPB1 | KPB2 Amplified Weatherproof Bar-Mount Speaker System with Bluetooth Sistema de alto-falantes Amplificado à prova de intempéries com Bluetooth Système d’enceintes Amplifiées étanches à Montage sur Barre avec Bluetooth Verstärktes Wetterfestes Bar-Mount-Lautsprechersystem mit Bluetooth...
-
Page 2: Table Of Contents
Contents Overview ......2 Specifications ......3 Installation ...... 4 Wiring ........4 Mounting ....... 5 Operation ....... 7 Status LED ......7 Control Panel ......8 Setting Input Source ....9 Broadcast Mode ....9 Remote Control Install ..10 Remote Control Operation ... -
Page 3: Overview
VENTILATION. SUBWOOFERS SHOULD BE MOUNTED WITH AT LEAST 1 INCH (2.5CM) CLEARANCE BETWEEN THE FRONT OF THE SPEAKER AND ANY SURFACE. KICKER PRODUCTS ARE CAPABLE OF PRODUCING SOUND LEVELS THAT CAN PERMANENTLY DAMAGE YOUR HEARING! TURNING UP A SYSTEM TO A LEVEL THAT HAS AUDIBLE DISTORTION IS MORE DAMAGING TO YOUR EARS THAN LISTENING TO AN UNDISTORTED SYSTEM AT THE SAME VOLUME LEVEL. -
Page 4: Specifications
Specifications Model: KPB1 KPB2 Power Output 150W 300W @ 14.4V, <10% THD+N Woofer [in, mm] 3, 76 Tweeter [in, mm] 1, 25 Wiring Harness Length [ft, 10, 3.05 Frequency Response [Hz] 50-20,000 Signal-to-Noise Ratio >75, A-weighted re: rated power Tweeter Magnet Material Neodymium Tweeter Dome Material Titanium... -
Page 5: Installation
Installation Wiring Disconnect the vehicle’s battery to avoid an electrical short. Connect the KPB’s black ground wire to a paint-and-corrosion-free, solid, metal area of the vehicle’s chassis, or to the negative battery terminal. Connect the KPB’s red power wire to the positive battery terminal. -
Page 6: Mounting
Keep the audio signal cable away from factory wiring harnesses and other power wiring. If you need to cross this wiring, cross it at a 90-degree angle. Mounting The KPB-series mounts natively to bar cylinders with included bar clamp diameter sizes of 1.5”, 1.75”, and 2”. - Page 7 2. Place the Clamp Rings around your mounting bar and secure the Clamp Rings to the Mounting Bases using the Clamp Screws. The KPB2 may be mounted with the bases and clamps in an inward, or outward configuration English...
-
Page 8: Operation
Operation Status LED LED color displays audio source, pairing status, and warnings: Flashing Blue - in pairing mode Solid Blue - connected bluetooth device Red - 1/8” (3.5mm) auxiliary input Bluetooth (Blue) Power is off Solid Bluetooth Connected Rapid Blinking Bluetooth Pairing Mode Alternate Red/Blue Waiting for Broadcast Mode... -
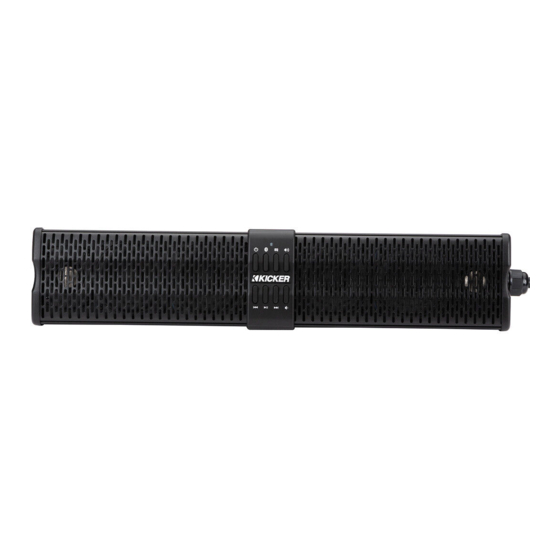
Page 9: Control Panel
Long Press - Fast Forward Short Press - Play/Pause or Mute Very Long Press (10s) - Software Reset Short Press - Change Input Source Long Press - Enter Bluetooth Pairing Mode Change EQ Presets - KICKER, LOUD, SOUND QUALITY, & VOICE English... -
Page 10: Setting Input Source
SOURCE button. To finish pairing, from your audio device select either ‘KPB1 KICKER’ or ‘KPB2 KICKER’. When successfully connected, the STATUS LED will be solid blue. When the PowerBar powers on in, or enters, Bluetooth mode, it will automatically begin to search for and connect with the last connected device. -
Page 11: Remote Control Install
Remote Control Install The remote control must be charged via USB micro 5V power input. Install the included remote control to your steering wheel as follows: 1. Place the KPB onto the wheel facing the user in the position in which it will be most used. 2. -
Page 12: Troubleshooting
Bluetooth device will not connect? On your mobile device: Œ Turn Bluetooth off, then on again. Remove ‘KPB1/2 KICKER’ from the Bluetooth menu. Then pair again (see page 9). Ž Move your mobile device closer to the speaker. Avoid obstacles that may block the wireless signal. - Page 13 Should service be necessary under this warranty for any reason due to manufacturing defect or malfunction during the warranty period, KICKER will repair or replace (at its discretion) the defective merchandise with equivalent merchandise. Warranty replacements may have cosmetic scratches and blemishes.
- Page 14 Service performed by anyone other than KICKER HOW LONG WILL IT TAKE? KICKER strives to maintain a goal of one week turnaround for all electronics (amplifiers, crossovers, equalizers, etc.) returns. Delays may be incurred if lack of replacement inventory or parts is encountered.
- Page 15 FCC Warning This device complies with part 15 of the FCC rules. Operation is subject to the following two conditions: (1) this device may not cause harmful interference, and (2) this device must accept any interference received, including interference that may cause undesired operation.
Need help?
Do you have a question about the PowerBar KPB1 and is the answer not in the manual?
Questions and answers