Zircon MultiScanner OneStep i700 Quick Manual
Multifunction wall scanner
Hide thumbs
Also See for MultiScanner OneStep i700:
- Quick start manual (2 pages) ,
- Quick start manual (3 pages) ,
- User manual
Advertisement
Available languages
Available languages
Quick Links
i
GB
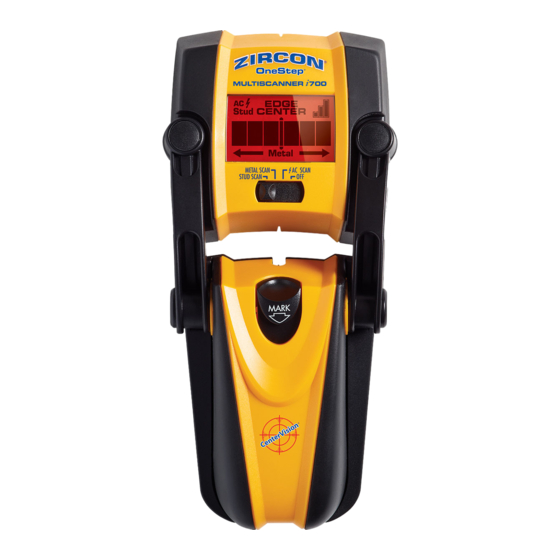
MultiScanner
700
®
OneStep
™
Multifunction Wall Scanner
The MultiScanner
i700 OneStep
features three scanning modes:
®
™
• Stud Scan Mode: Locates the centre and edges of wood and
metal studs up to 38 mm deep
• Metal Scan Mode: Detects and locates ferrous (magnetic) metal
up to 76 mm deep and non-ferrous (non-magnetic) metal up to
38 mm deep
• AC Scan Mode: Detects and locates live AC wires up to
50 mm deep
• WireWarning
Detection automatically detects and alerts the
®
user to live AC wires in Stud Scan and Metal Scan modes
1. INSTALLING THE BATTERY
Press battery door release in with your finger or a coin and lift up to remove door.
Place a new 9V battery into the compartment and press into place.
Replace battery door and snap shut.
Zircon
®
stud finders and detectors, particularly those with LCD screens, require and
consume a great deal of current from batteries.
For optimal performance, brand-new, recently purchased alkaline batteries are strongly
recommended for use in these tools.
If you are experiencing any trouble with your tool, please replace the battery in your
tool with a brand-new one, or e-mail info@zircon.com.
2. SELECTING THE MODE
Move selector switch to the desired mode: STUD SCAN for finding wood or metal
studs; METAL SCAN for locating metal; or AC SCAN for locating hot AC wiring.
Move selector switch to the Off position when not in use to prevent the tool from
accidentally powering on and wearing down the battery.
7. SCANNING IN METAL MODE
Note: When scanning for metal studs, use STUD SCAN Mode to quickly locate the centre and
edges of wood or metal studs. Use METAL SCAN Mode only to determine if studs are wood
or metal. In METAL SCAN Mode, only metal drywall screws will be found in wood studs,
while metal will be indicated everywhere on a metal stud.
METAL SCAN Mode has interactive calibration to adjust its sensitivity to metal which
can be used to find the precise location of metal objects in walls, floors, and ceilings.
Maximum sensitivity is ideal for quickly finding the approximate location of metal.
However, the user can reduce sensitivity by turning on the tool closer to metal. The reason
for reducing sensitivity is because with less sensitivity, the area where metal is indicated
will be smaller. But in both cases, the metal target is in the centre of the area where the
tool indicates metal is present.
1. (Figure A) Press the tool flat against the wall and slowly slide the scanner across the
surface. Mark the spot where the display bars peak. If it is a strong target, the SpotLite
Pointing System will also shine a beam of light and a steady beep will sound. Continue in
same direction until display bars reduce. Reverse direction and mark the spot where the
display bars peak from the reversed direction. The midpoint of the two marks is the location
of the centre of the metal object.
If the unit indicates metal over a large area, you can refine the scanning area to more accu-
rately locate the metal target.
2. (Figure B) To further pinpoint the location of the metal target, scan the area again.
Release the handle and then turn the unit back on, this time starting on the wall over
one of the previous marks. This will reset the tool to a lower sensitivity and make the
scan more precise.
3. (Figure C) Scan in both directions as in Step 1. The area indicated should become
smaller so you can more precisely identify the metal location. This procedure can be repeat-
ed to narrow the field even further.
Note: Small targets or targets deep within the surface may only illuminate some of the bars
and not the centre line or audio tone. In this case, use the highest indication to determine
the metal position.
8. SCANNING IN AC MODE
As with METAL SCAN Mode, AC SCAN Mode has interactive calibration and works in the
same manner.
1. (Figure A) Press the tool flat against the wall and slowly slide the scanner across the
surface. Mark the point where you get the highest AC indication (the most bars on the
screen). If it is a strong target, the SpotLite
Pointing System will also shine a beam of
®
light and a steady beep will sound. Continue in same direction until display bars reduce.
Reverse direction and mark the spot where the display bars peak from the reversed direc-
tion. The midpoint of the two marks is the location of the centre of the live AC wiring.
Dual SpotLite
Signal Strength
®
Pointing System
Indicator
Backlit LCD
Metal Sensor
(back of unit)
AC Mode &
WireWarning
®
Indication
Stud Scan Mode
Indication
Stud Edge or
Center Indication
Auto Recalibration
Indication
Metal Mode
Indication
Mode Selector
Switch
Erasable Marker
Mark Button
Running Board
Battery
(back of unit)
If the unit indicates live electricity over a large area, you can refine the scanning area to more accurately locate the live
AC wiring.
Figure A
2. (Figure B) To further pinpoint the location of the live AC wiring, scan the area again. Release the handle and then turn
the unit back on, this time starting on the wall over one of the previous marks. This will reset the tool to a lower sensitivity
and make the scan more precise.
3. (Figure C) Scan in both directions as in Step 1. The area indicated should become smaller so you can more precisely
identify the location of live AC wires. This procedure can be repeated to narrow the field even further.
Note: AC SCAN Mode will only detect live (energized) AC wiring.
WireWarning
Detection
®
Zircon's WireWarning
®
ing icon will appear in the display. If scanning begins over a live AC wire, the AC indicator will flash continuously.
Electrical field locators may not detect live AC wires if wires are more than 50 mm from the
WARNING
scanned surface, in concrete, encased in conduit, present behind a plywood shear wall or
®
metallic wall covering, or if moisture is present in the environment or scanned surface.
DO NOT ASSUME THERE ARE NO LIVE ELECTRICAL WIRES IN THE WALL. DO NOT TAKE ACTIONS
WARNING
Figure B
THAT COULD BE DANGEROUS IF THE WALL CONTAINS A LIVE ELECTRICAL WIRE. ALWAYS TURN OFF
THE ELECTRICAL POWER, GAS, AND WATER SUPPLIES BEFORE PENETRATING A SURFACE. FAILURE TO FOLLOW THESE
INSTRUCTIONS MAY RESULT IN ELECTRIC SHOCK, FIRE, AND/OR SERIOUS INJURY OR PROPERTY DAMAGE.
Always turn off power when working near electrical wires.
9. MARKING THE LOCATION
Once an object is located, you can MARK the location by gently pulling down the MARK button with the tip of your finger.
Pulling back the MARK button will cause a pencil point to extend from the front of the handle, placing a short erasable line
on the wall.
10. CHANGING THE MARKER TIP
Pull and hold the MARK button to fully extend the marker tip. Grasp the marker and pull it off the marker post. To install a
Figure C
new marker tip, pull and hold the MARK button to fully extend the marker post. Push the new marker onto the marker post.
Note: MultiScanner
i700 comes with three spare marker tips.These tips are stored in a compartment located behind
®
the battery .
arnoldingallsmoranvilleadvertising
11. REMOVING OR REPLACING THE SCANNING HEAD
MultiScanner
i700's scanner head may be removed from the handle to facilitate cleaning or repair. Or the scanning head
®
may also become separated from the handle if accidentally dropped or twisted. Follow the directions below to replace the scan-
ning head:
To remove head: Place the back of the head in the palm of one hand, and grasp the body of the unit in the other hand.
Slowly and gently lift and turn the body, removing one arm from the socket at a time.
To replace the head: Align the end of the arms over the sockets and gently snap them back into their sockets,
one arm at a time.
3. FINDING A STUD
Always scan for studs with the scanner placed flat against the wall. Move the mode
switch to STUD SCAN, place the tool against the wall, then press and hold the handle.
Wait for beep to confirm calibration has completed before moving tool.
Slowly slide tool across surface. EDGE display will
illuminate, indicating location of the stud edge.
Continue sliding tool. When the centre of
stud is located with three bars on the
Signal Strength Indicator, the buzzer will sound,
and the four middle bars, CENTER display,
and SpotLite
®
Pointing System will illuminate.
In cases of deeper studs (or thicker walls) two bars
will show on the Signal Strength Indicator and only
the SpotLite
®
Pointing System and four middle
bars will illuminate. If you still can't locate a stud,
try the next step.
Quickly (within one second) release and re-press
the handle down. The scanner will enter the
High Sensitivity Mode and the STUD SCAN Mode
Indication will flash continuously. The centre of a
very deep stud will be indicated by the four middle
bars illuminating.
4. TIPS FOR PROPER OPERATION
For optimum scanning results it is important to properly hold MultiScanner
move slowly when scanning. The following tips will ensure accurate scanning results:
• Grasp the handle with your thumb on one side and your fingers on the other side.
Make sure your fingertips are resting on or above the running board and not touching
the surface being scanned or the scanning head of the tool.
• Hold the tool straight up and down, parallel to the studs, and do not rotate the tool.
Detection feature works continuously in all modes. When live AC voltage is detected, the AC Alert warn-
• Keep tool flat against the wall and do not rock or tilt the tool when slowly sliding across the surface being scanned.
• Make sure your other hand or any other part of your body is not touching the surface being scanned. This could
interfere with the tool's performance.
5. CALIBRATING THE TOOL
MultiScanner
i700 constantly monitors the subsurface environment 10 times per second and automatically recalibrates,
®
when needed, to successfully find the centre of studs in OneStep
• Place MultiScanner
®
i700 against the wall and press the handle until it lays flat against the wall. Pressing the tool to lay
flat against the wall will automatically power on the tool via the internal on/off switch.
• Once powered on, tool will automatically perform all calibrations. The LCD will display all icons until calibration is
complete. Upon completion of calibration, the SpotLite
®
and buzzer will momentarily activate and the tool will begin
continuous measurements. Continue to press the tool flat against the wall and begin scanning.
Note: It is important to wait for calibration to complete (1–2 seconds) before moving the scanner.
• ACT
™
(Auto Correcting Technology)—During scanning, the tool will automatically
recalibrate itself when needed. This recalibration is usually transparent and no
indication is made. If the tool is initially calibrated near a stud and then moved away
(it will detect the density of the wall decreasing), an arrow icon will be illuminated,
indicating the direction of the missed stud.
6. WORKING WITH DIFFERENT MATERIALS
Wallpaper: The MultiScanner
®
i700 functions normally on walls covered with wallpaper or fabric, unless the materials are metallic foil,
contain metallic fibers, or are still wet after application. Wallpaper may need to dry for several weeks after application.
Lath & plaster: Due to irregularities in plaster thickness, it is difficult for the MultiScanner
Change to METAL SCAN Mode to locate nail heads holding laths to stud. If plaster has metal mesh reinforcement, MultiScanner
be unable to detect through that material.
Textured walls or acoustic ceilings: When scanning a ceiling or wall with an uneven surface, place thin cardboard on the surface to be
scanned and scan over the cardboard. Calibrate with cardboard in place.
Wood flooring, subflooring, or gypsum drywall over plywood sheathing: Use STUD SCAN Mode and move the tool slowly. The signal
strength indicator may only display 1 or 2 bars when the tool locates a stud through thick surfaces.
MultiScanner
i700 cannot scan for wood studs and joists through carpeting and pad. In problematic situations, try using METAL SCAN to locate
®
nails or drywall screws that line up vertically where a stud is positioned.
i700 and
Note: Sensing depth and accuracy can vary due to moisture content of materials, wall texture, and paint.
®
Do not rely exclusively on the detector to locate items behind the scanned surface. Use other information sources to
WARNING
help locate items before penetrating the surface. Such additional sources include construction plans, visible points
of entry of pipes and wiring into walls, such as in a basement, and in standard 40 and 60 cm stud spacing practices.
12. HELPFUL HINTS
(See also number 4, Tips for Proper Operation)
Situation
Probable Cause
Detects other objects
• Electrical wiring and metal/plastic pipes may be
besides studs in
near or touching back surface of wall.
STUD SCAN Mode.
Finds more targets
than there should be.
Area of voltage appears
• Static charge may develop on drywall, spreading
much larger than actual
voltage detection as much as 30 cm laterally
wire (AC only).
from each side of an actual electrical wire.
Difficulty detecting
• Tool calibrated over metal object.
metal.
• Metal targets too deep or small.
Image of metal object
• Metal has greater density than wood.
appears wider than
actual size.
Constant readings of
• Double and triple studs are usually found
studs near windows
around doors and windows. Solid headers are
and doors.
above them.
You suspect electrical
• Wires are shielded by metal conduit, a braided
wires, but do not
wire layer, or metallic wall covering.
detect any.
• Wires deeper than 50 mm from surface might
not be detected.
• Wires may not be live.
ACT, CenterVision, MultiScanner, OneStep, SpotLite, StudSesnor, WireWarning, and Zircon are registered trademarks or trademarks of Zircon Corporation.
Visit www.zircon.com for the most current instructions.
LIMITED 2 YEAR WARRANTY
Zircon Corporation, ("Zircon") warrants this product to be free from defects in
materials and workmanship for two years from the date of purchase. Any in-warranty
defective product returned to the place of purchase with proof of purchase date will
be replaced at retailer's option.This warranty is limited to the electronic circuitry
and original case of the product andspecifically excludes damage caused by abuse,
unreasonable use or neglect. This warranty is in lieu of all other warranties, express
or implied, and no other representations or claims of any nature shall bind or obligate
Zircon. Any implied warranties applicable to this product are limited to the two year
period following its purchase.
™
!
i700 to locate studs in STUD SCAN Mode.
®
i700 will
®
Solution
• Scan the area in METAL and AC SCAN modes to determine if metal or
hot AC is present.
• Check for other studs equally spaced to either side 30, 40, or 60 cm apart or the
same stud at several places directly above or below the first.
Use CAUTION when nailing, sawing, or drilling in walls, floors, and ceilings
where these items may exist.
• To narrow detection, turn unit off and on again at the edge of where wire was first
detected and scan again.
• Place your free hand flat against wall near tool during the entire scan to drain static.
• The scanner may have been calibrated over a metal object, reducing sensitivity.
Try calibrating in another location.
• Scan in both horizontal and vertical directions. Metal sensitivity is increased when
metal object is parallel to sensor, located under Zircon logo.
• To reduce sensitivity, follow Step 7 and recalibrate MultiScanner
i
700 over either of
®
first two marks. (Metal mode only.)
• Detect outer edges so you know where to begin.
• Try METAL SCAN to see if you can find metal, wire, or metal conduit.
• Always turn off the power when working near electrical wires.
• Try turning on switches to outlet.
• Try plugging a lamp into outlet and turning on switch.
IN NO EVENT WILL ZIRCON BE LIABLE FOR ANY SPECIAL, INCIDENTAL OR
CONSEQUENTIAL DAMAGES RESULTING FROM POSSESSION, USE OR MALFUNCTION
OF THIS PRODUCT.
ZirconCorporation
ZirconTV
www.zircon.com
info@zircon.com
|
ZirconTools
ZirconToolPro
ZirconTools
© 2017 Zircon Corporation • P/N 62099 • Rev C 07/17
Advertisement

Subscribe to Our Youtube Channel
Related Manuals for Zircon MultiScanner OneStep i700


Summary of Contents for Zircon MultiScanner OneStep i700
- Page 1 11. REMOVING OR REPLACING THE SCANNING HEAD ACT, CenterVision, MultiScanner, OneStep, SpotLite, StudSesnor, WireWarning, and Zircon are registered trademarks or trademarks of Zircon Corporation. 8. SCANNING IN AC MODE MultiScanner i700’s scanner head may be removed from the handle to facilitate cleaning or repair. Or the scanning head Visit www.zircon.com for the most current instructions.
- Page 2 ACT, CenterVision, MultiScanner, OneStep, SpotLite, StudSesnor, WireWarning, och Zircon är registrerade varumärken, eller varumärken som tillhör Zircon Corporation. Observera: Små metallobjekt eller objekt som ligger djupt under ytan kommer i regel bara Notera: Tre extra pennspetsar medföljer MultiScanner...
- Page 3 Skannerin pää voidaan irrottaa kahvasta puhditamista ja korjausta varten. Se voi irrota myös jos laite putoaa tai sitä heiluttaa kovin. eikä osoita keskustaa eikä anna ilmoituksesta äänimerkkiä. Tällaisessa tapauksessa odota ACT, CenterVision, MultiScanner, OneStep, SpotLite, WireWarning, and Zircon are registered trademarks or trademarks of Zircon Corporation. Käsittele varovasti. Seuraa irrotusohjeita: suurinta mahdollista palkkimäärää...
- Page 4 Should your Zircon product need replacement or is of no Om din Zircon produkt behöver ersättas eller om den inte Jos hävität käytetyn Zircon tuotteen tai sillä ei ole enää further use to you, do not dispose of it with household waste.
Need help?
Do you have a question about the MultiScanner OneStep i700 and is the answer not in the manual?
Questions and answers