
Related Manuals for HQ Power VDPL64 Series


Summary of Contents for HQ Power VDPL64 Series
- Page 1 " USER MANUAL GEBRUIKERSHANDLEIDING NOTICE D’EMPLOI MANUAL DEL USUARIO BEDIENUNGSANLEITUNG...
- Page 2 (xx = B2, C2, B3, C3) %&'()*+%,' &)*-.&&'/%+*- '0/)/%+*1& -& %&'()*+)/,* %&'()*+1)2* &'()*)&'3*4 !,. %, %3'* %5& 1,*%',66&' 6)*& 7',( 8)*/ )*%, 8)*/ 8634 +*- /,19&% ,*%',66&' 6)*& :+* 8)* *++' 8)* ++*8+//&* /%&99&' &* 1,*%+1% ; ,-)7)&' 6+ 6)4*& -3 1,*%'<6&3' -& =',15&/ &* =',15&/ 7)15&...
- Page 3 (xx = B2, C2, B3, C3) /&' (+*3+6 ; *%',-31%),* , +66 '&/)-&*%/ ,7 %5& 3',8&+* *),* (8,'%+*% &*:)',*(&*%+6 )*7,'(+%),* +=,3% %5)/ 8',-31% This symbol on the device or the package indicates that disposal of the device after its lifecycle could harm the environment. Do not dispose of the unit (or batteries) as unsorted municipal waste;...
- Page 4 (xx = B2, C2, B3, C3) • Only use the device for its intended purpose. All other uses may lead to short circuits, burns, electroshocks, lamp explosion, crash, etc. Using the device in an unauthorised way will void the warranty. •...
- Page 5 (xx = B2, C2, B3, C3) 1,**&1%),* Refer to the illustrations on page of this manual. • When applicable, connect an XLR cable to the female 3<pin XLR output of a controller (not incl.) and the other side to the male 3<pin XLR input E F of the ;...
- Page 6 (xx = B2, C2, B3, C3) • In case of the 5<channel , you will have to set the start address of the first unit to 001 (CH1~4), the second unit to 006 (1 + 5) (CH5~8), the third to 011 (6 + 5) (CH9~12), and so on.
- Page 7 (xx = B2, C2, B3, C3) /& %5)/ -&:)1& .)%5 ,')4)*+6 +11&//,')&/ ,*6?; &66&(+* *: 1+**,% =& 5&6- '&/8,*/)=6& )* %5& &:&*% ,7 -+(+4& ,' )*M3'? '&/36%&- 7',( )*1,''&1% 3/& ,7 %5)/ -&:)1&; ,' (,'& )*7, 1,*1&'*)*4 %5)/ 8',-31% 86&+/& :)/)% ,3' .&=/)%& ...;5N8,.&';&3; 5&...
- Page 8 (xx = B2, C2, B3, C3) Bescherm tegen stof en extreme hitte. Zorg dat de verluchtingsopeningen niet verstopt geraken. Voorzie een ruimte van minstens 2,5 cm tussen het toestel en elk ander object. Bescherm tegen schokken en vermijd brute kracht tijdens de bediening. •...
- Page 9 (xx = B2, C2, B3, C3) • Installeer dit toestel op een plaats waar niemand langs moet lopen, kan neerzitten of het toestel kan aanraken. • Een degelijke praktijkervaring is vereist voor de plaatsing van dit toestel. U moet de maximumbelasting van de draagconstructie kunnen berekenen, weten welk constructiemateriaal u kunt gebruiken en u moet het gebruikte materiaal en het toestel af en toe laten nakijken.
- Page 10 (xx = B2, C2, B3, C3) /%3')*4 Q-G • Druk op MODE E F tot de display E F ‘-’ weergeeft. Na enkele seconden geeft het lcd<scherm het DMX<adres weer. • Alle DMX<gestuurde toestellen hebben een digitaal startadres nodig, zodat het juiste toestel reageert op de signalen.
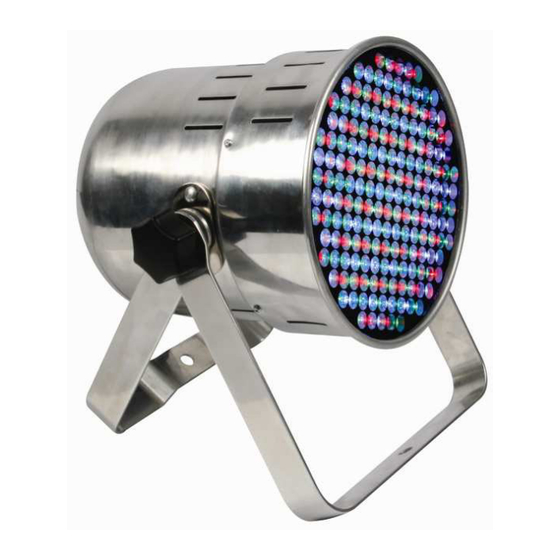
- Page 11 (xx = B2, C2, B3, C3) K; &15*)/15& /8&1)7)1+%)&/ kleur zwart verchroomd zwart verchroomd voeding 90 ~ 250 VAC / 50 ~ 60 Hz (switching power mode) verbruik 20 W 44 W DMX kanalen aantal leds 177 (36 x R, 83 x G, 58 x B) 39 x 1 W (9 x R, 18 x G, 12 x B) <...
- Page 12 (xx = B2, C2, B3, C3) Il n’y a aucune pièce maintenable par l’utilisateur. Commander des pièces de rechange éventuelles chez votre revendeur. • Cet appareil ressort à la classe de protection I, ce qui implique que l’appareil doit être mis à la terre.
- Page 13 (xx = B2, C2, B3, C3) &/1')8%),* Se référer aux illustrations à la page de cette notice. MODE entrée DMX sortie DMX DOWN @ sortie CA afficheur LCD A entrée CA ; */%+66+%),* ,/& 6)='& • Desserrer l’étrier de montage et le déplier. •...
- Page 14 (xx = B2, C2, B3, C3) @; (86,) Se référer aux illustrations en page de cette notice. • Le peut être utilisé de manière autonome avec une couleur fixe, ou piloté à l’aide d’un contrôleur DMX externe (non inclus). • En mode maître, le génère les valeurs DMX sur la sortie DMX E F.
- Page 15 (xx = B2, C2, B3, C3) & &'',3)66+4& -&/ %,315&/ • Maintenir enfoncé MODE E F pour verrouiller les touches (E F, E F et E F). Le LCD affiche alternativement le mode sélectionné et « LOC ». • Maintenir enfoncé MODE E F pour déverrouiller les touches. %)*1%),* •...
- Page 16 (xx = B2, C2, B3, C3) ; *%',-311)2* 6,/ 1)3-+-+*,/ -& 6+ *)2* 3',8&+ (8,'%+*%&/ )*7,'(+1),*&/ /,='& &6 (&-), +(=)&*%& 1,*1&'*)&*%& + &/%& 8',-31%, Este símbolo en este aparato o el embalaje indica que, si tira las muestras inservibles, podrían dañar el medio ambiente.
- Page 17 (xx = B2, C2, B3, C3) • Utilice sólo el para aplicaciones descritas en este manual a fin de evitar p.ej. cortocircuitos, quemaduras, descargas eléctricas, etc. Un uso desautorizado puede causar daños y anula la garantía completamente. • Los daños causados por descuido de las instrucciones de seguridad de este manual invalidarán su garantía y su distribuidor no será...
- Page 18 (xx = B2, C2, B3, C3) ,*& )2* • Si fuera necesario, conecte un cable con conector XLR (no incl.) a la salida XLR hembra de 3 polos del controlador y el otro conector XLR macho de 3 polos a la entrada E F del Es posible conectar varios en serie.
- Page 19 (xx = B2, C2, B3, C3) • Seleccione la dirección DMX con UP E F o DOWN E F. La pantalla LCD visualiza alternativamente la dirección seleccionada y « d ». • La dirección seleccionada se guarda automáticamente en la memoria. •...
- Page 20 (xx = B2, C2, B3, C3) +'+ (\/ )*7,'(+1)2* /,='& &/%& 8',-31%, :)/)%& *3&/%'+ 8\4)*+ ...;5N8,.&';&3; & 83&-&* (,-)7)1+' 6+/ &/8&1)7)1+1),*&/ ? &6 1,*%&*)-, -& &/%& (+*3+6 /)* 8'&:), +:)/,; © &66&(+* -)/8,*& -& 6,/ -&'&15,/ -& +3%,' 8+'+ &/%& (+*3+6 -&6 3/3+'),; Todos los derechos mundiales reservados.
- Page 21 (xx = B2, C2, B3, C3) Verwenden Sie das Gerät *3' )( **&*=&'&)15. Schützen Sie das Gerät vor Regen und Feuchte. Setzen Sie das Gerät keiner Flüssigkeit wie z.B. Tropf< oder Spritzwasser, aus. Schützen Sie das Gerät vor Staub. Schützen Sie das Gerät vor extremen Temperaturen.
- Page 22 (xx = B2, C2, B3, C3) • Lassen Sie das Gerät von einem Fachmann und gemäß den EN 60598<2<17 und allen anderen zutreffenden Normen installieren. • Die Konstruktion muss während einer Stunde eine Punktlast von maximal 10 x dem Gewicht des Geräts tragen können, ohne dass Verformung verursacht wird.
- Page 23 (xx = B2, C2, B3, C3) • Drücken Sie MODE E F bis das Display E F ‘ ’ anzeigt. Hiermit wird DMX<Kanal 001 eingeschaltet. • Die LED unten rechts leuchtet während des Empfangs des DMX<Signals. • Verwenden Sie den Slave<Modus auch zum Fernbedienen des Gerätes. Diese Funktion braucht keine DMX<Adresse.
- Page 24 (xx = B2, C2, B3, C3) 7. Es gibt keine wartbaren Teile. 8. Bestellen Sie eventuelle Ersatzteile bei Ihrem Fachhändler. K; &15*)/15& +%&* Farbe schwarz verchromt schwarz verchromt Stromversorgung 90<250VAC / 50<60Hz (switching power mode) Stromverbrauch DMX Kanäle LED<Anzahl 177 (36 R, 83 G, 58 B) 39 x 1W (9 R, 18 G, 12 B) <...
- Page 25 < alle rechtstreekse of onrechtstreekse schade na de levering veroorzaakt aan het toestel (bv. door oxidatie, schokken, val, stof, &66&(+*C &':)1& +*- D3+6)%? "+''+*%? vuil, vocht...), en door het toestel, alsook zijn inhoud (bv. verlies van Velleman® has over 35 years of experience in the electronics world data), vergoeding voor eventuele winstderving.
- Page 26 < tout dommage engendré par un retour de l’appareil emballé Reparatur zurückschicken. Stellt sich bei der Überprüfung des dans un conditionnement non ou insuffisamment protégé. Geräts heraus, dass kein Geräteschaden vorliegt, könnte dem < toute réparation ou modification effectuée par une tierce Kunden eine Untersuchungspauschale berechnet.
Need help?
Do you have a question about the VDPL64 Series and is the answer not in the manual?
Questions and answers