
Subscribe to Our Youtube Channel
Related Manuals for BodyMed ZZACOMBO


Summary of Contents for BodyMed ZZACOMBO
- Page 1 ZZACOMBO TENS/EMS/Massager Combo Please read this instruction manual prior to operating.
- Page 2 CAUTION: Federal law restricts this device to sale by or on the order of a physician. All Rights Reserved. ZZACOMBO - Rev. 2019...
-
Page 3: Table Of Contents
Table of Contents 1. Foreword .................4 2. Safety Information............6 3. Getting to Know Your Device .........13 4. Specification ..............15 5. Operating Instruction ............19 6. Instructions for Use ............23 7. Cleaning and Maintenance ...........29 8. Troubleshooting ............32 9. Storage ................33 10. Disposal ...............33 11. -
Page 4: Foreword
1. FOREWORD Introduction The device ZZACOMBO is a dual channel output TENS, EMS, and MASSAGE stimulator. Before using, please read the instruction manual. The COMBO stimulator belongs to the group of electrical stimulation systems. It has three basic functions: TENS (Transcutaneous Electrical Nerve Stimulation), EMS (Electronic Muscle Stimulation), and MASSAGE. - Page 5 1.2 Medical Background 1.2.1 About Pain Pain is an important signal in the human body warning system. It reminds us that something is wrong without which abnormal conditions may go undetected, causing damage or injury to vital parts of our bodies. Even though pain is a necessary warning signal of trauma or malfunction in the body, nature may have gone too far in its design.
-
Page 6: Safety Information
1.2.3 What Is EMS? Electrical Muscle Stimulation is an internationally accepted and proven way of treating muscular injuries. It works by sending electronic pulses to the muscle needing treatment that causes the muscle to exercise passively. It is a product deriving from the square waveform, originally invented by John Faraday in 1831. - Page 7 2.2 Important Safety Precautions and Warnings It is important that you read all the warnings and precautions included in this manual because they are intended to keep you safe, prevent risk of injury, and avoid a situation that could result in damage to the device. SAFETY SYMBOLS USED IN THIS MANUAL 2.2.1 Contraindication...
- Page 8 2.2.2 Warning 1) The long-term effect electrical stimulation is unknown. Electrical stimulation devices do not have any curative value. 2) This device should only be used under the continued supervision of a licensed medical practitioner. 3) Electrical stimulation is not effective for central origin pain such as headache.
- Page 9 11) Stimulation should not take place while the user is connected to high-frequency surgical equipment, it may cause burn injuries on the skin under the electrodes, as well as problems with the stimulator. 12) Do not use the stimulator in the vicinity of shortwave or microwave therapy equipment, since this may affect the output power of the stimulator.
- Page 10 2.2.3 Precautions 1) For single patient use only. 2) Keep yourself informed of the contraindications. 3) This stimulator shall never be used by patients who have noncompliant, emotionally disturbed, dementia, or low IQ. 4) Read, understand, and practice the precautionary and operating according to the instructions.
- Page 11 13) Do not apply stimulation while the patient is driving, operating machinery, or during any activity in which electrical stimulation can put the patient at risk of injury. 14) Never use the device in rooms where aerosols (sprays) are used or pure oxygen is being administered. 15) Do not use it near any highly-flammable substances, gases, or explosives.
- Page 12 25) Use caution when the patient has a tendency to bleed internally, such as following an injury or fracture. 26) Safety of powered muscle stimulators for use during pregnancy has not been established. 27) Caution should be used for patients with suspected or diagnosed epilepsy.
-
Page 13: Getting To Know Your Device
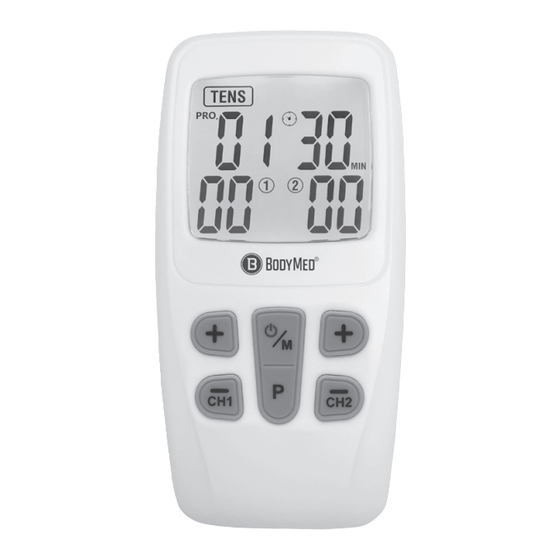
3. GETTING TO KNOW YOUR DEVICE 3.1 Components Included No. Description The COMBO Stimulator Electrode pad (50mm×50mm ) 4pcs Electrode wires 2pcs Ordinary batteries (1.5V, AAA) 3pcs Belt clip User manual 3.2 LCD Display No. Function Description No. Function Description Treatment mode Indicator of no load (Channel 1 and Channel 2) Symbol of program... - Page 14 3.3 Device Illustration No. Description LCD display [ON/OFF/M] button: At power saving mode, press the [ON/OFF/M] button to turn on the device; At standby mode, press the [ON/OFF/M] button to select treatment mode; At standby mode, press and hold the [ON/OFF/M] button to turn off the device; At treating mode, press the [ON/OFF/M] button to stop the treatment.
-
Page 15: Specification
4. SPECIFICATION 4.1 Technical Information Device Name Combo Electrotherapy Device Model/type ZZACOMBO Power sources 4.5V D.C., 3x AAA batteries Output channel Dual channel Waveform Bi-phase square-wave pulse Output current Max. 120mA (at 500ohm load) Output intensity 0 to 40 levels, adjustable... - Page 16 4.2 Treatment Programs Pro- Treatment Mode Pulse rate(Hz) Pulse width (us) Remark gram time(min) Default:30 Continuous Adj.:(5-90) Default:30 Continuous Adj.:(5-90) Default:30 Continuous Adj.:(5-90) Default:30 Pulse Rate and 2-60 260-160 Adj.:(5-90) Width Modulation Default:30 60/50/45/ Pulse Rate TENS Adj.:(5-90) 10/50/35 Modulation Default:30 Pulse Rate 40/6/50...
- Page 17 4.3 The waveform of the stimulation program: TENS Continuous Pulse Width Modulation Cycle time Pulse Rate Modulation Cycle time Modulation (Pulse Rate and Width Modulation) Cycle time...
- Page 18 Modulation(I. M) Synchronous Alternate...
-
Page 19: Operating Instruction
5. OPERATING INSTRUCTION 5.1 Battery 5.1.1 Check/Replace Batteries Open the battery cover and insert three batteries (type AAA) into the battery compartment. Make sure you are installing the batteries properly. Be sure to place the batteries according to the markings of positive terminal (+) and negative terminal (-) in the battery compartment of the device. - Page 20 5.2 Connect Electrode Pads to Electrode Wires Insert the electrode wires connector into the electrode connector. Make sure they are properly connected to ensure good performance. Please refer to the picture below. Caution Always use the electrode pads that comply with the requirements of the IEC/EN60601-1, ISO10993-1/-5/-10 and IEC/ EN60601-1-2, as well as CE and FDA 510(K) regulation.
- Page 21 5.4 Electrode 5.4.1 Electrode Options The electrodes should be routinely replaced when they start to lose their adhesiveness. If you are unsure of your electrode adhesive properties, please order new replacement electrodes. Replacing electrodes should be reordered under the advice of your physician or the device manufacturer to ensure proper quality.
- Page 22 5.4.3 Electrode Placement The placement of electrodes can be one of the most important factors in achieving successful therapy. Please consult a physician to try the various styles of electrode placement to find which method best fits the needs of the individual patient. Every patient is differing from the responds to electrical stimulation, and their needs may vary from the conventional settings suggested here.
-
Page 23: Instructions For Use
6. INSTRUCTIONS FOR USE 6.1 Turn On When using it for the first time, open the battery cover and load three new batteries (Please review Section 5.1.1 for the operating steps and schematic diagram). Press the [ON/OFF/M] button to turn the device on; the LCD will be lit. - Page 24 6.3 Select Treatment Program Based on your need, press [P] button to select the treatment program. The LCD displays as follows: 6.4 Set Program Parameter Press and hold [P] button to enter the setting mode. 1) In the program p1 to p6 of the TENS mode and the program p1 to p5 of the EMS mode, press [+]/[-] button to adjust treatment time.
- Page 25 3) Press [+]/[-] button to adjust corresponding data. Treatment Program Treatment Frequency (Hz) Pulse width (us) Mode time (min) Default:30 Default:50 Default:180 Adjustable:(5-90) Adjustable:(2-100) Adjustable:(100-300) Default:30 Default:60 Default:160-260 TENS Adjustable:(5-90) Adjustable:(2-100) Adjustable:(100-300) Default:30 Default:60 Default:260 (100-300) Adjustable:( 5-90) Adjustable:(2-100) Default:30 Default:5 (2-100) Default:300 (100-300) Adjustable:(5-90)
- Page 26 6.5 Start Treatment Press the [+] button of CH1 to increase the channel 1 intensity press the [+] button of CH2 to increase the channel 2 intensity. The LCD displays as follows: 6.6 Adjust the Output Intensity Place the electrodes on the body parts. Press the [+] button to increase output intensity.
- Page 27 Caution If you feel or become uncomfortable, reduce the stimulation intensity to a more comfortable level and consult with your medical practitioner if problems persist. 6.7 Stop the Treatment and Turn Off the Device Press the [ON/OFF/M] button to stop treatment during the treating mode.
- Page 28 6.9 Low Battery Detection When the battery is low, the icon will twinkle to indicate. Stop the device and change the battery. Notice of Batteries: a. Batteries may be fatal if swallowed. Therefore, keep the batteries and the product out of the reach of children. If a battery is swallowed, go to a hospital immediately.
-
Page 29: Cleaning And Maintenance
7. CLEANING AND MAINTENANCE Fully comply with the following necessary daily maintenance requirements to make sure the device is intact and guarantee its long-term performance and safety. 7.1 Cleaning and Caring for the Device 7.1.1 Pull the electrodes out of the stimulator; clean the device with a soft, slightly damp cloth. - Page 30 Use only the electrode placements and stimulation settings prescribed by your physician or therapist. 7.3.2 It is recommended to use electrodes measuring 50 x 50mm that are manufactured by BodyMed ® 7.3.3 Inspect your electrodes before every use. Replace electrodes if needed.
- Page 31 To use these electrodes: 1) Attach the electrode to the lead wire. 2) Remove the protective backing from the electrode surface. Do not throw away the protective backing because it can be reused after the treatment session has been completed. 3) Place the tacky surface to the prescribed skin area by pressing the electrode firmly to the skin.
-
Page 32: Troubleshooting
7.4 Cleaning the Electrodes Cords: Clean the electrode cords by wiping them with damp cloth. Coating them lightly with talcum powder will reduce tangles and prolong the life. 8. TROUBLESHOOTING Should any malfunction occur while using the device, check whether the parameters are set appropriately for therapy, and adjust the control correctly. -
Page 33: Storage
9. STORAGE 9.1 Storing the Electrode Pads and Lead Wires 1. Turn the device off and remove the lead wires from the unit. 2. Remove the electrodes from your body and disconnect the lead wires from the electrodes. 3. Place the electrodes onto the plastic film and then store in the sealed package. -
Page 34: Electromagnetic Compatibility (Emc) Tables
11. ELECTROMAGNETIC COMPATIBILITY (EMC) TABLES Guidance and Manufactures Declaration - Electromagnetic Emissions The device is intended for use in the electromagnetic environment specific below. The customer or the user has to assure it is used in such environment. Emissions Test Compliance Electromagnetic Environment - Guidance The device uses RF energy only for... - Page 35 Guidance and Manufactures Declaration — Electromagnetic Immunity The device is intended for use in the electromagnetic environment specific below. The customer or the user has to assure it is used in such environment. IEC 60601 Compliance Electromagnetic Immunity Test Test Level Level Environment-Guidance Electrostatic...
- Page 36 Guidance and Manufactures Declaration — Electromagnetic Immunity The device is intended for use in the electromagnetic environment specified below. The customer or the user of device should assure that it is used in such environment. Immunity IEC 60601 Compliance Electromagnetic Environment-Guidance Test Test Level Level...
- Page 37 Test Specifications for ENCLOSURE PORT IMMUNITY to RF Wireless Communications Equipment (Table 9) Test Band Service Modulation ) Maximum Dis- Immunity Frequency (MHz) Power (W) tance Test Level (MHz) (V/m) Pulse 380- modulation TETRA 400 18Hz GMRS 460, FM c)±5kHz 430- FRS 460 deviation...
-
Page 38: Normalized Symbols
12. NORMALIZED SYMBOLS Electrical devices are recyclable material and should not be disposed of with household waste after use. Help us protect the environment and save resources and take this device to the appropriate collection points. Please contact the organization that is responsible for waste disposal in your area if any questions. -
Page 39: Warranty
13. WARRANTY Please contact your dealer or the device center in case of a claim under the warranty. If you have to return the unit, enclose a copy of your receipt with clear statement of defect description. The warranty terms are as below: 1. - Page 40 TENS/EMS/Massager Combo ZZACOMBO...
Need help?
Do you have a question about the ZZACOMBO and is the answer not in the manual?
Questions and answers