Advertisement
Quick Links
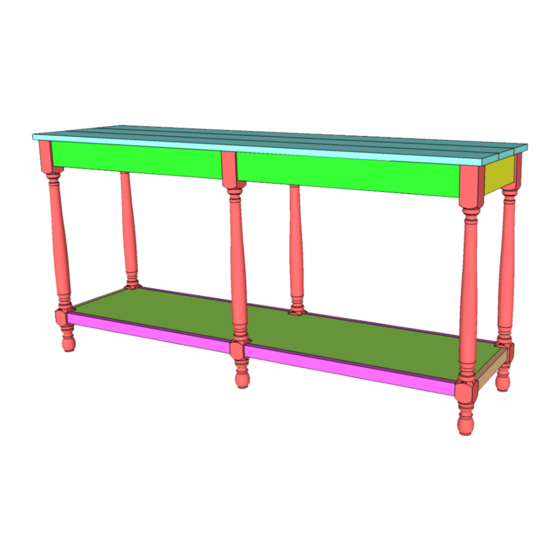
Turned Leg Console Table
Supply List
Item
13-1/2" x 30" x 3/4" plywood
1 x 6 x 6'
1 x 4 x 6'
1 x 2 x 6'
1-1/4" pocket hole screws
Brad nails
2" x 2" x 30" turned legs
Wood glue
Finish of choice
Copyright © 2014 Shanty-2-Chic.com
Quantity
Description
1
For the lower shelf
3
Pine or whitewood board
2
Pine or whitewood board
2
Pine or whitewood board
104
handful
Optional for attaching the lower trim
6
A link to the legs we used can be found on our website
Advertisement

Related Manuals for Shanty 2 CHIC Turned Leg Console Table


Summary of Contents for Shanty 2 CHIC Turned Leg Console Table
- Page 1 Turned Leg Console Table Copyright © 2014 Shanty-2-Chic.com Supply List Item Quantity Description 13-1/2” x 30” x 3/4” plywood For the lower shelf 1 x 6 x 6’ Pine or whitewood board 1 x 4 x 6’ Pine or whitewood board 1 x 2 x 6’...
- Page 2 Drill pocket holes for 1-1/4” pocket hole screws as indicated by the arrows. Use wood glue at every joint in this project. -2-C hanTy urned onsoLe abLe...
- Page 3 Attach the lower trim pieces to the lower shelf. Make sure the top sides are flush. This table will be built upside down. Start the assembly with the legs and the top rails. Make sure the pocket holes to attach the top panel are facing the right direction.
- Page 4 Glue and assemble the planked top. Carefully place the base assembly on the top panel and secure it with pocket hole screws. Sand and finish as you wish. Be sure to personalize your console to add your own touches. After your done stop by our website and let us know! We love seeing what you can come up with too!
Need help?
Do you have a question about the Turned Leg Console Table and is the answer not in the manual?
Questions and answers