Advertisement
Quick Links
Supply List
Item
48" x 48" x 3/4" plywood
24" x 48" x 1/4" plywood
1 x 4 x 8'
1 x 2 x 8'
3/4" x 8' cove moulding
1 x 6 x 15"
1 x 3 x 15"
3-1/2" bun feet
Wood glue
1-1/4" pocket hole screws
Brad nails or finish nails
Drawer pull
Finish of choice
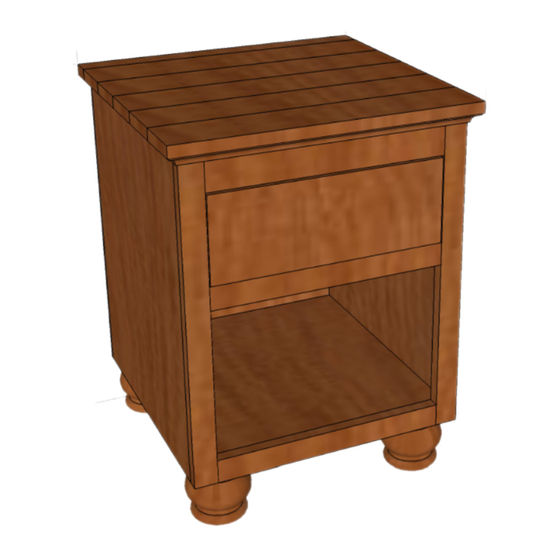
Bun Feet Nightstand
Copyright © 2015 Shanty-2-Chic.com
Quantity
Description
1
1
3
Pine or whitewood board
3
Pine or whitewood board
1
1
Pine or whitewood board
1
Pine or whitewood board
4
92
handful
1
Advertisement

Related Manuals for Shanty 2 CHIC Bun Feet Nightstand


Summary of Contents for Shanty 2 CHIC Bun Feet Nightstand
- Page 1 Bun Feet Nightstand Copyright © 2015 Shanty-2-Chic.com Supply List Item Quantity Description 48” x 48” x 3/4” plywood 24” x 48” x 1/4” plywood 1 x 4 x 8’ Pine or whitewood board 1 x 2 x 8’ Pine or whitewood board 3/4”...
- Page 2 -2-C hanty ightstand...
- Page 3 Use wood glue at every joint in this project. Attach the bottom panel to the sides with 1-1/4” pocket hole screws making sure the pocket holes are facing down. The top of the bottom panel is 1-1/2” from the bottom of the sides. Attach the top front and back braces.
- Page 4 Assemble the front faceframe. There should be a 5-5/8” gap between the top two pieces. Attach the front face frame to the front of the case. Secure it with brad nails on the side panels and pocket hole screws from the bottom panel and top brace.
- Page 5 First, attach the horizontal boards for the drawer to run across with pocket hole screws. These should be horizontal and start at the bottom of the drawer opening and go back. Then attach the fina cabinet back brace to the sides with pocket hole screws. The bottom of the brace should line up with the bottom of the drawer runners.
- Page 6 Attach the back with brad nails. Flip the cabinet upside down and use glue and brad nails to attach the feet support blocks. Then attach the bun feet as needed. -2-C hanty ightstand...
- Page 7 Assemble the drawer box with glue and 1-1/4’ pocket hole screws. Then attach the drawer bottom with wood glue and brad nails. Install the drawer and add the drawer front. Add your drawer pull to the drawer as well. -2-C hanty ightstand...
- Page 8 Assemble the top planking with wood glue and 1-1/4” pocket hole screws. Attach the top planking to the cabinet with wood glue and brad nails or finish nails. -2-C hanty ightstand...
- Page 9 Cut and install the cove moulding below the top. Fill any nail holes, sand, and apply your finish of choice. We hope you are able to make this super easy nightstand and if you do make one be sure to show it off on the reader projects section on website!! -2-C hanty...
Need help?
Do you have a question about the Bun Feet Nightstand and is the answer not in the manual?
Questions and answers