Advertisement
Advertisement
Table of Contents

Related Manuals for Russell Hobbs RHC1960


Summary of Contents for Russell Hobbs RHC1960
- Page 1 INSTRUCTIONS AND WARRANTY MODEL NO. RHC1960 RUSSELL HOBBS CERAMIC UPRIGHT HEATER...
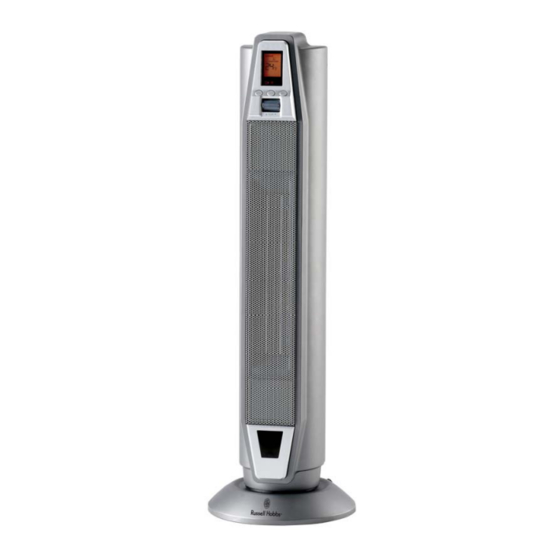
- Page 2 Congratulations on purchasing our Russell Hobbs Ceramic Upright Heater. Each unit is manufactured to ensure safety and reliability. Before using this heater for the first time, please read the instruction manual carefully and keep it for future reference. PART NAME : FRONT AND BACK FEATURES OF THE RUSSELL HOBBS CERAMIC UPRIGHT HEATER •...
-
Page 3: Important Safeguards
IMPORTANT SAFEGUARDS When using any electrical heater, basic safety precautions should always be followed including the following: 1. Please read the instructions carefully before using any heater. 2. Always ensure that the voltage on the rating label corresponds to the mains voltage in your home. - Page 4 plug point. Do not place the extension cord in a position where it can be pulled on by children or animals or tripped over. 16. This heater is not suitable for outdoor use. Do not use this heater for anything other than its intended use.
- Page 5 OPERATING INSTRUCTIONS The heater must be placed on a flat level surface. When heater is plugged in the power switch is turned on, there will be a “beep” and a red power light to indicate that the power is on. The red light will remain lit until the power switch is off or the heater is unplugged from the outlet.
-
Page 6: Cleaning And Maintenance
Once the timer has been set, the timer will count down the hours in 1 hour and the LCD will display the remaining operating time, until the heater will switch off. THERMOSTAT INSTRUCTION 1. Pressing the POWER/MODE button until the display shows AUTO mode. 2. - Page 7 • The body of the heater should be cleaned with a damp cloth. Do not let water enter the heater. • Do not use bleach or other abrasive substance or solvents to clean your heater as it can be damaging to the finish. •...
-
Page 8: Changing The Plug
CHANGING THE PLUG Should the need arise to change the fitted plug, follow the instructions below. This unit is designed to operate on 230V current only. Connecting to other power sources may damage the heater. Connect a three-pin plug as follows: The wires in this mains lead are coloured in accordance with the following code: Green/Yellow = Earth Blue... -
Page 9: Warranty
PLEASE AFFIX YOUR PROOF OF PURCHASE/RECEIPT HERE IN THE EVENT OF A CLAIM UNDER WARRANTY THIS RECEIPT MUST BE PRODUCED. W A R R A N T Y Amalgamated Appliances (Pty) Limited (“the Supplier”) warrants to the original purchaser of this product (“the Customer”) that this product will be free of defects in material and workmanship which under normal, personal, family or household purpose manifest themselves within a period of 365 days from the date of purchase or in respect of commercial or professional purposes, manifest themselves within a period of 90 days...
Need help?
Do you have a question about the RHC1960 and is the answer not in the manual?
Questions and answers