Table of Contents
Advertisement
Quick Links
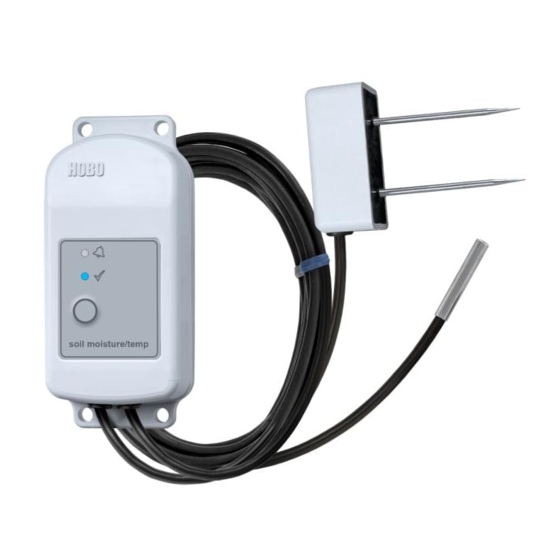
HOBO® MX Soil Moisture (MX2306) and
MX Soil Moisture and Temperature (MX2307) Data Logger Manual
MX2307 Model Shown
HOBO MX2306 and
MX2307 Data Loggers
Models:
Soil Moisture (MX2306)
Soil Moisture and
Temperature (MX2307)
Included Items:
Screws
Cable ties
Required Items:
HOBOconnect app
Mobile device with
Bluetooth and iOS,
iPadOS®, or Android™, or a
Windows computer with a
native BLE adapter or
supported BLE dongle
Accessories (sold
separately):
Solar radiation shield
(RS3‐B for use with
MX2307)
Soil moisture verification
clip (TEROS‐CLIP)
Replacement battery
(HRB‐2/3AA)
26456‐A
The HOBO MX Soil Moisture (MX2306) and HOBO MX Soil Moisture and Temperature (MX2307)
data loggers measure soil moisture and temperature in numerous soil types, including high
salinity and sandy soil. These Bluetooth®‐enabled loggers are designed for wireless
communication with a phone, tablet, or computer. Using the HOBOconnect® app, the user can
easily configure the logger and then download logged data to view or export for further
analysis. The loggers can calculate minimum, maximum, average, and standard deviation
statistics and be configured to indicate alarms at user‐specified thresholds. The loggers also
support burst logging, in which data is logged at a faster interval when sensor readings are
above or below certain limits.
Specifications
Measurement Range
(select one at
configuration)
Accuracy *
Resolution
Dielectric Measurement
Frequency
Volume of Influence
Percent of
Field Capacity
(for VWC measurements
only)
Temperature Sensor
(MX2307)
Range
Accuracy
Resolution
Drift
Response Time
Logger
Operating Range
Radio Power
Transmission Range
Wireless Data Standard
Logging Rate
Logging Modes
Memory Modes
Start Modes
Stop Modes
0.00 to 0.64 m³/m³ VWC in mineral soils
0.00 to 0.70 m³/m³ VWC in soilless media
Apparent Dielectric Permittivity: 1 (air) to 80 (water)
±0.031 m³/m³ typical in mineral soils that have solution EC <8
dS/m
±0.051 m³/m³ typical in soilless media
Apparent Dielectric Permittivity: +/‐ 1 Ɛa for the range 1 to 40
(soil range); +/‐15% for over 40
0.001 m³/m³
Apparent Dielectric Permittivity: 0.1 Ɛa
70 MHz
430 ml
Range: 0 to 200%
Resolution: 0.1%
‐40 to 100°C (‐40 to 212°F), with tip and cable immersion in fresh
water up to 50°C (122°F) for one year
±0.25°C from ‐40 to 0°C (±0.45 from ‐40 to 32°F)
±0.2°C from 0 to 70°C (±0.36 from 32 to 158°F)
±0.25°C from 70 to 100°C (±0.45 from 158 to 212°F)
0.04°C (0.072°F)
<0.01°C (0.018°F) per year
3 minutes in air moving 1 m/s; 20 seconds in stirred water
4 minutes in air moving 1 m/s with RS3‐B Solar Radiation Shield
‐25° to 60°C (‐13° to 140°F)
1 mW (0 dBm)
Approximately 30.5 m (100 ft) line‐of‐sight
Bluetooth Low Energy (Bluetooth Smart)
1 second to 18 hours
Fixed interval (normal, statistics) or burst
Wrap when full or stop when full
Immediate, push button, date & time, or next interval
When memory full, push button, date & time, or after a set
logging period
Advertisement
Table of Contents

Related Manuals for Hobo MX2306


Summary of Contents for Hobo MX2306
- Page 1 Specifications MX2307 Model Shown Measurement Range 0.00 to 0.64 m³/m³ VWC in mineral soils 0.00 to 0.70 m³/m³ VWC in soilless media (select one at configuration) Apparent Dielectric Permittivity: 1 (air) to 80 (water) Accuracy * ±0.031 m³/m³ typical in mineral soils that have solution EC <8 HOBO MX2306 and dS/m MX2307 Data Loggers ±0.051 m³/m³ typical in soilless media Apparent Dielectric Permittivity: +/‐ 1 Ɛa for the range 1 to 40 Models: (soil range); +/‐15% for over 40 Soil Moisture (MX2306) Resolution 0.001 m³/m³ Soil Moisture and Apparent Dielectric Permittivity: 0.1 Ɛa Temperature (MX2307) Dielectric Measurement 70 MHz Included Items: Frequency Screws Volume of Influence 430 ml Cable ties Range: 0 to 200% Percent of Resolution: 0.1% Required Items: ...
- Page 2 HOBO MX Soil Moisture (MX2306) and MX Soil Moisture and Temperature (MX2307) Data Logger Manual Time Accuracy ±1 minute per month 0° to 50°C (32° to 122°F) Battery Type 2/3 AA 3.6 Volt lithium, user replaceable Battery Life 2 years, typical with logging interval of 1 minute and Bluetooth Always On enabled; 5 years, typical with logging interval of 1 minute and Bluetooth Always On disabled. Faster logging intervals and statistics sampling intervals, burst logging, remaining connected with the app, excessive downloads, and paging may impact battery life. Memory 110,000 measurements, maximum (472 KB) Full Memory Download Approximately 60 seconds; may take longer the further the Time device is from the logger Dimensions Logger housing: 10.8 x 5.08 x 2.24 cm (4.25 x 2.0 x 0.88 in.) Soil moisture sensor: 7.5 x 5.1 x 2.4 cm (2.95 x 2.02 x 0.95 inches) Soil moisture sensor needle length: 5.4 cm (2.13 inches) Soil moisture sensor needle diameter: 0.32 cm (0.13 inches) Temperature sensor (MX2307) diameter: 0.53 cm (0.21 in.) Sensor cable length: 2 m (6.56 ft) Weight MX2306: 229 g (80 oz) MX2307: 267 g (94 oz) Materials Logger: Acetal, silicone gasket, stainless‐steel screws Soil Moisture Sensor: ASA plastic body with polyurethane epoxy filling and stainless‐steel pins Temperature Sensor (MX2307): Stainless‐steel waterproof tip Cable: PVC, UV resistant and rodent repellent (soil moisture sensor cable) Environmental Rating Logger: ‐25 to 60°C (‐13 to 140°F); weatherproof; NEMA 6 and IP67 Soil Moisture sensor and cable: ‐40 to 60°C (‐40 to 140°F) Temperature sensor and cable (MX2307): Immersion in water up ...
- Page 3 HOBO MX Soil Moisture (MX2306) and MX Soil Moisture and Temperature (MX2307) Data Logger Manual External Sensor: This is the soil moisture (and temperature sensor in MX2307 model) attached to the bottom of the logger. Soil Moisture Sensor Components and Operation The soil moisture sensor measures the volumetric water content (VWC) of soil using stainless‐steel needles. A ferrite core positioned on the sensor cable 7.6 cm (3 inches) away from the sensor head is used to isolate the sensor from any interferences in the system. This mitigates any potential noise from the system on the measured sensor data. Important: Do not attach anything to the section of the Downloading the App and cable between the sensor head and the ferrite core as Connecting to a Logger this may influence the measurements. Install the app to connect to and work with the logger. 1. Download HOBOconnect to a phone or tablet from the App Store® or Google Play™. Download the app to a Windows computer from Ferrite core WARNING: Risk of www.onsetcomp.com/products/software/hoboconnect. personal injury is 2. Open the app and enable Bluetooth in the device settings if present. Sensor needle prompted. points are extremely sharp and will puncture 3. Press the button on the logger to wake it up. skin. Handle with care. 4. Tap Devices and then tap the logger in the app to connect to it. If the logger does not appear or if it is having trouble connecting, follow these tips: ...
-
Page 4: Configuring The Logger
HOBO MX Soil Moisture (MX2306) and MX Soil Moisture and Temperature (MX2307) Data Logger Manual Now. Logging will begin immediately after configuration Tap this: To do this: settings are loaded on the logger. The data will start with Start logging if the logger was configured to start this indetermined time and at the selected logging > with a button push. See Configuring the Logger. interval from there. On Next Logging Interval. This is the most common start Stop the logger from recording data (this option. Logging will begin at the next even interval as > overrides any Stop Logging settings described in determined by the selected logging interval. For example, Configuring the Logger). if a 10‐minute interval is selected, the data will start at Illuminate the logger LEDs for 4 seconds. the next even 10‐minute time. > On Button Push. Logging will begin once the button on the logger is pressed for 3 seconds. Set a logger password that will be required if On Date/Time. Logging will begin on a date and time you > another mobile device attempts to connect to it. To reset a password, press the button on the specify. Select the date and time. Tap Save. logger for 10 seconds or tap and tap Reset. ... -
Page 5: Setting Up Alarms
HOBO MX Soil Moisture (MX2306) and MX Soil Moisture and Temperature (MX2307) Data Logger Manual logger is pressed to wake it up, thereby preserving as much to 0.05 for a soil moisture alarm and the duration m³/m³ battery power as possible. is set to 30 minutes, the alarm will trip once the sensor readings have been below 0.05 for a total of 30 m³/m 12. Select Soil Type: minutes since the logger was started. Mineral – for common soils, with EC values up to 8 Consecutive. The alarm will trip once the sensor reading dS/m. is out of the acceptable range continuously for the Soilless – for potting soils, perlite, and peat moss with selected duration. For example, if the low alarm is set to EC values up to 8 dS/m. 0.05 for a soil moisture alarm and the duration is m³/m³ Apparent Dielectric Permittivity – raw measurements set to 30 minutes, the alarm will only trip if all sensor that can be used in published equations such as the readings have been below 0.05 for a continuous 30‐ m³/m Topp equation to derive soil moisture data. minute period. 13. Enable or disable Percent of Field Capacity – To see soil 7. Tap Save. For MX2307 models, repeat steps 3–7 for the moisture as the percent of field capacity, enable this and ... - Page 6 HOBO MX Soil Moisture (MX2306) and MX Soil Moisture and Temperature (MX2307) Data Logger Manual To set up burst logging: selected. Statistics are calculated at a sampling rate you specify with the results for the sampling period recorded at each 1. Tap Devices. Press the button on the logger to wake it up (if logging interval. The following statistics can be logged for each necessary). sensor: The maximum, or highest, sampled value 2. Tap the logger in the app to connect to it and tap . The minimum, or lowest, sampled value 3. Tap Logging Mode and then tap Burst Logging. An average of all sampled values 4. Select Low and/or High and either type or drag the slider to set the low and/or high values. The standard deviation from the average for all sampled 5. Repeat step 4 for the other sensor if desired. values. 6. Set the burst logging interval, which must be faster than the For example, an MX2307 logger is configured with both the soil logging interval. Keep in mind that the faster the burst moisture and temperature sensors enabled, and the logging logging rate, the greater the impact on battery life and the interval is set to 5 minutes. The logging mode is set to fixed shorter the logging duration. Because measurements are logging with Normal and all four statistics enabled and with a being taken at the burst logging interval throughout the statistics sampling interval of 30 seconds. Once logging begins, deployment, the battery usage is similar to what it would be ...
-
Page 7: Setting A Password
HOBO MX Soil Moisture (MX2306) and MX Soil Moisture and Temperature (MX2307) Data Logger Manual Internal Event Name Definition Setting a Password Stopped The logger stopped logging. You can create an encrypted password for the logger that will be required if another device attempts to connect to it. This is Alarm An alarm has occurred because the recommended to ensure that a deployed logger is not Tripped/Cleared reading was outside the alarm limits or mistakenly stopped or purposely altered by others. This back within range. Note: Although the password uses a proprietary encryption algorithm that changes reading may have returned to a normal range during logging, an alarm cleared with every connection. event will not be logged if the logger was To set a password: set up to maintain alarms until reconfigured. 1. Tap Devices. Press the button on the logger to wake it up (if New Interval The logger has switched to logging at the necessary). Tap the logger in the app to connect to it. burst logging rate or back to the normal rate. 2. Tap (if applicable) and then . Safe Shutdown The battery level dropped below a safe 3. Type a password and then tap Set. operating voltage and the logger Only the device used to set the password can then connect to ... - Page 8 HOBO MX Soil Moisture (MX2306) and MX Soil Moisture and Temperature (MX2307) Data Logger Manual Avoid any metal located between the sensor and the Trench Installation Method ferrite core because it can interfere with VWC This method is best for shallow installations at less than 40 cm measurements. (15.7 inches). This requires digging a trench with a shovel, When installing sensors in rocky soils, use care to avoid excavator, or other tool to the depth of the deepest installed sensor (if installing more than one in the measurement bending sensor needles. location). For deep installations, this may require a large trench. Minimize air gaps around the sensor. Air gaps around the The sensor is then installed carefully by hand into the sensor needles will result in low readings of soil moisture. undisturbed soil of the trench sidewall. The trench is carefully Use conduit to protect the cable against damage from backfilled to preserve the bulk density of the soil and avoid animals, lawn mowers, exposure to chemicals, etc. dislodging the installed sensor by accidentally snagging the Secure any loose cables with cable ties. ferrite core. Sensor Installation Instructions 1. Auger or dig a hole to the desired sensor depth. 2. Carefully insert the sensor in the hole and push the sensor so that the needles are inserted into the undisturbed side of the soil. Check that the sensor is firmly seated. 3. If using the temperature sensor for soil temperature, insert that into the side of the hole, at least 2 cm (1 inch) from the soil moisture sensor and ferrite core. Sensor Installation Guidelines ...
-
Page 9: Maintenance
according to local regulations for lithium batteries. Federal Communication Commission Interference Statement This equipment has been tested and found to comply with the limits for a Class B digital device, pursuant to Part 15 of the FCC Rules. These limits are designed to provide reasonable protection against harmful interference in a residential installation. This equipment generates uses and can radiate radio frequency energy and, if not installed and used in accordance with the instructions, may cause harmful interference to radio communications. However, there is no guarantee that interference will not occur in a particular installation. If this equipment does cause harmful interference to radio or television reception, which can be determined by turning the equipment off and on, the user is encouraged to try to correct the interference by one of the following measures: Reorient or relocate the receiving antenna Increase the separation between the equipment and receiver Connect the equipment into an outlet on a circuit different from that to which the receiver is connected Consult the dealer or an experienced radio/TV technician for help This device complies with Part 15 of the FCC Rules. Operation is subject to the following two conditions: (1) This device may not cause harmful interference, and (2) this device must accept any interference received, including interference that may cause undesired operation. FCC Caution: Any changes or modifications not expressly approved by the party responsible for compliance could void the user's authority to operate this equipment. Industry Canada Statements This device complies with Industry Canada license‐exempt RSS standard(s). Operation is subject to the following two conditions: (1) this device may not cause interference, and (2) this device must accept any interference, including interference that may cause undesired operation of the device. Avis de conformité pour l’Industrie Canada Le présent appareil est conforme aux CNR d'Industrie Canada applicables aux appareils radio exempts de licence. L'exploitation est autorisée aux deux conditions suivantes : (1) l'appareil ne doit pas produire de brouillage, et (2) l'appareil doit accepter tout brouillage radioélectrique subi, même si le brouillage est susceptible d'en compromettre le fonctionnement. To comply with FCC and Industry Canada RF radiation exposure limits for general population, the logger must be installed to provide a separation distance of at least 20cm from all persons and must not be co‐located or operating in conjunction with any other antenna or transmitter. © 2015–2022 Onset Computer Corporation. All rights reserved. Onset, HOBO, HOBOconnect, and HOBOlink are registered trademarks of 1‐508‐759‐9500 (U.S. and International) Onset Computer Corporation. App Store, iPhone, iPad, and iPadOS are service marks or registered trademarks of Apple Inc. Android and 1‐800‐LOGGERS (564‐4377) (U.S. only) Google Play are trademarks of Google LLC. Windows is a registered trademark of Microsoft Corporation. Bluetooth and Bluetooth Smart www.onsetcomp.com/support/contact are registered trademarks of Bluetooth SIG, Inc. All other trademarks are the property of their respective companies. 26456‐A Patent #: 8,860,569...
Need help?
Do you have a question about the MX2306 and is the answer not in the manual?
Questions and answers