Hobo MX Series Quick Start
Water level logger
Hide thumbs
Also See for MX Series:
- Manual (14 pages) ,
- Quick start manual (4 pages) ,
- Manual (10 pages)
Table of Contents
Advertisement
Quick Links
Quick Start for the HOBO® MX Water Level Logger (MX2001)
Before you begin: After completing steps 1–4, it is recommended that you perform a trial run of steps 5 through 11 before deploying the
logger.
IMPORTANT: When assembling the logger or attaching the cable, make sure the O-rings and mating housing surfaces are clear of any
debris. Any contamination of these surfaces can cause leaks that will lead to logger failure.
1
Install the batteries in the top end. Unscrew the end cap and pull out the board. Apply a small amount of the included fresh
dielectric grease to the battery terminals. Insert the included two AA batteries observing polarity as shown on the board. Reinsert
the board. Screw the cap back on until hand tight.
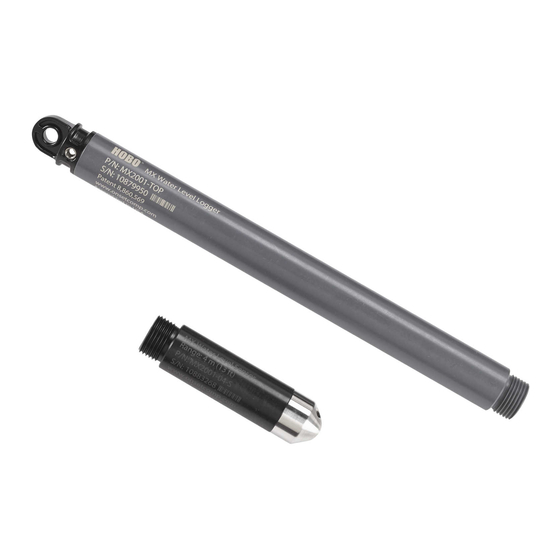
Top end
2
Connect the top end to the sensor end with the water level logger cable as shown here. The end of the cable with the longer
housing connects to the top end as shown below.
Sensor end
3
4
Open the app. Enable Bluetooth® in your device settings if prompted.
5
Tap Devices in the app. The logger should appear in the list of devices. If it does not appear, make sure it is within range of your
mobile device. (Note that the serial number shown in the app is for the top end of the logger).
6
If you are ready to deploy the logger, place it in the deployment location. Refer to the logger manual at
www.onsetcomp.com/manual/mx2001 for deployment guidelines. Otherwise, skip deployment and complete the following steps
as a test.
7
Tap the logger in the app to connect to it and tap
19388-K MAN-QSG-MX2001
Unscrew end cap
Plug this portion of the cable with
the longer housing into the top end
and screw to tighten (hand tight)
Plug this portion of the cable with the shorter housing
into the sensor end and screw to tighten (hand tight)
Download HOBOconnect® to your phone or tablet.
to set up the logger.
Remove board and
install batteries
Top end
Advertisement
Table of Contents

Subscribe to Our Youtube Channel
Related Manuals for Hobo MX Series


Summary of Contents for Hobo MX Series
- Page 1 Quick Start for the HOBO® MX Water Level Logger (MX2001) Before you begin: After completing steps 1–4, it is recommended that you perform a trial run of steps 5 through 11 before deploying the logger. IMPORTANT: When assembling the logger or attaching the cable, make sure the O-rings and mating housing surfaces are clear of any debris.
- Page 2 © 2015–2020 Onset Computer Corporation. All rights reserved. Onset, HOBO, and HOBOconnect are trade,marks or registered trademarks of Onset Computer Corporation. App Store is a service mark of Apple Inc. Google Play are is a trademark of Google LLC.
Need help?
Do you have a question about the MX Series and is the answer not in the manual?
Questions and answers