Sign In
Upload
Download
Add to my manuals
Delete from my manuals
Share
URL of this page:
HTML Link:
Bookmark this page
Add
Manual will be automatically added to "My Manuals"
Print this page
×
Bookmark added
×
Added to my manuals
Manuals
Brands
Walker Edison Manuals
Indoor Furnishing
AF18DEW1D
Assembly instructions manual
Walker Edison AF18DEW1D Assembly Instructions Manual
Hide thumbs
1
2
3
4
5
6
7
8
9
10
11
12
13
14
15
16
17
18
19
20
21
22
page
of
22
Go
/
22
Bookmarks
Advertisement
Quick Links
Download this manual
Previous
Page
Next
Page
1
2
3
4
5
Advertisement
Related Manuals for Walker Edison AF18DEW1D
Indoor Furnishing Walker Edison AF16LOST Assembly Instructions Manual
(7 pages)
Indoor Furnishing Walker Edison AF16ALSTG Assembly Instructions
(4 pages)
Indoor Furnishing Walker Edison AF18PKRST Assembly Instructions Manual
(16 pages)
Indoor Furnishing Walker Edison AF16RCSTGL Assembly Instructions Manual
(6 pages)
Indoor Furnishing Walker Edison AF18CHVST Assembly Instructions Manual
(7 pages)
Indoor Furnishing Walker Edison AF18NAOST Assembly Instructions Manual
(14 pages)
Indoor Furnishing Walker Edison AF19NATST Assembly Instruction Manual
(8 pages)
Indoor Furnishing Walker Edison AF18CRAST Assembly Instructions Manual
(22 pages)
Indoor Furnishing Walker Edison AF18LAN1DRST Assembly Instructions Manual
(25 pages)
Indoor Furnishing Walker Edison AF18BRIST Assembly Instructions Manual
(27 pages)
Indoor Furnishing Walker Edison AF18MXST Assembly Instructions Manual
(15 pages)
Indoor Furnishing Walker Edison AF18MWST Assembly Instructions Manual
(8 pages)
Indoor Furnishing Walker Edison AF16LWST Assembly Instructions Manual
(8 pages)
Indoor Furnishing Walker Edison AF16HEX3 Assembly Instructions Manual
(8 pages)
Indoor Furnishing Walker Edison AF30BELMC Assembly Instructions Manual
(18 pages)
Indoor Furnishing Walker Edison AF42LWETG Assembly Instructions Manual
(10 pages)
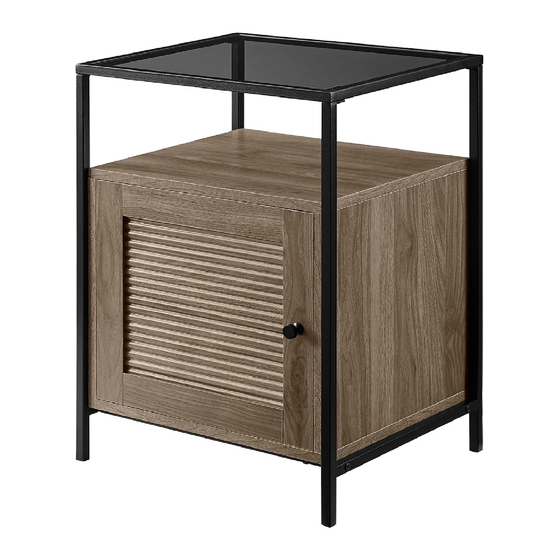
Summary of Contents for Walker Edison AF18DEW1D
Page 5
Secure cam bolt (B) into part (3),then using screw (L) attach Door stopper (K) to part (3) with Philips head screwdriver as per diagram.
Page 6
Insert wooden dowel (A) into parts (5,6) as per diagram.
Page 7
Using Cam lock(C) attach part (3) to part (5) with Philips head screwdriver as per diagram.
Page 8
Using Cam lock(C) attach part (3) to part (6) with Philips head screwdriver as per diagram.
Page 9
Place part (7) as per diagram.
Page 10
Using bolt (E) attach part (4) into parts (5,6,7) with hex key (F) as per diagram.
Page 11
Using screw (N) secure plastic wedge (M) with Philips head screwdriver as per diagram.
Page 12
Place sticker (D) cover the holes as per diagram .
Page 13
Using bolt (J) attach part (9) to part (4) with hex key (F) as per diagram. Note: Do not fully tighten all the bolts.
Page 14
Using bolt (H) attach part (8) to part (9) with hex key (F) as per diagram.
Page 15
Repeat the action same as last step 10.
Page 16
Using bolt (G) attach part (8) to part (2) with hex key (F) as per diagram. Note:Fully tighten all the bolts.
Page 17
Using screw (T) attach Europe hinge (U) to part (10) with Philips head screwdriver as per diagram.
Page 18
Using Handle bolt (Q) attach Handle (P) into part (10) with Philips head screwdriver as per diagram.
Page 19
Using screw (T) attach Europe hinge (U) to part (5) with Philips head screwdriver as per diagram.
Page 20
Tear off glass pad (R) and place glass pad (R) upon the part (2) as per diagram.
Page 21
Put part (1) carefully as per diagram.
Print
Rename the bookmark
Delete bookmark?
Delete from my manuals?
Login
Sign In
OR
Sign in with Facebook
Sign in with Google
Upload manual
Upload from disk
Upload from URL