Table of Contents
Advertisement
Quick Links
Advertisement
Table of Contents

Related Manuals for Thuraya IP Commander


Summary of Contents for Thuraya IP Commander
- Page 1 Thuraya IP Commander Operating Instructions Version 4.0...
- Page 2 Acrobat, Adobe Reader, and Flash are trademarks or registered trademarks of Adobe Sys- tems, Inc. Microsoft, Windows, and .NET are trademarks or registered trademarks of Microsoft Corporation in the United States and other countries. Thuraya is a registered trademark of Thuraya Satellite Telecommunications Company. Ethernet is a registered trade- mark of Ethernet Alliance, Inc.
-
Page 3: Table Of Contents
Thuraya IP Commander Terminal Table of Contents List of Figures List of Tables Safety Information Warning Symbols Warnings for the Thuraya IP Commander and Antenna 1. Introduction Computer and Local Area Network Configuration Network Configuration Ethernet Switches and Hubs Computers Microsoft Windows 7 Microsoft Windows XP Apple®... - Page 4 Figure 5: Hook-up Diagram (numbering same as above) Figure 6: IP Commander Mounting Details Figure 7: Steps to Install SIM Card Figure 8: Thuraya Handset Configured for Use With IP Commander SRT Wireless LLC is the sole distributor of products for SR Technologies, Inc.
-
Page 5: Thuraya Ip Commander Terminal
Table 2: Open Access Panel and Install Voice and IP SIM Cards Table 3: Close and Seal the Access Panel Table 4: Remote Control Thuraya IP Commander from Handset SRT Wireless LLC is the sole distributor of products for SR Technologies, Inc. -
Page 6: Safety Information
Safety Information For your safety and protection, read this entire user guide before you attempt to use the Thuraya IP Commander. In particular, read this safety section carefully. Keep this safety information where you can refer to if necessary. Warning Symbols This section introduces the various types of warnings used in this document to alert you to possible safety hazards. - Page 7 Do not locate the antenna close to interfering signal sources or receivers. It is recommended that no other antennas be loc- ated within three meters of the Thuraya antenna. If there is other equipment installed near the Thuraya IP Commander, it is recommended to operate all equipment simultaneously and verify there is no co-interference.
- Page 8 WARNING: General Handle your Thuraya IP Commander device with care. The Thuraya antenna is weather resistant per IEC 60529 IP56; however, do not submerge the unit. Avoid exposing the Thuraya IP Commander to extreme hot or cold temperatures outside the range -25 ºC to +55 ºC.
- Page 9 Therefore, people who wear a cardiac pacemaker and who want to use the Thuraya IP Commander should seek the advice of their cardiologist. If, as a pacemaker user, you are still con-...
- Page 10 This page is intentionally blank SRT Wireless LLC is the sole distributor of products for SR Technologies, Inc.
-
Page 11: Introduction
IP Commander gives you instant access to the Internet anywhere you can “see” a Thuraya satellite. With the addition of a multi-port switch, you can use your IP Commander to set up a small network for wired devices, as well as wireless con- nections through its standard Wi-Fi®... -
Page 12: Computer And Local Area Network Configuration
10/100 MB/sec To Thuraya Connect Ethernet Port of Laptop Antenna Directly to Ethernet Port of IP Commander Figure 1: Direct Connection of Laptop and IP Commander • Connect the IP Commander and Laptop PC through an Ethernet hub or switch (multiple users). See Figure 2. -
Page 13: Ethernet Switches And Hubs
1. Introduction Ethernet Switches and Hubs By connecting the designated input port of a five-port Ethernet hub or switch to the Eth- ernet (RJ-45) connector on the IP Commander front panel, four TCP/IP compatible net- work devices, such as switches, printers, and computers, can be added to the local area network. -
Page 14: Microsoft Windows Xp
5. Select Obtain an IP address automatically. Once the new window appears, click the OK button. Click the OK button again to complete the PC configuration. 6. Power-up the IP Commander and link with the Thuraya satellite. 7. Launch your preferred web browser and enter the URL http://www.192.168.1.254. -
Page 15: Apple® Os X® (Vers. 10.6.8 And Newer)
IP Commander (or through an Ethernet switch, which in turn is connected to the IP Commander). 2. Power-up the IP Commander and link with the Thuraya satellite. 3. Launch your preferred web browser and enter the URL http://www.192.168.1.254. The default username is admin, and the default password is admin. -
Page 16: Install Your New Ip Commander System
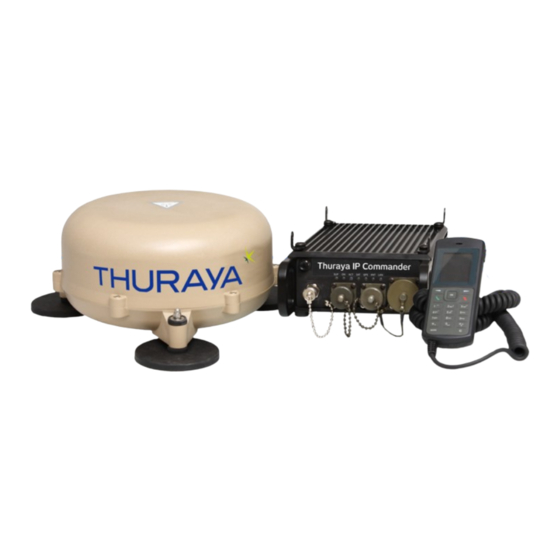
See Figure 3 below. Figure 3: Thuraya® IP Commander System Packing Case The system is shipped in a custom shipping box, which contains a Thuraya IP Com- mander radio, a SpaceCom® antenna with a 10-foot (3 meter) RF cable, a wired Thuraya handset, two Wi-Fi antennas, Ethernet (RJ-45) cable, a DC power cable, an AC power sup-... -
Page 17: Front Panel Controls
SAT: Satellite antenna status GPS: GPS status ANT: Transmit antenna status LAN: Local Area Network status Quickly press and release to power up the Thuraya ❼Power/Reset Button IP Commander. Press and hold for several seconds to reboot or completely power-down the unit. -
Page 18: Equipment Setup
(item ❺ above), and the other to your network (switch, router, or a computer). 5. Connect the locking end of the power supply to the Thuraya IP Commander (item ❹ above). Connect the AC power cord (removed from photo for clarity) to the power supply and plug into a standard wall outlet (100-240 VAC, 50/60 Hz). -
Page 19: Physical Placement Of The Ip Commander Enclosure
For permanent installations, the Thuraya IP Commander may be small enough to be mounted under the dashboard or center console of some vehicles. Mounting hardware (screws, bolts, brackets) are not provided. - Page 20 The enclosure is aluminum; do not overtighten the bolts, as it may strip the threads. Because of its small size, and ability to be controlled with a web browser, the Thuraya IP Commander enclosure can be mounted almost anywhere, in plain sight, or stashed away, out of sight.
-
Page 21: Figure 6: Ip Commander Mounting Details
2. Install Your New IP Commander System Figure 6: IP Commander Mounting Details... -
Page 22: Install Sim Card
Secondary. Both are installed into slots behind a metal plate on the left side of the Thuraya IP Commander enclosure, though only the Primary SIM card is used at this time. Below are the instructions for installing the SIM card. -
Page 23: Antenna Installation Guidelines
(if steel or other ferrous metal), or if you intend to use this vehicle per- manently as a platform for the Thuraya antenna, drill mounting holes in the roof to bolt and secure the antenna to that surface, or if available, install roof rails and bolt the assembly to the rails. -
Page 24: Other Mounting Options
2. Install Your New IP Commander System Other Mounting Options There are two other methods of mounting the antenna to your vehicle, though each is more destructive than using the magnetic mount system, and are not supported by SRTW: • Attach mounting brackets between the antenna and roof rails (not available from SRTW). -
Page 25: Secure The Transmission Line And Attach To The Antenna And The Ip Commander
Secure the Transmission Line and Attach to the Antenna and the IP Commander Once the antenna enclosure and the IP Commander are connected via the rf coaxial cable, secure the cable to fixed objects on the vehicle, such as a roof rack, using nylon cable ties. -
Page 26: Handset Status Display
4), press one of the keypad combinations as shown below, followed by presing the Send (OK) button. For example, to reboot the Thuraya IP Commander, press the # key three times, followed by the number 7, or ###7, and Send (OK).
Need help?
Do you have a question about the IP Commander and is the answer not in the manual?
Questions and answers