Table of Contents
Advertisement
Quick Links
Advertisement
Table of Contents

Subscribe to Our Youtube Channel
Related Manuals for Thuraya ATLAS IP+


Summary of Contents for Thuraya ATLAS IP+
- Page 1 Thuraya ATLAS IP+ User Manual User Manual Revision 1.0...
-
Page 2: Table Of Contents
REGULATORY INFORMATION _____________________________________________________ 3 SAFETY INSTRUCTIONS __________________________________________________________ 4 IMPORTANT INFORMATION TO INSTALLERS AND USERS ___________________________ 7 INTRODUCTION ______________________________________________________________ 9 THURAYA NETWORK COVERAGE _____________________________________________ 10 MAIN UNITS ________________________________________________________________ 11 GETTING STARTED __________________________________________________________ 15 USING WEB CONSOLE _______________________________________________________ 20 ENTERING SAFE MODE ENVIRONMENT ______________________________________ 65... -
Page 3: Regulatory Information
Atlas IP+ Terminal User Manual REGULATORY INFORMATION FEDERAL COMMUNICATION COMMISSION NOTICE FCC Identifier: QO4-AVIAIPPLUS USE CONDITIONS: This device complies with Part 15 of the FCC Rules. Operation is subject to the following two conditions: (1) This device may not cause harmful interference, and (2) This device must accept any interference received, including interference that may cause undesired operation. -
Page 4: Safety Instructions
Atlas IP+ Terminal User Manual SAFETY INSTRUCTIONS For the sake of safety and protection, read the manual before attempting to use Thuraya Atlas IP+ Terminal. The following general safety precautions must be observed during all phases of operation, service and repair of this equipment. Failure to comply with these precautions or with specific warnings elsewhere in this user guide violates safety standards of intended use of the terminal. - Page 5 Atlas IP+ Terminal User Manual The chassis of the equipment must be connected to an Grounding, cables and electrical ground. This will minimise electric shock and connections mutual interference. In short, the EQUIPMENT must be grounded to the vessel. Do not attempt to access to the interior of the equipment. Service Only qualified personnel authorized by its manufacturer may perform service.
- Page 6 To legally operate Thuraya equipment, it is necessary to obtain permission from the local telecommunications regulatory authorities of the country you are operating from. Using your equipment in any country without permission causes you to run the risk of confiscation of the equipment by the local authorities.
-
Page 7: Important Information To Installers And Users
This manual is periodically revised and updated. To obtain latest version, please enquire it from the product manufacturer or distributor. Installation Refer to Thuraya Atlas IP Plus Installation Manual. Copyright © Copyright 2018 Addvalue Innovation Pte Ltd. All rights reserved. This publication and its contents are proprietary to Addvalue Innovation Pte Ltd. - Page 8 Atlas IP+ Terminal User Manual Trademarks All trademarks, marks, names, or product names referenced in this publication are the property of their respective owners, and Addvalue Innovation Pte Ltd neither endorses nor otherwise sponsors any such products or services referred to herein. Microsoft, Windows, Windows NT, Windows 2000, Windows XP and Windows 7 are registered trademarks of Microsoft Corporation in the U.S.A.
-
Page 9: Introduction
It supports broadband data communications at speeds up to 444kbps and asymmetric streaming at 16kbps to 384 kbps. Thuraya Atlas IP+ provides improved power efficiency, a smaller form factor and greater versatility than rival maritime broadband products. The terminal features a single cable connection to the stabilised antenna, direct bulkhead mounting and built-in Wi-Fi. -
Page 10: Thuraya Network Coverage
Thuraya's robust satellite network provides coverage in the most remote locations, ensuring congestion-free satellite communications to keep you connected at all times. From innovative satellite design to the reliability of each Thuraya device and accessory, we provide a truly superior satellite communication solution beyond the boundaries of terrestrial systems and cellular networks. -
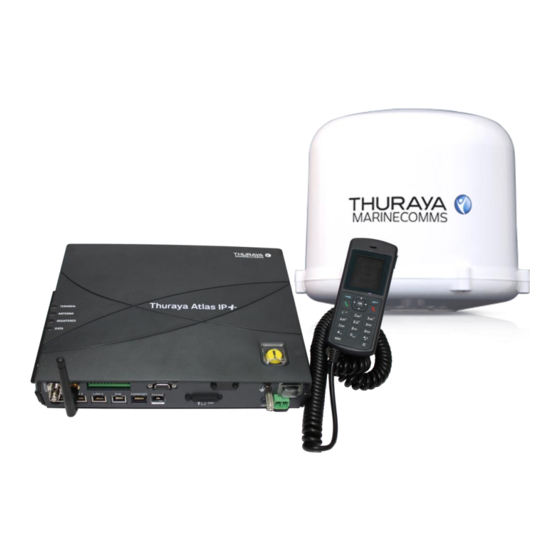
Page 11: Main Units
Atlas IP+ Terminal User Manual 3 MAIN UNITS The terminal includes the following main units: 3.1 Above Deck Unit (ADU) The ADU is a maritime-based 3-axis controlled antenna. The antenna is self-tracking based on patented beam squint technology. The simple and robust electromechanical system, with one motor per free axis, provides full coverage in azimuth and elevation. - Page 12 Atlas IP+ Terminal User Manual 3.2 Below Deck Unit (BDU) The BDU has been developed for maximum flexibility and is the controlling unit for the terminal. It features a reliable industry standard interface connectors and enables users to have optimal connectivity no matter what the conditions or your position at sea. The BDU has a built-in Web Console, which can be accessed from a computer connected to the BDU, using an Internet browser.
- Page 13 SIM Card Slot The BDU has a SIM (Subscriber Identity Module) card slot located at the front panel of the BDU. The terminal requires a dedicated Thuraya SIM card to access the Thuraya network and configure the settings of the terminal.
- Page 14 Atlas IP+ Terminal User Manual Connectivity Ports and Button The following diagram shows the front panel of the BDU and the alert button on the top facing surface of the terminal. a. Antenna Connector (TNC) b. Wi-Fi Connector (SMA) c. LAN Ports (RJ45) d.
-
Page 15: Getting Started
Atlas IP+ Terminal User Manual 4 GETTING STARTED System Configuration 25-m Antenna Cable Above Deck Unit (To be installed in an exposed area) Below Deck Unit (To be installed in protected area) Wi-Fi AC/DC Power Supply Unit PoE (1x) LAN (3x) RS232 Serial GPS O/P (NMEA 0183) Router... - Page 16 4.1 Preparation for Operation 4.1.1 Install the SIM card. The terminal requires a SIM card to access the Thuraya network and configure the settings of the BDU. Please refer to your Airtime Service Provider for more information. a. Tilt up the SIM card slot rubber cover.
- Page 17 Atlas IP+ Terminal User Manual d. Tilt down the SIM card cover to its original position. 4.1.2 Connecting the Antenna Cable a. Connect the antenna cable connector to the connector on the BDU front panel. Rotate the connector in the clockwise direction until it is secured.
- Page 18 Atlas IP+ Terminal User Manual 4.1.4 Connecting the Phone for VoIP Voice Service a. Connect an analogue phone to the Phone port on the BDU front panel. 4.1.5 Connecting to DC Power Source a. Insert the power cable plug to the terminal BDU’s DC power socket until it clicks and is locked in place.
- Page 19 Atlas IP+ Terminal User Manual 4.1.6 Powering Up the Terminal a. Use the ON/OFF switch on the BDU’s front panel. b. Wait for all LED indicators to turn green to indicate the terminal is completely power up. Refer the table below for meaning of the status indicators.
-
Page 20: Using Web Console
Atlas IP+ Terminal User Manual 5 USING WEB CONSOLE 5.1 Register to the Network a. Connect your computer to the BDU using a LAN cable. b. When the connection has been established, open the web browser (for example: Internet Explorer, Google Chrome or Firefox.) . c. - Page 21 Atlas IP+ Terminal User Manual take 2 to 3 minutes. Upon successful registration, with all four BDU’s status indicators lit in green, the terminal will be ready for normal operation. 5.2 Navigating the Web Console 5.2.1 Status Indicators Signal Icon: indicates the signal strength of the satellite. In Data Mode, the status indicator will appear with the Data Icon: Select Data mode for use with VoIP voice services.
- Page 22 Atlas IP+ Terminal User Manual 5.2.2 Menu Icons Below you can see all of the sub menu tabs, under each icon menu item. Home Phone Data Settings Phone Book Compose Connection Language Call History Inbox Data Profiles Terminal Info Sent Port Forwarding Ethernet Draft...
- Page 23 Atlas IP+ Terminal User Manual In Data Mode, a prefix of “D” will be displayed. In Voice Mode, a prefix of “V” will be displayed. The prefix “V” indicates the terminal is operating in Voice Mode and is not to be Note: confused with VoIP services.
- Page 24 Atlas IP+ Terminal User Manual Phone Menu Click Phone icon. Phonebook (For making CS call when on Voice Mode only.) The Phonebook entries can be stored on the SIM card. It allows you to view, add, edit and delete entries on your Phonebook list and to send SMS messages directly from the Phonebook entries.
- Page 25 Atlas IP+ Terminal User Manual Adding to Phonebook record Follow these steps to add a phonebook record: a. Click on Add button b. Input name and phone number. c. Select to save on SIM or Terminal. d. Click on Save. Edit a Phonebook record Follow these steps to edit a phonebook record: a.
- Page 26 Atlas IP+ Terminal User Manual a. Select an entry to delete on from the Phonebook. b. Click on delete button. c. Click on OK to confirm deletion of the entry. Send SMS to a Phone Book record Follow these steps to send an SMS to a phonebook record: a.
- Page 27 Atlas IP+ Terminal User Manual Call History ( In Data Mode ) Allows you to view VoIP call logs, delete entries from the record. Call History ( In Voice Mode ) Allows you to view call logs, delete entries from the record and to send SMS messages directly from the selected entry.
- Page 28 Atlas IP+ Terminal User Manual View option The following table shows the view option for Data Mode and Voice Mode. Mode View Option Description Dialed Call ( VoIP ) To view the list of dialed VoIP calls only. Received Call ( VoIP ) To view the list of received VoIP calls only.
- Page 29 Atlas IP+ Terminal User Manual Deleting a Call History entry Follow these steps to delete a Call History entry: a. Select the entry from the Call History list. b. Click Delete. c. Click Ok to confirm or click Cancel to abort deleting the entry. Refresh Call History display The terminal will periodically update and refresh the call records after a call has ended or changes been made to the records.
- Page 30 Atlas IP+ Terminal User Manual SMS Menu Click on SMS icon. SMS menu provide the following options: Compose ( Only available in Voice Mode) To compose and send text messages. Simply enter a mobile number, type your message and click Send. Composing a New Message Follow these steps to compose a new SMS: a.
- Page 31 Atlas IP+ Terminal User Manual Note: Message is limited to 160 characters (using 7 bit encoded default alphabets) including spaces between words. But it is limited to 70 characters per message using Unicode (UCS2) text message (such as message typed in Chinese, etc.). If the user does not need to store a copy of the sent SMS into SIM card, do uncheck “Store a copy in the SIM”...
- Page 32 Atlas IP+ Terminal User Manual Inbox Shows the details (Sender information, Message, Date and Time stamp) of all SMS received. Reply and Forward button are not available in Data mode. Replying to a SMS (Only available in Voice Mode.) Follow these steps to reply a SMS: Click on a SMS to select it.
- Page 33 Atlas IP+ Terminal User Manual Forwarding an SMS (Only available in Voice Mode.) Follow these steps to forward an SMS: Click on a SMS to select it. The selected SMS will be highlighted in light blue. Click Forward. The Inbox console switches over to the Compose console. c.
- Page 34 Atlas IP+ Terminal User Manual Sent Shows the details (Receiver information and Message) of SMS sent. Resend and Forward button are not available in Data mode. Resending a sent SMS (Only available in Voice Mode.) Follow these steps to resend a sent SMS (sending the same SMS to the same receiver): a) Click on a SMS to select it.
- Page 35 Atlas IP+ Terminal User Manual Deleting a SMS from the Sent list Follow these steps to delete a single SMS from the Sent list: Click on a SMS to select it. a. Click Delete. b. Click OK to confirm or click Cancel to abort deleting the SMS. Deleting multiple SMS from the Sent list Follow these steps to delete multiple SMS from the from the Sent list: a.
- Page 36 Atlas IP+ Terminal User Manual Draft Stores SMS saved from the Compose console. Sending a draft SMS (Only available in Voice Mode.) Send and Forward button are not available in Data mode. Follow these steps to send a draft SMS: a.
- Page 37 Atlas IP+ Terminal User Manual Forwarding a draft SMS to another recipient (Only available in Voice Mode.) Follow these steps to forward a draft SMS to another recipient: a. Click on a SMS to select it. b. Click Forward. The Draft console switches over to the Compose console. c.
- Page 38 Atlas IP+ Terminal User Manual Data Menu Click on Data icon. Data menu provides the following options: Connection To activate or deactivate PDP context ( internet connection). Click “Activate Default Profile” to activate the PDP context APN and the assigned public IP Address details will be displayed and the user can proceed to access the Internet and use the related features.
- Page 39 Atlas IP+ Terminal User Manual Data Profiles Data Profiles define the connection type of using Standard or Streaming IP connection. You can select from a list of profiles to be the default primary profile and connection type. From Profile 8 to Profile 25, the user create other customized primary profile. Note: The Standard profile is set as the default primary profile and the default connection type is standard (this is charged by the...
- Page 40 Atlas IP+ Terminal User Manual c. Enter the username and password if required. IP Configuration By default, the Dynamic IP Address is selected. If using Static IP Address, then select Static IP Address and enter the IP Address in the space provided. ...
- Page 41 Atlas IP+ Terminal User Manual Enter Incoming Port number in the space provided. (For example, the user is expecting HTTP traffic, the port is 1001). c. Enter the Destination IP Address. (For example, the IP Address of the PC that is connected to the terminal). d.
- Page 42 Atlas IP+ Terminal User Manual Rules To define rules to allow or reject with selected traffic type packets. (Allows maximum setting of up to 220 rules.) Page 42 of 106...
- Page 43 Atlas IP+ Terminal User Manual Mac Filtering Mac Filtering allows the user to define a list of devices to be allowed for connection to the device for both devices connected through LAN port and Wi-Fi connection. Select Enabled to activate the feature. Reject List All devices will be allowed to access the terminal except for those (MAC addresses) listed in the Reject List.
- Page 44 Atlas IP+ Terminal User Manual Setting Selection of the Ethernet mode to be used for incoming traffic connection for either Single user or Multi user mode. Under Ethernet mode, a. Router Mode (Single User) Enable this mode to forward all incoming traffic to a single laptop or desktop based on IP address specified by user.
- Page 45 Atlas IP+ Terminal User Manual Settings Menu Click on Settings icon. Setting menu provides the following options: Language Select the desired language for the Web Console to be displayed. (English, Chinese-Simplified, Chinese-Traditional, Spanish and Vietnamese). Page 45 of 106...
- Page 46 Atlas IP+ Terminal User Manual Terminal Info This tab shows general information about the terminal, Call Log and Call/Data Usage. Information Displays information; a. Software Version b. Hardware Version c. Modem Version d. MCU Version e. Model ID BDU Serial Number g.
- Page 47 Atlas IP+ Terminal User Manual Call Log Displays the call history including the voice call and data sessions. Select VOIP under Call Log Type to display the VOIP call session history. Select PS under Call Log Type to display the data sessions history. Select CS under Call Log Type to display the voice call history.
- Page 48 Atlas IP+ Terminal User Manual Call / Data Usage Displays the total Call Usage, Data Usage and VoIP Usage. Click Clear to reset counter for both call and data usage. Note: All Call and Data usage records are only for reference purposes only. Kindly contact the network operator for detailed billing enquiries.
- Page 49 Atlas IP+ Terminal User Manual When a reserved IP address is selected, the terminal shall prompt an error message and the change shall not take effect. DHCP To change the DHCP IP Pool Start address and Subnet Mask. Wi-Fi By default, the Wi-Fi is disabled.
- Page 50 Atlas IP+ Terminal User Manual Note: When the IP address of the terminal is different from the default, the terminal shall not allow any changes on the WIFI setting. To enable making a change on the WIFI setting, change the terminal IP address back to the default value. Setup Select Enabled to turn on the Wi-Fi module.
- Page 51 Atlas IP+ Terminal User Manual System info Display the information of Ethernet MAC Address, WLAN MAC Address and Software Version. Wireless Settings a. Choose ideal Network Mode and Channel. b. If required, Network Name (SSID) can be renamed by the user. c.
- Page 52 Atlas IP+ Terminal User Manual Security Settings To disable security mode, select Disabled. To other security mode, follow the steps to configure the security settings of the Wi-Fi module. Select the security mode and authentication key. Note: There are four sets of security passwords available for your security configuration and you can only select one set of password.
- Page 53 Atlas IP+ Terminal User Manual VoIP Note: Kindly ensure that VoIP service subscription and provisioning have been activated by the Service Provider prior to using the VoIP service on the terminal. VoIP Setup a. By default, VoIP is enabled. LED should be in Data mode. To activate the data connection, select DATA >...
- Page 54 Atlas IP+ Terminal User Manual VoIP Event Log Display the VoIP event information. Soft-Reboot Tracking Settings a. Default setting is Disabled. b. Select Enabled to activate GPS reporting. c. Select either reporting in IP Data or SMS mode. d. Key in the desire Frequency in seconds. (The time interval to update the server.) e.
- Page 55 Atlas IP+ Terminal User Manual Key in number of Retries when the alert fails to send out due to unexpected error. m. Key in desired seconds in Resend Frequency and Maximum Number of Tries. Page 55 of 106...
- Page 56 Atlas IP+ Terminal User Manual Geo Fence a. There are two ways to enter latitude/longitude: i. Degrees, minutes, seconds. ii. Decimal degrees. b. Select the desire latitude/longitude format. c. Click Add. d. Select Trigger Type: i. In ii. Out iii. In/Out e.
- Page 57 Atlas IP+ Terminal User Manual Emergency Text Misc The Service Centre Address has been predefined with SMSC contact number and it can be modified with the required contact number according to the service provider. Alternatively, click Predefined SMSC. Select the desired service centre address and then click OK to take effect.
- Page 58 Atlas IP+ Terminal User Manual External Ringer Click Enabled to activate the external ringer (or buzzer) when there is an incoming call. The external ringer’s wires are connected to Pin 9 and Pin 10 of the BDU GPIO Output Port. Debug Click Enabled to enable the log file.
- Page 59 Atlas IP+ Terminal User Manual Admin Change Password Follow these steps to change the Web Console login Password: a. Enter the old password in the Old Password field. b. Enter the new password in the New Password field. c. Re-enter the new password in the Re-type Password field. d.
- Page 60 Atlas IP+ Terminal User Manual Please be informed that firmware upgrading is done at your own risk and the equipment manufacturer will not be held responsible for any possible malfunction or damage to the system due to upgrading the firmware. If you encounter any problems or have any questions, please contact the equipment distributor for technical support Browse to the location of the new firmware, select a correct file (*.bin) and click...
- Page 61 Atlas IP+ Terminal User Manual Factory Reset To perform a Factory Reset, enter the security code “admin” and click Factory Reset. Warning: All the settings and user data (Call History, Call/Data Usage, etc.) of the BDU will be cleared and reset to the default settings. System Operation Mode Select either Data for IP data connection or Voice for CS voice mode connection.
- Page 62 Atlas IP+ Terminal User Manual Modem Error Log The Error Log will display the error code number with its short description as illustrated below. Refer to Chapter 9 Error Codes for more information in the remedial actions or solutions. Download Log Files The Log Files can be compressed into a single archive file.
- Page 63 Atlas IP+ Terminal User Manual Click Create Log Archive and the process of the compressing the log files into a single archive file will take several minutes to complete. After completing the creation of the log archive file, click Download Log Archive and save it as your preferred location.
- Page 64 Atlas IP+ Terminal User Manual Firmware Upgrade Follow the following instruction to switch the terminal to safe mode before performing firmware upgrade for the built-in modem. Refer to Chapter 6 for the detailed instruction on the firmware upgrade for built-in modem.
-
Page 65: Entering Safe Mode Environment
Atlas IP+ Terminal User Manual 6 ENTERING SAFE MODE ENVIRONMENT Firmware Upgrade The firmware upgrade is similar as Setting Admin ► Admin ► Firmware Upgrade and it is only applicable for the application firmware. Browse for correct file (*.bin) and then click Upload. Please be informed that firmware upgrading is done at your own risk and the equipment manufacturer will not be held responsible for any possible malfunction or damage to the system due to upgrading the firmware. - Page 66 Atlas IP+ Terminal User Manual Reboot Terminal Click Reboot for the terminal to restart. Page 66 of 106...
- Page 67 Atlas IP+ Terminal User Manual Factory Reset Click Factory Reset with the security code “admin” for the terminal to carry out the factory reset. The factory reset will clear all the settings and user data of the BDU and reset it to the default settings.
- Page 68 Atlas IP+ Terminal User Manual Firewall Click Enabled or Disabled and then Update. Logout To log out from the Web Console. Page 68 of 106...
-
Page 69: Using Alert Button
Atlas IP+ Terminal User Manual 7 USING ALERT BUTTON An Alert Button is easily to be found on the top, right bottom of the BDU and it is used for triggering an emergency alert. Before using the Alert Button, the pre-configuration in both Data and Voice Modes is to be set up under the tracking page. - Page 70 Atlas IP+ Terminal User Manual Page 70 of 106...
-
Page 71: Terminal Accessories
Atlas IP+ Terminal User Manual 8 TERMINAL ACCESSORIES Atlas IP Handset The Atlas IP Handset is connected to the BDU via its handset port and is powered directly from the BDU. The handset is equipped with a large 2’, 65K CSTN, 220 Liquid Crystal Display (LCD), allows you to make/ receive voice calls and also serves as a remote access to the terminal for an user to access various configurations supported by the BDU. - Page 72 Atlas IP+ Terminal User Manual 8.1 Overview of Atlas IP Handset 1. Earpiece 2. Display 3. Hands-free Headset Jack 4. OK Key 5. 4-Way Navigation Ring 6. Select Left Key 7. Select Right Key 8. Call/Answer Key 9. Call/Menu End Key 10.
- Page 73 Atlas IP+ Terminal User Manual 8.2 Keypad - Description and Functions Keys Description/Functions 4-way navigation ring. Press the 4-way navigation ring to scroll left, right, up, and down on the display. Enables scrolling through names, phone numbers, menus or settings. OK key.
- Page 74 Atlas IP+ Terminal User Manual Keys Description/Functions Star * key When entering a phone number, press this key to insert a *. Press and hold this key to insert a +. When writing text, press this key to access a list of special symbols.
- Page 75 Atlas IP+ Terminal User Manual 8.3 The Handset Display and Menu Status Indicator Line Network Indicator Line Selection Key Line Status Indicator line The indicator line shows status symbol informing you about the operating conditions of the BDU. Network Indicator Line The indicator line shows the registration status and region information of the terminal.
- Page 76 Atlas IP+ Terminal User Manual Handset Status Indicators able below explains the meaning of each status indicator displayed in the Main Display screen. Status Indicator Description Signal Strength Indicator New Short Message (SMS) in Inbox Handset Disconnected from Terminal Handset Connected to Terminal Voice Mode Data Mode Handset in Silent Mode...
- Page 77 Atlas IP+ Terminal User Manual Using Contacts or Call Log list from the Handset: Enter the Contacts list of the Handset; scroll to the desired number and press key, or Enter the Log list of the Handset; scroll to the desired number and press key.
- Page 78 Atlas IP+ Terminal User Manual Table below summarizes the functionalities within each menu option: Contacts This menu manages your user contacts. This menu allows you to view call histories. Telephony This menu configures settings related to voice telephony services. Signal This menu displays the terminal information of satellite signal and GPS.
- Page 79 Atlas IP+ Terminal User Manual Contacts Menu The Contacts menu allows you to store, retrieve and update names and phone numbers of your contacts in the SIM card memory. You can also access this menu by pressing Left selection key in Main Display screen.
- Page 80 Atlas IP+ Terminal User Manual Make a voice call to this contact. Search Select this to enter a specific name to search within the contact list. Delete Delete selected contact. Note: You can also delete the selected contact by pressing the Clear key.
- Page 81 Atlas IP+ Terminal User Manual Assign Speed Dial Add this contact to the speed dial list. Reload contacts Reload the contact information from the SIM. Memory status Displays the number of contacts stored in the memory. Note: You can also make a voice call to the selected contact when browsing through or viewing the contacts by pressing the Call key.
- Page 82 Atlas IP+ Terminal User Manual Call Call the number in the selected log entry. Send Send an SMS to the number in the selected log entry. Save Save the number from the selected log entry to the contact list. Note: This option is not available when the log entry already has an entry in the contact list.
- Page 83 Atlas IP+ Terminal User Manual Speed Dial List Select this to configure the speed dial list. The following options are available when pressing the Left selection key while browsing through the list: Assign Assign a contact to the selected entry. To assign a contact: a.
- Page 84 Atlas IP+ Terminal User Manual Signal Menu The Signal menu provides the following sub menus to get the information of the terminal’s GPS. GPS status Show current Latitude and Longitude coordinates, Speed (knots) and Date &Time of acquisition on the BDU. Messaging Menu The Messaging menu allows the user to write new messages, view stored messages from Inbox, Drafts and/or Sent folders and configure...
- Page 85 Atlas IP+ Terminal User Manual c. To send the message, press the key and select Send. d. Enter the recipient’s phone number, and press the key. Alternatively you can select Search by pressing the Left selection key to select the phone number from the contacts.
- Page 86 Atlas IP+ Terminal User Manual Using the 4-way navigation ring , navigate to the desired symbol. Press to confirm selection. Clearing text: To clear text, press once to clear one character at a time. To clear the whole text entry, press and hold to clear the whole text entry.
- Page 87 Atlas IP+ Terminal User Manual Details Display the details of the selected message. Note: You can also make a voice call to the selected message contact when browsing through the messages list by pressing the Call key. Sent Contain text messages that you have sent. The following are available options when pressing the Left selection key while browsing through or viewing the messages in this folder:...
- Page 88 Atlas IP+ Terminal User Manual Open selected message. You can also press while browsing through the message list to open the selected message (This option is not available when viewing the message). Delete Delete selected message. Note: You can also delete the selected message by pressing the Clear key.
- Page 89 Atlas IP+ Terminal User Manual Delete all Select this to clear the messages in a particular folder. Available folder options are: All messages Delete messages in all folders including Inbox, Sent and Draft. Inbox Sent Draft Settings Menu The Settings menu provides the following sub menus to configure the time zone and language.
- Page 90 Serial number Serial number of the BDU. Software version Software version of the BDU Thuraya Module Firmware version of Thuraya Module IMEI number IMEI number of the BDU IMSI number IMSI number of the SIM card ...
- Page 91 Atlas IP+ Terminal User Manual VoIP Info State State of VoIP service. MSIDN MSIDN of VoIP service. MAC address MAC address of VoIP module. Hardware Version Hardware version of VoIP Module. Program Version Program version of VoIP Module. ...
- Page 92 Atlas IP+ Terminal User Manual Security settings Menu The Security menu provides an option to carry out a factory reset to the Handset. Factory reset To perform factory reset on the Handset. Phone manager Menu The Phone manager menu provides the following sub menus to configure settings that are local to the Handset: Display Configure settings that are related to Handset display.
- Page 93 Atlas IP+ Terminal User Manual Backlight To set the duration of the display backlight to remain on. Settings range from Always On (Backlight permanently turned on), 15 seconds to 1 minute. Note: The backlight will be slightly dimmer and finally off when there is no keypad activity after sometime.
- Page 94 Atlas IP+ Terminal User Manual Copyright Display Copyright message Page 94 of 106...
-
Page 95: Troubleshooting
Atlas IP+ Terminal User Manual 9 TROUBLESHOOTING Antenna / Satellite Signal Level Symptoms Descriptions / Remedial Actions Low Signal Strength Bar Check any interference signal from other electronics devices on Web Console that are close to the ADU. Check to ensure that the antenna cable is properly secured. - Page 96 Hang up and retry the call again. SIM Card Symptoms Descriptions / Remedial Actions “REGISTERED” LED Ensure that a correct Thuraya SIM card is used. is red. Ensure that a SIM card is properly inserted into SIM Card slot. ...
- Page 97 Atlas IP+ Terminal User Manual Terminal (BDU) fails to power up Symptoms Descriptions / Remedial Actions Ensure the power switch on the BDU’s front panel is at “On” No light appear on BDU LEDs. position. To reset the circuit breaker on the BDU’s front panel by depressing the lever of the circuit breaker inward fully.
- Page 98 Atlas IP+ Terminal User Manual unexpected errors occurred. RJ11 Phone Port for Standard Call Symptoms Descriptions / Remedial Actions Unable to make outgoing Make sure that there is dial tone before making the call. call For the case of busy tone, o Ensure that the line is not engaged by any other telephone services.
- Page 99 Atlas IP+ Terminal User Manual VoIP Call Service Symptoms Descriptions / Remedial Actions Ensure the data connection has been established. No tone when lifted the handset off hook Ensure that the phone line is connected to the phone port of the BDU.
-
Page 100: Error Codes
Atlas IP+ Terminal User Manual ERROR CODES Code Description Remedial Actions / Solutions Number No error. No action required. The BDU is functioning properly. Failed to read IMEI The BDU failed to read the IMEI. Please restart the BDU. If the problem persists, contact your Service Provider. - Page 101 Atlas IP+ Terminal User Manual Antenna communication problem Check the antenna cable connections are secured at both ADU and BDU antenna ports. Restart the BDU. Calibration failure Check the antenna cable connections are secured at both ADU and BDU antenna ports. Restart the BDU.
- Page 102 Atlas IP+ Terminal User Manual contact the Service Provider. IMSI unknown HLR The subscriber information is not recognized by the network. Please contact your Service Provider. IMSI unknown VLR The subscriber information is not on the network's roaming list. Please contact your Service Provider.
- Page 103 Atlas IP+ Terminal User Manual Registration retries exhausted Network re-connection failure. Restart the BDU if the problem persists. Signal lost Make sure no obstruction is blocking satellite signal and the ADU has a clear sky view in the direction of the satellite. No GPS Make sure no obstruction is blocking satellite signal and no object is placed over the ADU.
- Page 104 Atlas IP+ Terminal User Manual service is already in use for this subscriber. Restart the BDU. If the problem persists, please contact your Service Provider. PDP deactivated by network Network connection failure or the network may be down. Please contact your Service Provider. PDP retries exhausted Network connection failure or the network may down.
- Page 105 Atlas IP+ Terminal User Manual PDP activation rejected Network connection failure due to unknown cause. If the problem persists, please contact your Service Provider. PDP temporarily unavailable Network access temporarily unavailable. Please wait for the terminal to reacquire a connection within 3 to 5 minutes. If the problem persists, contact your Service Provider.
-
Page 106: Glossary
Atlas IP+ Terminal User Manual find a more suitable signal automatically. If this message persists, please contact your Service Provider. GLOSSARY Alternating Current Above Decks Unit Access Point Name Below Decks Unit Direct Current File Transfer Protocol Global Position System GPIO General Purpose Input / Output High Power Amplifier...
Need help?
Do you have a question about the ATLAS IP+ and is the answer not in the manual?
Questions and answers