Table of Contents
Advertisement
Quick Links
Advertisement
Table of Contents

Related Manuals for SCA 585722


Summary of Contents for SCA 585722
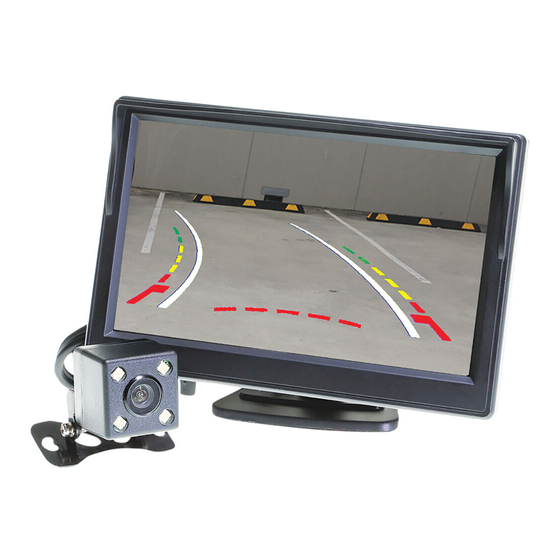
- Page 1 5” DYNAMIC GUIDELINE REVERSE CAMERA KIT INSTRUCTION MANUAL PLU 585722...
-
Page 2: Product Overview
ALL of these instructions before assembling and operating. PRODUCT OVERVIEW Thank you for purchasing the SCA-RC51 Dynamic guideline reversing camera kit. The dynamic guidelines show the intended motion of the vehicle while reversing. This product is designed for easy DIY installation but does require some specific tools, and may require a qualified... - Page 3 WIRING INSTALL DIAGRAM Monitor/Display 6 Metre RCA extension cable Camera Power connector Positive wire (red) connects to positive reverse lamp feed The video signal is transferred from the camera to a monitor via an RCA cable that will need to be run from the boot, through the passenger compartment to the monitors wiring loom.
-
Page 4: Wiring Diagram
WIRING DIAGRAM Monitor 25cm Additional Input (White Female RCA) Reverse Camera Signal 1.7m (Yellow Female RCA) FUSE Monitor Ground Power Harness Negative wire connects to Male RCA vehicle chassis 1.0m 12V + Power connector Positive wire connects to ACC/IGN +12V... - Page 5 WIRING DIAGRAM CONT... Video extension cable Male to Male RCA (Yellow Video/Signal) 6.0m Connects to video signal RCA (cable no: 2) 12V+ Power 12V+ Power Alternative power connector connector supply for display Positive wire monitor. Display Positive wire connects to power monitor can be connects to wire on display...
-
Page 6: Installation
INSTALLATION When mounting the camera, make sure that the camera does not cover any part of the license plate. Choose a position that does not impede the access/operation of the boot release or tailgate latch. For easy DIY installation, the cables for this product are numbered 1 to 6. - Page 7 INSTALLATION Cont... STEP 3. Connect Monitor Power Harness Recommended Power Connection: The end of the monitor power harness cable connects to the red power input cable connector. This connection splits into two wires, a red and a black wire. Connect the red wire (+12V) to a wire that is powered when the vehicles accessories or ignition is turned on.
- Page 8 INSTALLATION Cont... STEP 4. Connect Video Extension Cable Connect one end of the video extension RCA cable to the RCA socket from the camera power harness, then run the RCA cable to the front under side of the driver side dash board to connect to Monitors video input RCA (Yellow AV1).
- Page 9 INSTALLATION Cont... STEP 6. Connect Camera Harness Connect the camera power harness to the camera harness. Mount the camera to vehicle NOTES: CAN BUS In the event that the cars reversing lights are driven by CAN BUS the above wiring system may not trigger the system correctly.
-
Page 10: Menu Functions
TESTING THE REVERSING CAMERA 1. Engage the park brake and turn the ignition key to the on position. DO NOT START THE VEHICLE. 2. Select reverse gear with the gear shift. The monitor will trigger and turn on automatically when it receives the camera video signal. -
Page 11: Product Specifications
PRODUCT SPECIFICATIONS Display 5.0 inch 16:9 TFT-LCD Lens view angle 100 degree wide viewing angle Resolution 420 (TV Lines) Effective pixels 480(H)*234(V) TV system PAL/NTSC Contrast 500:1 Brightness 500cd/m2 Monitor Rated 12V DC working voltage Video inputs Camera Dynamic guidelines Dimensions W125 x H82 x D30 mm... -
Page 12: Warranty
WARRANTY This product is guaranteed against defects for a period of 12 months from date of purchase. This warranty is provided by SRGS Pty Ltd ABN: 23 113 230 050 (Supercheap Auto) of 6 Coulthards Avenue, Strathpine, Queensland 4500, Australia. Ph (07) 3482 7500. Supercheap Auto will offer a repair, replacement product or store credit if the product is assessed as being defective during the warranty period.
Need help?
Do you have a question about the 585722 and is the answer not in the manual?
Questions and answers