Table of Contents
Advertisement
Quick Links
FOR MODEL NUMBERS MD1500 / MD1501 / MD1502
OWNER'S MANUAL
RATIS
TM
DO NOT REMOVE PRIOR TO SALE
WARNING: This document is for the use of licensed users only.
No part of this document may be reproduced, transmitted, or transcribed in any
form or by any means without the express permission of Mustang Survival Inc.
While every effort possible has been made to ensure technical accuracy,
information within this document is subject to change without notice.
INFLATABLE LPU
Advertisement
Table of Contents

Subscribe to Our Youtube Channel
Related Manuals for Mustang Survival RATIS MD1500


Summary of Contents for Mustang Survival RATIS MD1500
- Page 1 WARNING: This document is for the use of licensed users only. No part of this document may be reproduced, transmitted, or transcribed in any form or by any means without the express permission of Mustang Survival Inc. While every effort possible has been made to ensure technical accuracy,...
-
Page 2: Table Of Contents
TABLE OF CONTENTS RATIS™ LPU INTRODUCTION ..............2 OVERVIEW ......................2 WARNINGS AND CAUTIONS ................. 3 READINESS CHECKLIST ..................4 PRODUCT OVERVIEW ..................5 INTEGRATION WITH ARMOR CARRIER ...........6 RATIS™ LPU PLACEMENT ON ARMOR CARRIER ........6 STANDARD ARMOR CARRIER FRONT ATTACHMENT ......7 GIRTH HITCH ARMOR CARRIER FRONT ATTACHMENT .......9 STANDARD ARMOR CARRIER BACK ATTACHMENT ......12 CONFIRM FIT .....................13... - Page 3 PACKING .....................24 RE-ARMING THE RATIS™ INFLATABLE LPU ........... 31 RE-ARM KITS .....................31 RE-ARMING THE HAMMAR ELECTRONIC INFLATOR (WITH MA1510)....................31 RE-ARMING THE HAMMAR AUTOMATIC INFLATOR (WITH MA1511) OR HAMMAR MANUAL INFLATOR (WITH MA1512) ......36 CARE AND MAINTENANCE ..............40 LEAK TESTING ....................40 GENERAL TESTS AND INSPECTIONS ............
-
Page 4: Ratis™ Lpu Introduction
OVERVIEW This manual provides instructions and guidelines for safely using and maintaining the Mustang Survival Ratis™ Inflatable Life Preserver Unit (LPU). The Ratis™ LPU is a lightweight tactical LPU for military and law enforcement and is designed to easily attach to an armor carrier with MOLLE (carrier not included). -
Page 5: Warnings And Cautions
WARNINGS AND CAUTIONS • It is recommended each user complete in-water testing with full load-out to validate that the Ratis™ LPU is safe to use. In-water performance will vary based on user size, carrier, attachment method, and kit. • The Ratis™ LPU should not be constrained so as to prevent the bladder from expanding normally. -
Page 6: Readiness Checklist
… Top Velcro tab is fastened to prevent breakout zippers from accidentally disengaging. … Zipper ends are tucked in at the bottom of the lobes. … Buckles are fastened, including sternum strap. MUSTANG SURVIVAL/ OWNER'S MANUAL – RATIS™ INFLATABLE LPU... -
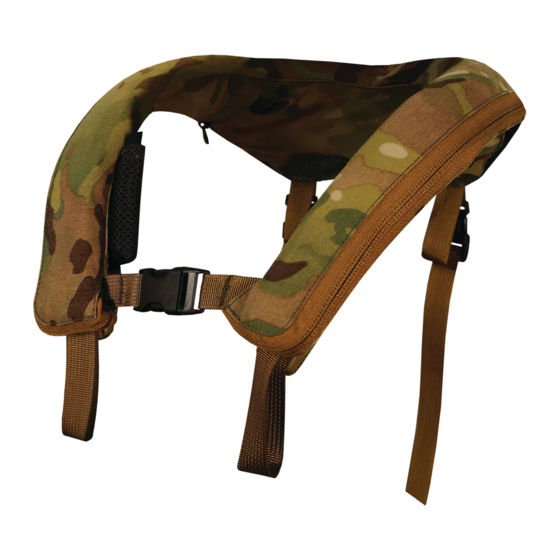
Page 7: Product Overview
PRODUCT OVERVIEW BACK ATTACHMENT BACK ATTACHMENT MOLLE STRAP MOLLE STRAP VELCRO FLAP VELCRO FLAP CYLINDER POUCH CYLINDER POUCH USER’S USER’S USER’S USER’S PULL HANDLE PULL HANDLE RIGHT RIGHT LEFT LEFT PULL HANDLE BUTTONHOLE PULL HANDLE BUTTONHOLE PULL HANDLE VELCRO PULL HANDLE VELCRO STERNUM STERNUM STRAP... -
Page 8: Integration With Armor Carrier
2. Place the Ratis™ LPU on top of the armor carrier. The two lobes are placed on the front of the carrier. MUSTANG SURVIVAL/ OWNER'S MANUAL – RATIS™ INFLATABLE LPU... -
Page 9: Standard Armor Carrier Front Attachment
STANDARD ARMOR CARRIER FRONT ATTACHMENT NOTE: TO ATTACH THE RATIS™ LPU USING THE GIRTH HITCHES PROVIDED, SKIP TO THE “GIRTH HITCH ARMOR CARRIER FRONT ATTACHMENT” SECTION. 1. Loop one of the male buckle straps of the front lobe through a MOLLE slot on the front of the carrier. - Page 10 7. IMPORTANT! Close the sternum strap in front of the inflatable. This holds the bladder lobes together in the inflated condition. If it is not fastened, self-righting performance will be negatively affected. MUSTANG SURVIVAL/ OWNER'S MANUAL – RATIS™ INFLATABLE LPU...
-
Page 11: Girth Hitch Armor Carrier Front Attachment
GIRTH HITCH ARMOR CARRIER FRONT ATTACHMENT NOTE: THE SELF-RIGHTING AND FLOTATION PERFORMANCE OF THE RATIS™ LPU IS REDUCED WHEN USING THE GIRTH HITCHES AS THEY WILL NOT FASTEN THE RATIS™ LPU AS TIGHTLY TO THE ARMOR CARRIER AS THE WEBBING SEWN TO THE RATIS™ LPU ITSELF. - Page 12 4. Remove male buckle from webbing strap attached to the Ratis™ LPU body. 5. Feed the male buckle onto the girth hitch webbing as shown. 6. Route webbing tail through attachment. MUSTANG SURVIVAL/ OWNER'S MANUAL – RATIS™ INFLATABLE LPU...
- Page 13 7. Complete Step 1 – Step 6 for second girth hitch 8. Clip to unit. Confirm webbing will not loosen. Stow excess webbing tails as necessary. 9. IMPORTANT! Close the sternum strap in front of the inflatable. This holds the bladder lobes together in the inflated condition. If it is not fastened, self-righting performance will be negatively affected.
-
Page 14: Standard Armor Carrier Back Attachment
WITHOUT CLIPS). THIS MAY BE EASIER THAN RETHREADING THE BUCKLE. 3. Clip the male buckle to the female buckle on the back. 4. Pull the strap tight so the inflatable is securely attached in place. MUSTANG SURVIVAL/ OWNER'S MANUAL – RATIS™ INFLATABLE LPU... -
Page 15: Confirm Fit
5. Repeat steps 1 - 4 for the other back buckle. CONFIRM FIT 1. Inspect and confirm that all Ratis™ LPU straps are tightly attached to the armor carrier. The collar of the Ratis™ LPU should be close to the neckline of the user for optimal performance. Stow all straps if necessary. - Page 16 MUSTANG SURVIVAL/ OWNER'S MANUAL – RATIS™ INFLATABLE LPU...
-
Page 17: Removal From The Armor Carrier
NOTE: EXACT ATTACHMENT LOCATIONS WILL VARY BETWEEN DIFFERENT ARMOR CARRIERS AND KIT SET-UP. IN ALL CASES, THE ARMOR CARRIER MUST BE ATTACHED SNUGLY TO THE USER. IF THE CARRIER IS LOOSE, THE RATIS™ LPU MAY RIDE UP AND OVER THE HEAD OF THE USER WHEN INFLATED. REMOVAL FROM THE ARMOR CARRIER To remove the Ratis™... -
Page 18: Integration With Stand Alone 'Bro' Chest Harness
1. Orient the harness and identify the front and back. 2. Loop one of the male buckle straps of the front lobe through the front Bro slot. 3. Feed the buckle all the way through the Bro slot. MUSTANG SURVIVAL/ OWNER'S MANUAL – RATIS™ INFLATABLE LPU... - Page 19 4. Clip the male buckle to the female buckle under the inflatable lobe. 5. Feed the buckle strap back through the slot (optional). 6. Pull the strap tight so the inflatable is securely attached in place. 7. Repeat steps 2 – 6 for the other front lobe 8.
- Page 20 11. Clip the male buckle to the female buckle on the back. 12. Pull the strap tight so the Ratis™ LPU is securely attached in place. 13. Repeat steps 9 – 12 for the other back buckle. MUSTANG SURVIVAL/ OWNER'S MANUAL – RATIS™ INFLATABLE LPU...
-
Page 21: Removal From Harness
14. Inspect and confirm that all Ratis™ LPU straps are tightly attached to the Bro and that no webbing or attachments are twisted. The harness should sit flat against the back. The collar of the Ratis™ LPU should be close to the neckline of the user for optimal performance. -
Page 22: Inflation And Deflation
“test mode”. See the Hammar Electronic Inflator manual for further details on arming the inflator, testing the inflator, and what modes are included. Hammar Automatic Inflator (included with MD1501 and sold separately) MUSTANG SURVIVAL/ OWNER'S MANUAL – RATIS™ INFLATABLE LPU... -
Page 23: Hammar Automatic Inflator Conversion To Manual (With Ma7219 Conversion Cap)
When the Hammar Automatic Inflator is submerged under more than approximately four inches of water, the hydrostatic water inlet valve opens, allowing water contact the water-sensitive element. The element releases a stainless steel coil spring, driving a needle into the end of the gas cylinder, puncturing it and allowing the gas to fill the Ratis™... -
Page 24: Hammar Manual Inflator (Included With Md1502 And Sold Separately)
INFLATOR, ORAL INFLATION FOLLOWED BY WATER IMMERSION MAY RESULT IN OVER-PRESSURIZATION. CAUTION: WHEN USING THE RATIS™ LPU IN TEMPERATURES BELOW FREEZING, FULLY DISCHARGING THE CO CYLINDER MAY NOT PROVIDE ADEQUATE INFLATION; USE THE ORAL INFLATOR TO TOP-UP THE LPU. MUSTANG SURVIVAL/ OWNER'S MANUAL – RATIS™ INFLATABLE LPU... -
Page 25: Oral Inflation
CAUTION: DO NOT CONSTRAIN THE RATIS™ LPU SO AS TO PREVENT THE BLADDER FROM EXPANDING. DO NOT INFLATE IN A SMALL SPACE. DO NOT WEAR CLOTHING OR EQUIPMENT OVER THE RATIS™ LPU. IF STRAPPING (INCLUDING A SLING) IS PLACED OVER THE RATIS™, IT MAY IMPEDE INFLATION. ORAL INFLATION A properly armed Ratis™... -
Page 26: Packing
4. Grasp the zipper tape so that both sides are aligned evenly. Pull the slider down to join the zipper. Join both zipper coils and close each approximately 3 inches. MUSTANG SURVIVAL/ OWNER'S MANUAL – RATIS™ INFLATABLE LPU... - Page 27 5. Close the Velcro flap on the top of the Ratis™. This prevents the zippers from opening. 6. Locate the front attachment buckle (underneath bladder). This is used as a landmark for folding the bladder. NOTE: THE USER’S LEFT LOBE HAS PACKING PICTOGRAMS ON THE BLADDER ATTACHMENT PANELS THAT MAY BE USED FOR REFERENCE.
- Page 28 9. Fold the male sternum strap over towards the inside of the Ratis™. Align the inside edge of the box stitch with the inside edge of the front attachment buckle. Route the buckle strap under the inside piece of the cover. MUSTANG SURVIVAL/ OWNER'S MANUAL – RATIS™ INFLATABLE LPU...
- Page 29 10. Fold the inside of the bottom of lobe over so that the fold edge is in-line with the inside of the front attachment buckle. 11. Fold the bottom of the lobe upwards. Pull taut. TIP: BY KEEPING THE FOLDS TIGHT OVER THE FRONT ATTACHMENT BUCKLE, THE LATER STEP OF ZIPPING THE LOBE CLOSED IS EASIER.
- Page 30 17. Before folding the second lobe, all excess air must be removed. WARNING: EXCESS AIR MAY PREVENT AUTOMATIC INFLATION OF THE MD1501. AIR MUST BE EVACUATED BY 2 PEOPLE. Before packing the second lobe, all excess air must be removed. MUSTANG SURVIVAL/ OWNER'S MANUAL – RATIS™ INFLATABLE LPU...
- Page 31 18. Lock oral valve. 19. Align the base of the oral tube with the label on the inside of the cover. 20. For MD1500 and MD1501, fold the manual pull cord. The MD1502 pull cord is shorter and does not require folding as shown above. 21.
- Page 32 23. Stow zipper pulls. Confirm the MD150X is armed and there is no excess air in the bladder 24. Close access pouch. MUSTANG SURVIVAL/ OWNER'S MANUAL – RATIS™ INFLATABLE LPU...
-
Page 33: Re-Arming The Ratis™ Inflatable Lpu
RE-ARMING THE RATIS™ INFLATABLE LPU RE-ARM KITS Re-arm kits are sold separately. The following model numbers are the re-arm kits for the Ratis™ LPU. To check what inflator you have or need, see INFLATION. RE-ARMING THE HAMMAR ELECTRONIC INFLATOR (WITH MA1510) NOTE: REFER TO HAMMAR ELECTRONIC INFLATOR INSTRUCTION MANUAL FOR SETTINGS, FUNCTIONS, CARE, AND MAINTENANCE. - Page 34 Hammar inflator cap from the cylinder assembly. 4. Remove the cap from the cylinder assembly. 5. Pinch to fold the sealing ring to allow the removal of the cylinder assembly. Visually check the sealing ring for any damage. MUSTANG SURVIVAL/ OWNER'S MANUAL – RATIS™ INFLATABLE LPU...
- Page 35 6. Carefully insert the new cylinder assembly into the bladder. New cylinder = NO residue Used cylinder = visible residue 7. Align the cylinder with the location image on the bladder and make sure the sealing ring rests on the cylinder assembly and does not capture extra folds of the bladder film .
- Page 36 - A red light indicates the circuit is still open and the cylinder will not inflate the device. - A green light guarantees a good connection. - See Hammar Electronic Inflator Manual for more information. TEST MUSTANG SURVIVAL/ OWNER'S MANUAL – RATIS™ INFLATABLE LPU...
- Page 37 11. Turn the Mode Selector to the desired position, based on the inflatable requirements. See Hammar Electronic Inflator Manual for more information. TEST 12. Close the cylinder pouch. 13. To test for leakage, inflate the Ratis™ LPU using the oral inflator tube (see INFLATION).
-
Page 38: Re-Arming The Hammar Automatic Inflator (With Ma1511) Or Hammar Manual Inflator (With Ma1512)
3. While holding the cylinder through the bladder, use the Hammar Key and insert it between the yellow inflator cap and the black locking ring. Turn the key counter clockwise, which will cause the black portion of the cap to rotate counter-clockwise. MUSTANG SURVIVAL/ OWNER'S MANUAL – RATIS™ INFLATABLE LPU... - Page 39 4. Keep turning the locking ring counter-clockwise and remove the cap from the cylinder assembly. The used inflator cap can be scrapped. 5. Pinch to fold the sealing ring, to allow the removal of the cylinder assembly. Visually check the sealing ring for any damage. 6.
- Page 40 8. Place the new inflator on top of the cylinder assembly. 9. Press down on the inflator and turn the locking ring clockwise until it is locked in place. MUSTANG SURVIVAL/ OWNER'S MANUAL – RATIS™ INFLATABLE LPU...
- Page 41 10. Fold the pull handle of the new inflator in half, pass it through the buttonhole of the left lobe, and attach it to the Velcro patch. 11. Close the cylinder pouch zipper. 12. To test for leakage, inflate the Ratis™ LPU using the oral inflator tube (see INFLATION).
-
Page 42: Care And Maintenance
Particular attention must be paid to the stitching, straps, and hardware. 3. Test for leaks. 4. Test the oral inflation valve. 5. Ensure the inflator status is good (see INFLATION). MUSTANG SURVIVAL/ OWNER'S MANUAL – RATIS™ INFLATABLE LPU... -
Page 43: Testing The Inflators And Ratis™ Lpu Performance
TESTING THE INFLATORS AND RATIS™ LPU PERFORMANCE NOTE: A FULLY ARMED UNIT WITH A RE-ARM KIT IS REQUIRED FOR THIS TEST. 1. Don the Ratis™ LPU. 2. If the Ratis™ LPU is equipped with a: a. Hammar Electronic Inflator, enter the water so that the conditions of the activation mode are met. -
Page 44: Accessories And Related Products
RATIS™ INFLATABLE LPU ELECTRONIC INFLATOR RE-ARM KIT (CYL. AND BODY) MA1511 RATIS™ INFLATABLE LPU HAMMAR AUTOMATIC INFLATOR RE-ARM KIT MA1512 RATIS™ INFLATABLE LPU HAMMAR MANUAL RE-ARM KIT MA7219 HAMMAR MANUAL CONVERSION KIT MUSTANG SURVIVAL/ OWNER'S MANUAL – RATIS™ INFLATABLE LPU... - Page 46 We build gear that saves lives and fuels exploration. www.mustangsurvival.com DO NOT REMOVE PRIOR TO SALE. MUSTANG SURVIVAL AND SEAHORSE DESIGN ARE ALL REGISTERED TRADEMARKS OF MUSTANG SURVIVAL ULC. HT1188 REV 27FEB2020...
Need help?
Do you have a question about the RATIS MD1500 and is the answer not in the manual?
Questions and answers