Table of Contents
Advertisement
Quick Links
Advertisement
Table of Contents

Related Manuals for XAG ACS2


Summary of Contents for XAG ACS2
- Page 1 ACS2 Control Stick User Manual Version AU V1.0...
- Page 3 To Users Dear user, thank you for choosing XAG products. For safety reasons and the best experience possible, XAG recommends that you read through the Module Assembly & Maintenance Manual and Disclaimer in this document before attempting to use the P-Series Agricultural UAVs.
-
Page 4: Table Of Contents
Contents List of Items Remote Controller Overview Using the Remote Controller Inserting SIM Card Charging the Remote Controller Turning the Remote Controller ON/OFF Connecting to Remote Controller Hotspot Settings Firmware Update Remote Controller Status Indicator Description Indicator - Battle Level Indicator - Smart Device Connection Indicator - Smart Device Connection Indicator - Control Status... -
Page 5: List Of Items
Please carefully check if the product contains all the items listed below and your dealer if there are any missing items. USB To Type-C Micro USB To Type-C Type-C To Type-C Cable Cable Cable × 1 × 1 × 1 ControlStick (Body) × 1 XAG AUSTRALIA... -
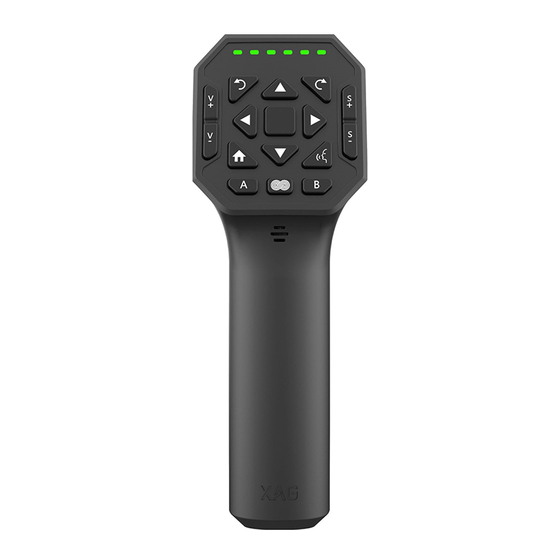
Page 6: Remote Controller Overview
Remote Controller Overview The main structural components of the ACS2 Remote Controller are as follow. Front View LED – Battery Level LED – Smart Device Connection LED – Device (UAV/UGV) Connection Indicator LED – Control Status LED – Flight Status LED –... - Page 7 Hover Button Used to turn the remote controller ON / OFF Power Button Provides Cellular connection Nano SIM Slot Increase Altitude Altitude + Decrease Altitude Altitude – Connects to a power source to charge the Remote Controller Power Port XAG AUSTRALIA...
-
Page 8: Using The Remote Controller
Insert the nano-SIM card in as the direction shown in the figure Close and Secure the Rubber Plug SIM Card Cut-Corner Chip Side ACS2 uses a nano-SIM. Damages caused by the use of other specifications of SIM Warning will be beared by user XAG AUSTRALIA... -
Page 9: Charging The Remote Controller
The Battery Level and the mode of charging is indicated by the Battery Level Indicator Charging Mode Indicator Description Quick flash Quick Charging Slow flash Standard Charging Battery Level Indicator Description Green 60% - 100% Yellow 30% - 60% < 30% XAG AUSTRALIA... -
Page 10: Turning The Remote Controller On/Off
Release and then Press and Hold the Power Button again until a Broadcast is heard from the Remote Controller TURN OFF Press and Hold the Power Button until all the indicators flash simultaneously Release and then Press and Hold the Power Button again until all indicators are off XAG AUSTRALIA... -
Page 11: Connecting To Remote Controller
Smart Phone / Tablet is connected to the ACS2 ](The Icon turns green) IMPORTANT �� Please keep the Smart Phone / Tablet at a minimal distance of 20cm away from the ACS2 Remote Controller to prevent signal interference XAG AUSTRALIA... -
Page 12: Hotspot Settings
Hotspot Settings STEP 1 - Open XAG APP and tap on the Icon [ ]to open Remote Controller Module Page STEP 2 - Select Hotspot Setting STEP 3 - Edit and save the new Settings XAG AUSTRALIA... -
Page 13: Firmware Update
Firmware Update The Avatar STEP 1 - Open XAG APP and tap on the Avatar to Open the Menus STEP 2 - Tap on “Devices” STEP 3 - Tap on the Device to expand the Menu STEP 4 - Tap on the [ICON] for Firmware Update page... - Page 14 Controller from the Smart Device • If there is a notification that transfer failed, please restart the update procedure • When the Remote Controller is being updated from the APP, please ensure there are sufficient data and cellular connectivity XAG AUSTRALIA...
-
Page 15: Remote Controller Status Indicator Description
Yellow 30% - 60% 10% - 30% Red (Flashing) < 10% When the ACS2 Remote Controller is OFF, Battery Level can be observed by pressing the Power button once No. of Indicator Battery Level 1 Green light <5% 2 Green light... -
Page 16: Indicator - Smart Device Connection
Autonomous Mode / No Device Indicator - Flight Status Indicator Status Green Autonomous Mode Manual Mode / No Device Indicator - RTK Status Indicator Status Green (Flashing) Float Green Yellow RTK Module Standby Mode Abnormal Module RC has no RTK Module XAG AUSTRALIA... -
Page 17: Controls
The safety distance of the UAV is 2 meters above ground; UAV will not be able to descent once it reaches the height of 2 meters above ground Return to Home (RTH) • Press and Hold the RTH Button to command the UAV to return to Take-off-Point XAG AUSTRALIA... -
Page 18: Motion Control
Press the Hover Button to command the UAV to Hover Switch Mode: Press and Hold the Hover Button to switch Mode. The ACS2 Remote Controller will exit Manual Control and enter Autonomous Mode, the Controller will also broadcast Autonomous Mode... -
Page 19: Spray / Spread Control
Dosage Rate of Spray/ Spread Terrain Button Broadcast: Press the Terrain Button Once to broadcast the current Mode (GPS Height / Terrain Follow) Switch Mode: Press the Terrain Button Twice to switch between GPS Height and Terrain Follow XAG AUSTRALIA... -
Page 20: Ugv
Press to drive the Vehicle Backward Rotate the Vehicle Counter-Clockwise (CCW) Rotate the Vehicle Clockwise (CW) Control Mode Autonomous: Press and Hold the Hover Button to enter Autonomous Mode Manual: Press any Motion Control button to exit Autonomous Mode for Manual Control XAG AUSTRALIA... -
Page 21: Speed Control
Voice Broadcast, the vehicle then will enter cruise control driving the vehicle forward Press the Left/Right Button to move the vehicle back to its lane in the event of deviation Press any of the Yaw Control Button to exit Cruse Control XAG AUSTRALIA... -
Page 22: Technical Specifications
Technical Specifications Model ACS2 Dimensions 76mm×60mm×177mm Operating frequency 2.4GHz/5.8GHz Transmitting power 23dbm Mobile phone operating system supported Android Built-in battery capacity 5000mAh/37Wh ℃ ℃ Ambient temperature for charging to 45 Max. signal range (no interference/obstruction) 800m Charging voltage/current 5V/2A, 9V/1.5A, 12V/1.5A... -
Page 23: Disclaimer
This does not mean that the contents of this Disclaimer are necessarily invalid. 8. To the extent permitted by law, XAG has the final right to interpret and modify the above terms. XAG has the right to update, modify, or terminate these terms through its official website, the “Product Manual/Operation Manual”, online APP and other means without prior notice. - Page 24 The copyright of all information in this user manual (including but not limited to any text description, illustrations, photos, methods, processes, etc.) belongs to XAG Australia and is protected by copyright law. No individual or organization may imitate, extract, translate, distribute or reproduce or quote all the contents of this manual...
Need help?
Do you have a question about the ACS2 and is the answer not in the manual?
Questions and answers