
Subscribe to Our Youtube Channel
Related Manuals for XAG ACS1


Summary of Contents for XAG ACS1
- Page 1 ACS1 Control Stick Quick Start Guide Version 1.0 MAKE AGRICULTURE SMARTER A U S T R A L I A...
- Page 3 Dear user, thank you for choosing XAG products. For safety reasons and to ensure the best experience possible, XAG recommends that you read through the Quick Start Guide and Disclaimer in this document before attempting to use the ACS1 ControlStick.
-
Page 4: List Of Items
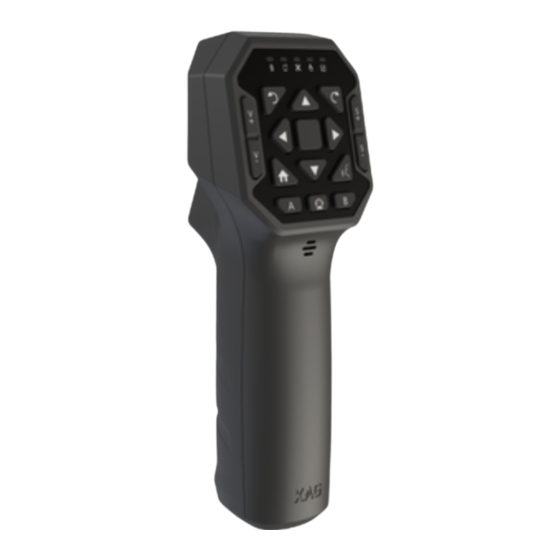
Please carefully check if the product contains all the items listed below and your dealer if there are any missing items. USB To Type-C Micro USB To Type-C Type-C To Type-C Cable Cable Cable × 1 × 1 × 1 ACS1 RC (Body) Power Adapter (Type A) × 1... - Page 5 Overview 14 15 16 17 18 Power Button Speed Control Yaw Control Directional Control LEDs - Battery Status Spray/Spread Control Status LEDs LEDs - Device Connection Data Port (Type-C) LEDs - Aircraft Status Terrain Follow Heat Sink LEDs - Flight Status Smart Mode Altitude Control LEDs - Mission Status...
-
Page 6: Remote Controller Overview
(Default) Hotspot Name: XAG123 (Default) Hotspot Password: 20070401 Then, Turn on the Hotspot 2. Open XAG AGRI APP, and wait for connection. ( icon turns green) Notes: Please keep the Smart device at a distance of 20cm-10m away from the ControlStick. Do not keep the two devices too close, to... -
Page 7: Parameters Setting
Parameters Setting On the XAG AGRI APP, select Select “Edit” to enter Parameters Settings Menu ( 02 ) Icon (01) Parameters Settings Menu for Flight... -
Page 8: Manual Control
Manual Control Press and hold both Altitude Control buttons for 3 seconds, and the UAV will automatically take off and hover at 2.5 meters. If the Altitude Control buttons are released within 3 seconds, it will cancel the Take-off command. •... - Page 9 • Yaw Control Rotate UAV CCW (Counter Clockwise) Rotate UAV CW (Clockwise) • Land/RTH Land : While airborne, Press and hold both Altitude Control Buttons to land the UAV (Left figure) RTH : Press and hold the RTH button to RTH (Return to Home) (Right figure)
- Page 10 Increase Rate/Volume S− : Decrease Rate/Volume Note : During Manual control of the UAV by the ACS1, the ACS Flight Status LEDS will be green and the UAV is switched to Manual Mode. The Aircraft status indicator will display double flashes in green.
- Page 11 AB Point Mode 1. Defining points ① . Fly the UAV to the designated location, press the A button twice to define the location as Point A ② . Fly the UAV to the designated location, press the B button twice to define the location as Point B 2.
- Page 12 3 . Change Route ① . Switch to manual mode: Press and hold the Smart Mode button until a voice prompt ② . Press the A/B button to select another route 4 . Exit Operation Press any directional control or Smart Mode button.
- Page 13 Others Checking Battery level When the ControlStick is off, press the Power button once and the five status LEDs will display the current battery level (see below). When the ControlStick is on, battery level is indicated by the Status LEDs (see page 11-12).
- Page 14 Charging Recharge the ACB Control Stick with the provided adapter and Type-C Cable. Charging status is indicated by the battery status LEDs. LED Display* Status Quick flash(Green) Quick Charge Mode Slow flash (Green) Slow Charge Mode Solid Green Fully charged...
- Page 15 Status LEDS Indication (Left to Right) Battery Status LEDs Status Quick flash (green) Quick Charge Mode Slow flash (green) Slow Charge Mode Green light on Power level 60%~100% Yellow light on Power level 20%~59% Red light on Power level 5%~29% Device Connection LEDs Status Green light on...
-
Page 16: Firmware Update
ControlStick is under the USB flash drive mode. Connect the ACS1 to the PC, and wait for a flash drive is detect- ed on the PC, then copy the .fw filw into the drive. -
Page 17: Technical Specifications
Technical Specifications •Model ACS1 •Dimensions 175mm×60mm×68mm •Operating Frequency 2.4Ghz/5.8GHz •Transmitting power 23dbm •Supported OS Android •Built-in battery capacity 3500 mAh /25 Wh •Charging Temperature 5°C - 45°C •Charging voltage/current 5V/2A, 9V/1.5A, 12V/1.5A •Max Transmission Distance 800 m (No interference/obstruction) •Mesh network Supported •Voice broadcast... - Page 18 This does not mean that the contents of this Disclaimer are necessarily invalid. To the extent permitted by law, XAG has the final right to interpret and modify the above terms. XAG has the right to update, modify, or terminate these terms through its official website, the “Product...
- Page 19 Strong safety awareness is required to operate this product. Do not use the parts that are not provided or suggested by XAG. Please strictly follow the instructions of XAG to install and use the product.
- Page 20 Scan the QR code Download XAG AGRI App info@xa.com Visit our website for more information @XAGofficial www.xa.com/en @XAG_official This Guide is subject to update with- @XAG Official out prior notice.
Need help?
Do you have a question about the ACS1 and is the answer not in the manual?
Questions and answers