Table of Contents
Advertisement
Advertisement
Table of Contents

Related Manuals for Ananda D15

Summary of Contents for Ananda D15
- Page 1 Manual...
-
Page 2: Table Of Contents
Content A. About the Manual ..........2 B. Appearance and size ..........2 Material and Color ..........2 Illustration ............ 2 Diagram ............3 C. Product Functions ..........3 D. Bottom Definition ..........5 E. Installation ............ 5 F. Operation............6 1. -
Page 3: About The Manual
B. Appearance and size Material and Color D15-MSUP display using emerald green LED display, 3 button operation, light and beautiful appearance, and clear interface. Four-layer PCB, nylon buckle, ABS shell, the material of the shell allows normal use at temperatures from -20 ℃... -
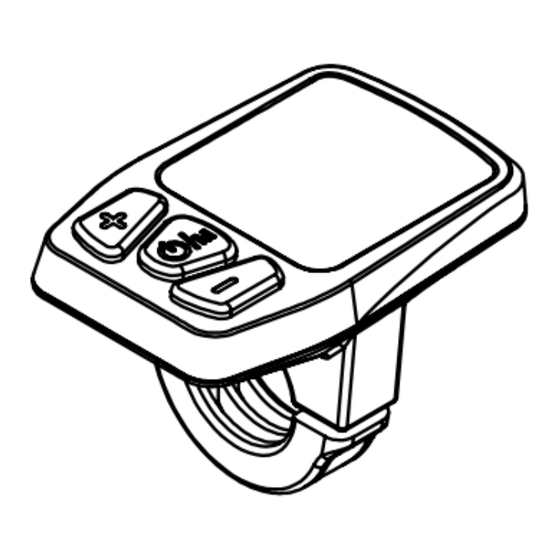
Page 4: Diagram
D15-MSUP display is an emerald green LED display. It can match the 24V/36V/48V battery with wide voltage and integrate the headlight switch function. This instrument communicates with the corresponding controller and battery by UART communication. The main functions of D15 are: (as shown in Pic 3-1 below) ◆ Light Status ◆... - Page 5 Pas level Plus On/ Off Remain battery Minus Pic 3-1 Display Area When the display is turned on, there will be an LED marquee, which is very cool. The interface design and LED selection are clearly visible even in the sun; and it is not glaring, making people look comfortable. The refreshing design of the display interface and the unique design scheme make the customer more convenient to use.
-
Page 6: Bottom Definition
Pic 3-2 D. Bottom Definition D15-MSUP equipped with 3 buttons. Including key, open key, minus key. Plus On/ Off Minus Pic 4 E. Installation Fix the display and bolt on the handlebar, adjust the proper angle of view, and screw on the bolt in an easy-to-manipulate position. Tighten the screws to complete the installation. -
Page 7: Operation
Insect bolt on the handlebar Tighten the screws to complete the installation F. Operation 1. Switch on/off Long press the key for 1 second, the display is turned on, there will be LED marquee when the power is turned on, the power assisted gear defaults to 1st gear, the right LED light will have corresponding battery power indication, and the instrument provides the controller working power. -
Page 8: Turning On/Off The Lights
power system. In the off state, the meter no longer uses the battery's power supply, and the meter's leakage current is less than 1μA. The operation process is as shown in Pic 6-1: Long press 1s to star; long press 2 s to turn off Pic 6-1 2. -
Page 9: Pas Level And Walking Assistant Mode
3. Pas level and Walking Assistant Mode In the power-on state, the pas position is 5 segments of LED display. By adding and subtracting keys, the electric vehicle assist gear position is switched, and the motor output power is changed. The instrument output power range is 0-5 oas. -
Page 10: Battery Capacity
4. Battery Capacity The battery power is displayed in 5 segments. When the battery is fully charged, the right LED is fully illuminated; when the battery is under voltage, the right LED flashes and needs to be charged immediately. The battery level is displayed from bottom to top in increments. -
Page 11: Q&A
D15-MSUP display is a 5-pin lead-out cable that is powered by a 24V/36V/48V battery voltage. The power supply is positive (red line) 2. ground (black line) 3. communication T (yellow line) 4. communication R (Green line) 5. Weak electric lock (blue line). -
Page 12: Exception
The warranty period of the product is calculated within 30 months from the production date Exception: The following conditions are not covered by the warranty Unauthorized disassembly and modification. Failure or damage caused by misuse or incorrect installation or commissioning by the user or a third party. The outer casing is scratched or the outer casing is damaged. - Page 13 Pas 2 & 3 LED both flashing Controller HALL sensor error Pas 2 & 4 LED both flashing Controller Over Heating Pas 2 & 3 & 4 LED both flashing Controller Over Current Pas 2 & 5 LED both flashing Controller Overvoltage or undervoltage error Pas 2 &...
Need help?
Do you have a question about the D15 and is the answer not in the manual?
Questions and answers