Table of Contents
Advertisement
Quick Links
Advertisement
Table of Contents

Related Manuals for Keiser AIR300 2531 Series


Summary of Contents for Keiser AIR300 2531 Series
- Page 1 STRENGTH | CARDIO | FUNCTIONAL AIR300 LEG PRESS MODEL 2531XX OPERATION MANUAL...
-
Page 2: Table Of Contents
Distribution and copying of this document, use and communication of its contents is not permitted without written authorization from Keiser Corporation. The content of this document is furnished for informational use only, may be subject to change without notice, and should not be construed as a commitment by Keiser Corporation. -
Page 3: General Information
Air300 Leg Press after reading this manual, our Keiser Customer Support team will be happy to assist by telephone at 1 559 256 8000 and via live chat at keiser.com/support (Monday—Friday, 9 am to 5 pm Pacific Time), or by email at service@keiser.com. -
Page 4: Important Safety Information
AIR300 LEG PRESS OPERATION MANUAL IMPORTANT SAFETY INFORMATION It is the sole responsibility of the purchaser of Keiser Corporation 15. Never perform Power Test without a proper warm-up. This equipment to instruct all individuals, whether they are the end- high resistance/high-speed test should only be performed user or supervising personnel, on proper usage of the equipment. - Page 5 SAFETY AND NOTIFICATION LABELS 002531XX 888888-88888 SEAT SEAT Part No. 255603 Maintain and do not remove safety or notification labels for any reason. They contain important information. If unreadable or missing, contact Keiser Corporation for a replacement (see back cover for contact information).
-
Page 6: Technical Specifications
• 1.5V D Alkaline Batteries (quantity 2, Keiser PN 966500) • 3V CR2032 Lithium Coin Cell Battery (quantity 1) Permanently attached, not serviceable. Contact Keiser Customer Support for service. KEISER CHIP SYSTEM • The eChip insertion slot receives the Keiser eChip (electronic memory chip) for data transfer and storage... -
Page 7: Installation And Placement
Plug the Compressor into the appropriate power source to power the Compressor ON (allow the Compressor to build up to a minimum of 100 psi / 6.89 bar; Keiser Compressor and Keiser Air Keiser System not included, sold separately) Small Air Compressor 2. -
Page 8: Operation
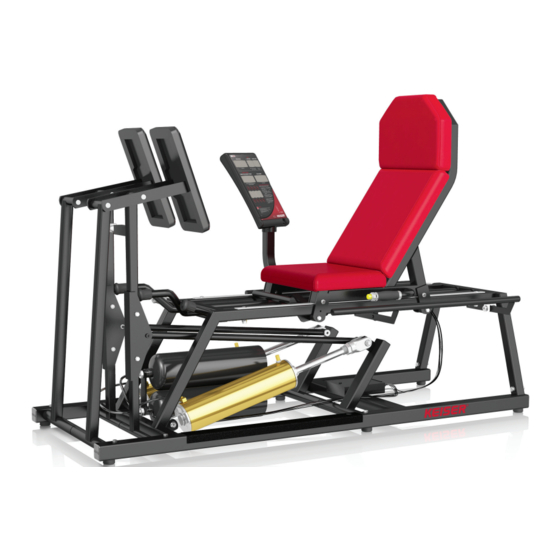
AIR300 LEG PRESS OPERATION MANUAL OPERATION EQUIPMENT OVERVIEW Figure 5. Air300 Leg Press Power Display Stop/Release Bars Foot Pads Processor Box Exercise Arms Quick Disconnect (QD) with Tube Lock Bar Air Tubes and Communication Wires Movable Stops Seat Track and Position Settings Stops (on Frame) Increase/Decrease (+/-) Thumb Buttons Air Tanks... -
Page 9: 09_Power Display
AIR300 LEG PRESS OPERATION MANUAL POWER DISPLAY SEAT SEAT When using the eChip, ensure that it is fully inserted into the slot as shown. Figure 6. Power Display Overview CAUTION Rate monitoring systems may be inaccurate. Over Use of the exercise Target program requires medical exercising may result in serious injury or death. -
Page 10: 10_Display Features
Keiser eChip software allows saved eChip data to be viewed, stored, and exported (.csv file format) for analysis. NOTE: Three user eChips (red color) come standard with your Air300 Leg Press. The Keiser USB Power Kit (a USB adapter to transfer data from your eChip to your computer and Time Set eChips to set the time zone/time on your Air300 Leg Press) is available. -
Page 11: 11_Proper Operation Check
Immediately replace damaged, worn, or broken parts. Do not use the Air300 Leg Press until all repairs have been completed and tested by a Keiser-certified technician. * “Lo-bA” = Batteries are low, replace immediately. If batteries are dead (depleted), the Power Display remains blank (see... -
Page 12: 12_How To Use The Air300 Leg Press
AIR300 LEG PRESS OPERATION MANUAL HOW TO USE THE AIR300 LEG PRESS BEFORE ENTERING THE MACHINE Set the Lock Bar to exercise one leg at a time or both together. Lift the Seat Lever to adjust the Seat and comfortably enter Lock Bar the machine. - Page 13 AIR300 LEG PRESS OPERATION MANUAL HOW TO USE THE AIR300 LEG PRESS (CONTINUED) CAUTION • Consult your physician before beginning any exercise • If you feel pain, faintness, or are unable to maintain program. good form, stop immediately. • This equipment should only be used with proper •...
-
Page 14: 14_Power Test
TEST PROTOCOL — The Power Test (KEISER Six-Rep Test) is used to determine the resistance at which you achieve MAXIMUM POWER. The test consists of two sets: Three repetitions Three repetitions... -
Page 15: Maintenance
IMPORTANT: Do not use household or industrial cleaners as they contain caustic chemicals that can destroy the paint finish and cause corrosion. Use only mild soap/detergent (neutral, non-caustic) to clean. Contact Keiser Customer Support for replacement parts order, or for any matters regarding the safe operation of your Air300 Leg Press (see back cover for contact information). -
Page 16: 16_Battery Replacement
AIR300 LEG PRESS OPERATION MANUAL BATTERY REPLACEMENT Do not operate the equipment during battery replacement procedure. “Lo-bA” = Batteries are low, replace immediately. NOTE: If batteries are dead (depleted), the Power Display remains blank. To replace the batteries, refer to Figure 10 and follow the instructions below (no tools required). -
Page 17: 17_Annual Maintenance
THE AIR IN THE EQUIPMENT (“— ” THUMB BUTTON) BEFORE PERFORMING ROUTINE MAINTENANCE. Figure 11. Annual Routine Maintenance Contact Keiser Customer Support for replacement part(s) order, or for any matters regarding the safe operation of your Air300 Leg Press (see back cover for contact information). -
Page 18: Regulatory And Compliance Notices
AIR300 LEG PRESS OPERATION MANUAL REGULATORY AND COMPLIANCE NOTICES Standards ISO/EN 20957-1 Accuracy Class A (High accuracy) and Usage Class S (Studio, commercial use); IEC/EN 60601-1 and IEC/EN 60601-1-2. Marks SAFETY NOTIFICATIONS Displayed watts testing parameters: “Current Power,” “Peak Power,” and “Percent of Peak Power” are not suitable for use in applications where the health and safety of a patient may be dependent on the accuracy of those parameters. -
Page 19: 19_Electromagnetic Compatibility (Emc)
Wear parts: After being replaced, wear parts must be disposed of according to country-specific waste laws. If you have any questions about equipment disposal, please contact your local dealer or Keiser Customer Support (see back cover for contact information). -
Page 20: Warranty Statement
View or print your Air300 Leg Press warranty online at keiser.com/support/warranty. If you have any questions about your warranty, please contact Keiser Customer Support at 1 559 256 8000 and via live chat at keiser.com/support (Monday—Friday, 9 am to 5 pm Pacific Time), or by email at service@keiser.com.
Need help?
Do you have a question about the AIR300 2531 Series and is the answer not in the manual?
Questions and answers