Photon Systems Instruments AquaPen-C AP 110-C Instruction Manual
Hide thumbs
Also See for AquaPen-C AP 110-C:
- Manual and user manual (55 pages) ,
- Manual and user manual (56 pages)
Table of Contents
Advertisement
Quick Links
Advertisement
Table of Contents

Related Manuals for Photon Systems Instruments AquaPen-C AP 110-C


Summary of Contents for Photon Systems Instruments AquaPen-C AP 110-C
- Page 2 Manual Version: 2021/12 © PSI (Photon Systems Instruments), spol. s r.o. www.psi.cz This document and its parts can be copied or provided to a third party only with the express permission of PSI. The contents of this manual have been verified to correspond to the specifications of the device. However, deviations cannot be ruled out.
-
Page 3: Table Of Contents
ABLE OF ONTENT Information before using AquaPen device ......................5 General Description ............................6 Technical Specification ..............................7 Device Description ............................9 List of equipment and customer information......................10 Care and maintenance ............................10 Principle of measurement ..........................11 Getting started ............................... 14 Measurements based on fluorescence ........................14 5.1.1 Pulses description and setting ..........................14... - Page 4 10.1 GPS/AquaPen operation ............................50 10.2 Data download ...............................50 Warranty terms and conditions ........................52 Troubleshooting and Customer Support ......................52 Page | 4...
-
Page 5: Information Before Using Aquapen Device
NFORMATION BEFORE USING EN DEVICE Read this manual carefully before operating the device. If you are not sure about something in the manual, contact the manufacturer for clarification. By accepting the device, the customer agrees to follow the instructions in this guide. Always follow corresponding manuals while working with the AquaPen device or doing the maintenance. -
Page 6: General Description
This AquaPen version is supplied with single blue LED emitter (optionally red or white). AquaPen-C AP 110-C is a cuvette version of the fluorometer. The sample is measured in a plastic cuvette inserted into an optical holder with a lid. This version of the AP can also be used in laboratory conditions or field studies where samples of suspension may be obtained and placed in the AP. -
Page 7: Technical Specification
2.1 T ECHNICAL PECIFICATION – instantaneous chlorophyll fluorescence Quantum Yield OJIP Protocols Non-photochemical quenching Light curve Optical density at 680 and 720 nm (AP 110-C only) AP 110-C: Red-orange (630 nm) and blue (455 nm) LED emitter AP 110-P: Blue (470 nm), other wavelengths on request Saturating pulse Illumination Up to 3,000 µmol(photon).m (adjustable from 10 to 100%) - Page 8 Bluetooth module compliance data: Category Country Standard FCC Part 15 Subpart B: 2008 Class B Radio FCC CRF Title 47 Part 15 Subpart C FCC ID: T9J-RN42 ETSI EN 301 489-1 V1.8.1 Europe ETSI EN 301 489-17 V2.1.1 ETSI EN 300 328 V1.7.1 Canada IC RSS-210 low power comm.
-
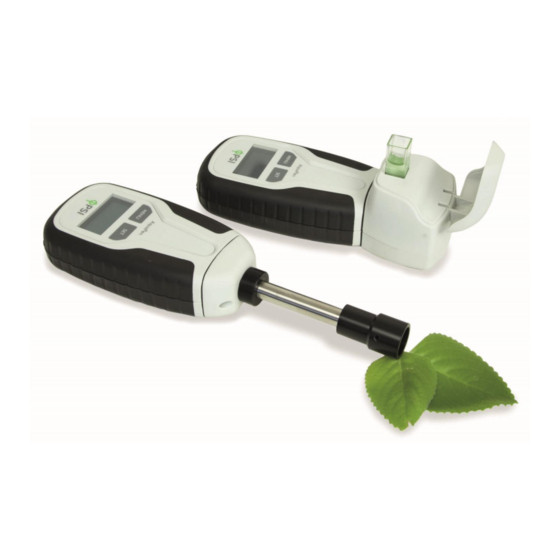
Page 9: Device Description
EVICE ESCRIPTION Fig. 1 Device description. Page | 9... -
Page 10: List Of Equipment And Customer Information
3.1 L IST OF EQUIPMENT AND CUSTOMER INFORMATION Standard version of the AquaPen device package consists: • AquaPen-C AP 110-C or AquaPen-P AP 110-P • Carrying Case • pieces of 4 ml volume plastic cuvette with stopper (AquaPen-C only) •... -
Page 11: Principle Of Measurement
RINCIPLE OF MEASUREMENT AquaPen is a fluorometer adapted for measurements of chlorophyll fluorescence parameters in liquid suspensions of algae, cyanobacteria and isolated plant cells. Two versions of the AquaPen are available, the cuvette version (AP-C) and the probe version (AP- P). - Page 12 Measuring the optical density of growing cultures is a common method to quantify various important culture parameters like cell concentration, biomass production or changes in the cell morphology. The cuvette version of the AquaPen measures OD at two wavelengths 680 and 720nm. AquaPen measures: Ft - Instantaneous Chlorophyll Fluorescence is equivalent to F...
- Page 13 Fig. 3 AquaPen-C AP110-C. Fig. 4 AquaPen-P AP 110-P. Page | 13...
-
Page 14: Getting Started
ETTING STARTED For more detailed information on steps of AquaPen operation please refer to chapter Error! Reference source not found.. The device is powered by built in Li-Ion battery. Ensure that the battery if fully charged by plugging it into a PC via USB cable or the AC outlet via USB adapter (not included) and the cable. - Page 15 Default setting of light color and intensities in AquaPen firmware. These may be changed according to user requirements and algal growth conditions: Measuring color – 455 (470, respectively) nm Flash pulse 30% = Measuring flash pulse Super pulse 70% = Saturating pulse Actinic pulse 300 µmol.m (30 %) = Actinic light Please note that those parameters are recommended by manufacturer and can be change according to user...
- Page 16 Super pulse setting To determine the optimal intensity of the Super pulse is to perform OJIP measurement with different suspensions of the same culture at different Super Pulse settings. Please note that OJIP measurement should be performed with dark adapted culture. Similarly, as for QY measurements, new sample should be used for subsequent measurements of OJIP or sufficient time should be allowed for the sample to be dark adapted again.
- Page 17 Fig. 7 OJIP data - measurement performed with different intensities of Super pulse. The highest Fv/Fm value indicates the optimal intensity of Super pulse (20% in this case). Actinic pulse setting Intensity of Actinic pulse should correspond with cultivation light intensity or should be set according to application. If Overflow is observed on display during measurement there are two options to resolve this problem - to dilute the sample or lower the pulse intensity.
-
Page 18: Measurement
5.1.2 EASUREMENT No device calibration is required before making chlorophyll fluorescence measurement. Results of fluorescence measurement are affected by the device settings and the physiology of the sample. Steps for Chlorophyll Fluorescence measurements with AquaPen-C: • Fill the cuvette with the sample of algae or cyanobacteria and close the cuvette with the stopper. Fill the cuvette with 3 ml of the sample. - Page 19 The OJIP protocol includes the following measured and calculated parameters: Abbreviation Explanation Bckg Background , fluorescence intensity at 50 µs 50µs = fluorescence intensity at J-step (at 2 ms) = fluorescence intensity at i-step (at 30 ms) = maximal fluorescence intensity (maximal variable fluorescence) = ( F ) / ( F...
-
Page 20: Non-Photochemical Quenching (Npq) Protocols
5.1.4 (NPQ) PHOTOCHEMICAL QUENCHING PROTOCOLS The NPQ protocol is used to quantify photochemical and non-photochemical quenching. It should be performed with dark-adapted samples. The NPQ protocol starts with a measurement of minimal level of fluorescence F during a dark period. A short saturating flash of light is then applied to reduce the plastoquinone pool and measure maximum fluorescence in the dark-adapted state, F . - Page 21 _Ln is calculated as F / ((F – F ) / F _Ln). For more details, please refer to: Oxborough K., Baker N.R. (1997): Resolving chlorophyll a fluorescence images of photosynthetic efficiency into photochemical and non-photochemical components: calculation of qP and Fv’/Fm’ without measuring F0’. Photosynthesis Research 54: 135-142.
- Page 22 Fig. 8 NPQ Protocol. Page | 22...
-
Page 23: Light Curve (Lc) Protocols
5.1.5 (LC) IGHT CURVE PROTOCOLS The protocols called Light Curve (LC) were designed to acquire parameters for construction of Light Response Curve relating the rate of photosynthesis to photon flux density. The method is based on successive measurements of the sample exposed to a stepwise increase of light intensity. - Page 24 Fig. 9 LC1 Protocol. Page | 24...
- Page 25 Fig. 10 LC2 Protocol. Page | 25...
-
Page 26: Optical Density Measurement (Aquapen-C Only)
5.2 O PTICAL DENSITY MEASUREMENT ONLY 5.2.1 ALIBRATION Calibration of the AquaPen is required before measuring OD. It can be done with either plain water or ideally, culture medium placed in a cuvette and the AquaPen. Calibration assures accurate OD measurements and it is recommended before every set of samples. It is highly recommended to calibrate AquaPen for OD measurements every time the instrument is switched ON. -
Page 27: Multiple Measurement
5.3 M ULTIPLE MEASUREMENT In addition to the single measurement of each available protocol, it is possible to perform also the multiple measurements of the same protocol over a period of time. The AquaPen may be set up to perform repeated measurements of the same parameter or protocol by selecting Settings >... -
Page 28: Control Menu Tree
ONTROL MENU TREE The next few pages of this manual show the structure of the firmware menu on the AquaPen device, and explain in a schematic way the operation of the AquaPen. The schematic shows the Main Menu, first-level Sub-Menus and second- level Sub-Menus. - Page 29 Page | 29...
- Page 30 Page | 30...
- Page 31 Page | 31...
- Page 32 Page | 32...
- Page 33 Page | 33...
- Page 34 Page | 34...
- Page 35 Page | 35...
-
Page 36: Usb Connection
7 USB C ONNECTION AquaPen comes with the USB cable that is required for charging of the Li-ion battery and can also be used for data transfer to the PC after completion of measurements. To connect the USB cable with the AquaPen device Follow the picture instructions below. Please note that a lock in system is used to secure the USB cable to the AquaPen and extreme caution has to be used when setting up this connection to avoid damage to the cable pins. -
Page 37: Bluetooth Connection
LUETOOTH CONNECTION In addition to data transfer via USB the AquarPen may be connected to the software via Bluetooth for data transfer. Before setting up the Bluetooth connection between the AquaPen and the PC, ensure the following components are in place: Bluetooth enabled PC The PC must have Bluetooth wireless technology, either built-in or through a Bluetooth card. - Page 38 Opening the Add Bluetooth Device Application • Select: “Add a device” to start searching for the new Bluetooth device. Be sure that the AquaPen is in discoverable mode (see step 1). Fig. 13 Adda device. Selecting the AquaPen • Select: PSI AquaPen icon. •...
- Page 39 Fig. 15 Pairing process. New version of AquaPen AP-110: • Select: Yes (Fig. 16). Please note that the AquaPen device does not display the verification number. The verification code is not important for the BT connection. • Select: Next. Fig. 16 Verifying of the Bluetooth pairing. Completing the AquaPen Pairing •...
-
Page 40: Fluorpen Software
LUOR EN SOFTWARE 9.1 S OFTWARE INSTALLATION Copy the FluorPen software provided on the USB flash disk to your computer and launch the FluorPen program. To connect and recognize the AquaPen device in the FluorPen software, proceeds first with the registration of the FluorPen software (Fig. 18). -
Page 41: Menu And Icons Explanation
9.2 M ENU AND ICONS EXPLANATION 9.2.1 AIN MENU MENU: File Load Loads previously saved data files. Save Saves data to hard disc. Export Exports data in .txt format. Export to JSON Exports data in JavaScript Object Notation. Close Closes the current experiment. Close All Closes all running experiments. -
Page 42: Menu Settings
9.2.2 ENU SETTINGS MENU > Setup > Settings After Download – Memory Erase If the box is checked the AquaPen memory is erased after each data download. Data – Inverted If the box is checked the polarity of data is inverted, e.g., multiplied by -1. This feature can be helpful for a certain type of experiment when the measured data are undesirably interpreted as negative values. - Page 43 Online Control – Values (Fig. The tab Values allows to set the measuring characteristics as light pulses intensities, measurement averaging and Multiple measurement. Please remember that each set value needs to be confirmed either by leaving the box or by pressing the ENTER key. The intensities of Actinic, Super and Flash Pulse light can be set in this window.
- Page 44 Online Control – Protocols (Fig. The requested Protocol using the previous settings can be started in this window. Once the measurement is completed the data is saved to the device and can be downloaded to the PC later. Measuring of OD 680nm and OD 720nm is active only in the AquaPen AP 110-C model.
-
Page 45: Data Transfer And Visualization
9.3 D ATA TRANSFER AND VISUALIZATION Once kinetic protocols data (OJIP, NPQ, LC) have been collected with the AquaPen to visualize the data it needs to be downloaded to the PC first via FluorPen software. Before data transfer can occur a successful connection between the AquaPen and the PC needs to be established via USB cable or Bluetooth module (see chapter 7 and 8 for details). - Page 46 Fig. 25 Graphic visualization of experiment. To export data from the FluorPen software select File > Export or Export icon. Select data type to export (Ft, QY, OJIP…) -Fig. 26. Selected only – exports only one measurement that is selected by mouse, otherwise it will export everything. Source data –...
- Page 47 Fig. 26 Data export. Page | 47...
-
Page 48: Firmware Update
9.4 F IRMWARE UPDATE All data in the AquaPen memory are erased during the firmware update! Before starting any firmware update, download all your data from the AquaPen memory to the computer! Starting Update • Select: Setup > Update Firmware From File (Fig. 27). Fig. - Page 49 Fig. 29 Select .bxn file. Finishing Upload • Select: OK to start uploading of the update (Fig. 30). Fig. 30 Data loss warning. • The bottom bar indicates the upload progress (Fig. 31). Fig. 31 Upload progress. • Press: OK to finish upload (Fig. 32). Fig.
-
Page 50: Gps Module
10 GPS MODULE The new versions of the AquaPen device (AP110) have integrated GPS module which can be turned on during the measurements. When GPS module is turned on the map coordinates will be automatically saved with all collected data and will be downloaded during data download. - Page 51 Fig. 34 GPS coordinates. Page | 51...
- Page 52 11 W ARRANTY TERMS AND CONDITIONS • This Limited Warranty applies only to the AquaPen device. It is valid for one year from the date of shipment. • If at any time within this warranty period the instrument does not function as warranted, return it and the manufacturer will repair or replace it at no charge.
Need help?
Do you have a question about the AquaPen-C AP 110-C and is the answer not in the manual?
Questions and answers