Advertisement
Quick Links
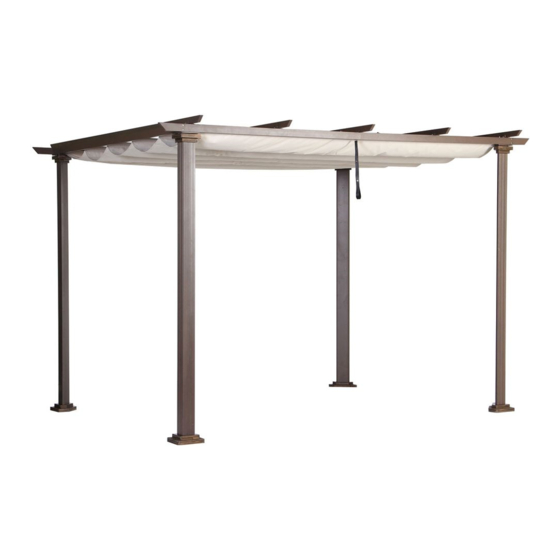
Model # 5LGZ1319
Toulon 12ft x 10ft Steel Pergola with Flat Roof
Questions, problems, missing parts? Before returning to the store,
call Pacific Casual Customer Service
7.30 a.m. - 4.30 p.m., PS T, Monday - Friday
(888) 445-6690
Pacific Casual L.L.C.
1060 Avenida Acaso, Camarillo CA 93012
CustomerService@PacificCasual.com
Ver: 1-12-2021
Advertisement

Related Manuals for Pacific Casual 5LGZ1319


Summary of Contents for Pacific Casual 5LGZ1319
- Page 1 Model # 5LGZ1319 Toulon 12ft x 10ft Steel Pergola with Flat Roof Questions, problems, missing parts? Before returning to the store, call Pacific Casual Customer Service 7.30 a.m. - 4.30 p.m., PS T, Monday - Friday (888) 445-6690 Pacific Casual L.L.C.
-
Page 2: Table Of Contents
Table of Contents Table of Contents ............2 Care Instructions..............2 Safety Information ............2 Pre-Assembly..............3 Assembly ...............5 Safety Information WARNING: of any foreign WARNING: This garden house Gazebo is NOT a permanent structure and is designed for sunshade and privacy and must be used under normal weather conditions. -
Page 3: Pre-Assembly
Pre-Assembly PLANNING ASSEMBLY It will take two people about 20 minutes to complete the assembly process. A Philips screwdriver, a freestanding ladder and a rubber mallet are needed. HARDWARE INCLUDED NOTE: Hardware not shown to actual size. Part Description Quantity Bolt (M6x16) Bolt (M6x30) Bolt (M6x75) - Page 4 Pre-Assembly PACKAGE CONTENTS Part Description Quantity Part Description Quantity Corner post Short side beam with rail Corner post Central beam with rail Fixed pole Post top accent Fixed pole Post base accent Guide pole Post base Guide pole Rear side beam Front side beam Canopy Pole receiver...
-
Page 5: Assembly
Assembly Assembling corner posts □ Slide post top accent (C) followed by post base accent (D) up from the bottom on each corner post (A/B). □ Secure the post top accent (C) to the top of the corner post with screws (EE) using a Philips Screwdriver. □... - Page 6 Assembly Assembling long side beams □ Plug the rear side beam (G) into the rear side beam (F) and secure them with bolts (AA) using hex wrench (FF). (Fig.2.1) □ Plug the front side beam (G1) into the front side beam (F1) and secure them with bolts (AA) using hex wrench (FF). (Fig.2.2) □...
- Page 7 Assembly Attaching short cross beams □ Attach one short cross beam (H) onto the top of two adjacent corner posts (A) and (B) with bolts (CC) using hex wrench (FF). (Fig.3.1) □ Repeat this for the other short cross beam. Bolt (M6x75) CC (8)
- Page 8 Assembly Attaching long side beams □ Attach the complete rear side beam (F/G) onto the top of corner posts with one bolt (CC) at each corner. □ Attach the complete rear side beam (F/G) to the short side beams (H) with two bolts (DD) at each outside corner using hex wrench (II). □...
- Page 9 Assembly Assembling the roof frame (1) □ Attach the short side beams with rail (J) onto the top of the assembled long beams with bolt (CC) and bolt (AA) using hex wrench (FF). J (2) Bolt (M6x16) Bolt (M6x75) AA (4) CC (4)
- Page 10 Assembly Assembling the roof frame (2) □ Attach the central beam (K) onto the top of the complete side beams (F_G, and F1_G1) with bolts (AA) using hex wrench (FF). □ Attach the short side beams (I) onto the the complete side beams (F_G, and F1_G1) with bolts (AA) using hex wrench (FF). K(1) I (2) Bolt (M6x16)
- Page 11 Assembly Attaching the canopy fabric □ Secure the assembled poles (L) and (M) onto the long beams without the pole receivers (Q) with bolts (BB) using hex wrench (FF). (Fig.8.1) □ On both short sides of the pergola, tie the canopy to the rings inside the rails of the side cross beams (J) with the elastic band (2). (Fig.8.2) □...
- Page 12 Assembly Placement of the canopy pull □ For clean look, when the canopy is fully extened, please take down the canopy pull (R) and hook it on corner post (B). (Fig.9.1) □ When the canopy is fully folded, set the hook on side beam (G). (Fig.9.2) (Fig.
Need help?
Do you have a question about the 5LGZ1319 and is the answer not in the manual?
Questions and answers