Table of Contents
Advertisement
Quick Links
Advertisement
Table of Contents

Subscribe to Our Youtube Channel
Related Manuals for Magnadyne M9


Summary of Contents for Magnadyne M9
- Page 1 10.2” BLUETOOTH MULTI-MEDIA RECEIVER...
-
Page 3: Precautions
For a more detailed description of certain Please don’t change the fuse on the power cord without professional guidance, using and navigate to www.magnadyne.com. an improper fuse may cause damage to this information on. MUTE supply with proper negative grounding. -
Page 4: Table Of Contents
Contents Precautions ..........1 Sound setting ..........17 Control Panel ...........3 Other Mode ..........17 Navigation Operations ......17 Basic Operations ........4 AUX Operations ........17 Turn on/off the power......4 Black Out Screen ..................4 Adjust the Volume........4 System settings ........18 Playing Source Selection ......4 Steering Wheel Control ...... -
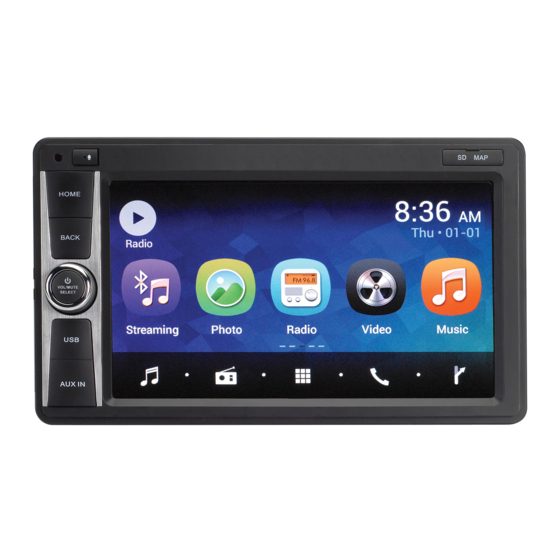
Page 5: Control Panel
Control Panel Press [ VOL/MUTE SELECT ] button to turn on the unit. 1. [ HOME ] Button 4. USB Socket Show main menu (press) Show main options(long press) 5. AUX IN Socket 2. [ BACK ] Button 6. Reset Load factory settings screen Bluetooth Internal MIC... -
Page 6: Basic Operations
Basic Operations Turn on/off the power V O L / M U T E 1. P r e s s a n d r e l e a s e [ is Off, the unit’s display will show the safety SELECT ] to turn the unit on. -
Page 7: Main Menu
Main menu Radio Operations Main Menu Select [Radio] on the main menu to enter radio mode. Touch the [ ] button to enter main source menu. 1. Return to home menu 1. Show current player source. 2. Hold and drag down to show the 3. -
Page 8: Select One Radio Band
Radio Operations Select Radio Band Recall the Stored Stations Touch the [ Band ] button to select one radio 1. Touch [ ] button on the screen to show the preset stations. Manual Tuning 2. Select a band 3. On the middle of the screen, drag the list During manual tuning, the frequency will be left/right to scroll, touch a station on the list changed in steps. -
Page 9: Rds Basics
Radio Operations RDS Basics PTY Function Radio Data System (RDS) enables traffic reports to be received and provides many facilities, including enabling the radio station name to be displayed on the radio display. and arrows on the screen. Adjust RDS Settings 1. -
Page 10: Sd/Usb Operations
SD/USB Operations Using a SD Card Drag up/down to scroll. 1. Open the card slot cap, insert a SD card Touch an item to select. into the corresponding slot, the unit will load 10. Enter search menu. another source, in order to avoid damaging off the card after it pops out. -
Page 11: Playlists
SD/USB Operations Select Music by Album 1. Touch [Albums] on the left of the screen. 2. Touch an album shown on the list. 3. Select a song to play. Select Music by Song Name 1. Touch [Songs] on the left of the screen. 2. -
Page 12: Gallery Operations
SD/USB Operations Bluetooth Operations Bluetooth Operations Gallery Operations The Bluetooth allows you to utilize your car’s 1. Select [Photo] on the APPS menu. mobile phone or music communication. Some 2. Select one gallery to show the picture list. Bluetooth mobile phones have the audio features, and some portable audio players support Bluetooth feature. -
Page 13: Call History
Bluetooth Operations Call from Phonebook After connect successfully, the unit show following menu. 1. Touch [ Contacts ] button to show your 2. Select a number to select and touch [ button to dial out. 3. Touch [ ] to search a contact name. Making a Call Touch [ ] to clear the digits. -
Page 14: Bluetooth Settings
Bluetooth Operations Bluetooth Settings Audio streaming may or may not resume a f t e r t e l e p h o n e i n t e r r u p t a s t h i s i s Touch [ Settings ] button to show Bluetooth dependent on your mobile phone. -
Page 15: Ipod/Iphone Operations
iPod/iPhone Operations DVR-RECORDER (optional) Connect car recorder to the unit. This unit supports only the following iPod/iPhone models: After connection, user can control the car recorder through DVD screen. To access the Recorder menu, touch DVR Computer icon on the main menu. Quick instruction Plug in microSD icon to enter. -
Page 16: Siriusxm Satellite Radio
SiriusXM Satellite Radio SiriusXM Satellite Radio SiriusXM® Satellite Radio Once subscribed, you can tune to channels in your sub-scription plan. Note, the activation The device can be used for SiriusXM satellite Note: to be powered on and receiving the SiriusXM signal to receive the activation message. - Page 17 SiriusXM Satellite Radio SiriusXM Satellite Radio SiriusXM Satellite Radio SiriusXM main display SiriusXM main display channel 1 channel 1 ® ® Seek Tuning Seek Tuning the [ ] icon and to scroll through the the [ ] icon and to scroll through the higher channels touch and hold the [ higher channels touch and hold the [ icon.
- Page 18 SiriusXM Satellite Radio SiriusXM Satellite Radio SiriusXM Satellite Radio that preset. Drag up/down to scroll. that preset. Drag up/down to scroll. Locking Individual SXM Recalling a Channel 3. Touch the [ < ] icon to return to the SXM ® 3.
-
Page 19: Sound Setting
Other Mode Sound Setting Navigation Operations Select [EQ] on the menu to enter sound setting mode To navigate by the unit, simply select the Touch to select a preset EQ on upper side of desired navigation application on the app menu. -
Page 20: System Settings
System settings Steering Wheel Control: Select [SWC] on the manin menu to enter SWC setting menu. 1.Touch number button to select a SWC button. 2. Select a function. 3. Press each individual steering wheel control button for each corresponding function. 4. -
Page 21: Adjust Video Settings
System settings Adjust Video Settings 1. Touch [Video]. 2. Touch an option repeatedly to select. Video settings Opciones Descripción Choose video output mode Video output NTSC/PAL Choose rear/left/right camera display mode Camera Settings Adjust Time Settings 1. Touch [ Time ]. 2. -
Page 22: Device Connections
Device Connections Notes of connection voltage is appropriate for this unit to be used, otherwise, have a professionally installed transformer to convert the output voltage to 12V. disconnected before installation. To prevent short circuit in the wiring and damaging to this unit, secure all wirings with cable clamp or adhesive tape. - Page 23 Device Connections Parking Brake Cable Connections Green/White Wire...
- Page 24 Device Connections Device Connections Device Connections Device Connections Wiring Diagram Wiring Diagram Wiring Diagram YELLOW YELLOW YELLOW Automotive WHITE WHITE WHITE AM/FM Antenna BT ANT (Do Not Connect) Optical Audio Input Antenna Safety Cameras (Optional) WHITE REAR L REAR R WHITE FRONT L FRONT R...
- Page 25 Troubleshooting Troubleshooting The following checklist can help you solve the problems which you may encounter when using the The following checklist can help you solve the problems which you may encounter when using the unit. Before consulting it, check the connections and follow the instructions in the user manual. unit.
-
Page 26: Troubleshooting
Troubleshooting Problem Possible cause Solution General Car ignition is not on. Cable is not properly The unit will not switch on. connected. Replace fuse with a new fuse of the Fuse is burnt. same capacity. Volume is set at minimum or No sound the mute function is on. - Page 27 General Reference Supply Voltage ..............12V(DC) General Operating Voltage Range ............Reference Supply Voltage ..............12V(DC) .................15A Operating Voltage Range ............10.5 - 15.8V(DC) Grounding System ............ Car Battery Negative Pole Max Operating Current .................18A Dimensions(WXHXD) ..........314.0 x 176.0 x 171.0mm Grounding System ............
-
Page 28: Fcc Statement
FCC Statement FCC STATEMENT 1. This device complies with Part 15 of the FCC Rules.Operation is subject to the following two conditions: (2) This device must accept any interference received, including interferencethat may causeundesired operation. void the user's authority to operate the equipment. NOTE: This equipment has been tested and found to comply with the limits for aClass B digital device, pursuant to Part 15 of the FCC Rules. -
Page 29: Warranty
Warranty ONE (1) YEAR LIMITED WARRANTY Magnadyne Corporation or its authorized agents will within one year from the date of sale to you, repair, replace or refund the retail sales price of said product or any part thereof, at the option of the Magnadyne Corporation or its authorized agents, if said product or part is found defective in materials or workmanship, when properly connected and operating on the correct power requirements designated for the specific product. - Page 32 P.N.: 1270750004800/A0 M 9 - U M _ r e v . A...
Need help?
Do you have a question about the M9 and is the answer not in the manual?
Questions and answers