
Subscribe to Our Youtube Channel
Related Manuals for Magnadyne RV4500


Summary of Contents for Magnadyne RV4500
- Page 1 AS/PS DISP and Installation PUSH 3-Beam Laser Pickup Multi-Media Receiver Operation Manual SPEAKER AM/FM DISC RESET HEADPHONES RV4500 AM / FM Stereo...
-
Page 2: Table Of Contents
Button Locations and Functions Remote Control Button Locations and Functions General Operation Sound Controls Speaker Selection Setting the Clock Sleep Timer Operation Alarm Operation Radio Operations Disc Warnings Music Disc Operation MP3 Disc Operation Movie Disc Operation Setup Menu Audio/Video Input Headphone Output... -
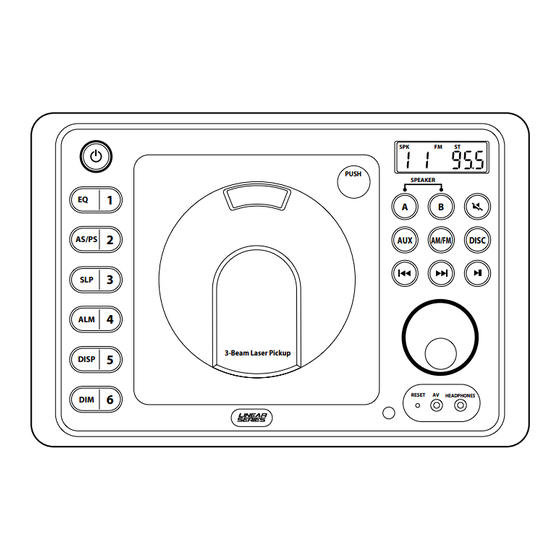
Page 3: Button Locations And Functions
14. Audio/Video Input Jack: Press the AUX button until “Av In F” appears in the display then plug in a device via the 3.5mm audio/video input socket. Note: The RV4500 does not control the device, it just allows the audio/video to be played through the system. -
Page 4: Button Locations And Functions
17. Dimmer Button (DIM): Press to dim the lighting in the display area. Sequential presses will select dif- ferent levels of display area lighting. 18. Radio Preset Button (6): Recalls a memorized radio station, and programs a radio station into memory. -
Page 5: Remote Control Button Locations And Functions
6. Display Button (DISP): Press to toggle through the available display information. 7. Radio SEEK Button: Press and the tuner will seek up to the next strong station and stop. 8. Radio SCAN Button: Press this button and the tuner will scan up to the next strong station, paus- ing for 10 seconds at each station. -
Page 6: General Operation
To select a play source, press one of the follow- ing mode buttons: AUX (Auxiliary Input Front or Rear), AM/FM (AM or FM Radio Band) or DISC (Music or Movie) Dimming the Display: Press the DIM button to select the desired level of brightness for the display area. - Page 7 Sound Controls Bass, Treble and Balance Control Select the desired sound mode by pressing the VOLUME knob. The modes will be displayed in the fol- lowing order: Bass, Treble, Balance and Volume. Bass: Select the Bass mode by pressing the VOLUME knob.
-
Page 8: Sound Controls
Sound Controls (Continued) Mute: Press the button to mute the volume level. Press the button again to restore the volume. Speaker Selection Selecting Speaker Sets: • Press the A button to toggle speaker set A on and off. “SPK A” appears in the display when speaker set A is on. -
Page 9: Setting The Clock
Setting the Clock (Continued) 4. Press the VOLUME knob and the Minute indica- tors will start flashing. 5. Rotate the VOLUME knob until the correct Minutes appears in the display. Wait 5 seconds and the colon between the hours and the min- utes will start flashing indicating the clock is set. -
Page 10: Alarm Operation
Alarm Operation Setting the Alarm Timer: 1. Press the ALM button and the clock will appear in the display with the hour number flashing. 2. Rotate the VOLUME knob until the correct Hour appears in the display. “ALM” will appear in the display indicating the alarm is activated. -
Page 11: Radio Operations
Memorizing Radio Stations: 1. Press the AM/FM button to select either the FM 1, FM 2, FM 3, AM 1 or AM 2 radio band. 2. Tune-in the desired radio station. 3. To memorize the station press and hold any- one of the six radio station recall buttons until the preset number appears. -
Page 12: Disc Warnings
(Continued) Automatically Store Radio Stations: 1. Press the AM/FM button to select either the FM or AM radio band. 2. Press and hold the AS/PS button then release. The tuner will search for the strongest sta- tions and store them into memory. The new stations will replace stations that were previ- ously stored in the current band. -
Page 13: Music Disc Operation
Music Disc Operation General Operations: 1. Push the door access the disc player. 2. Insert the disc onto the hub with the label facing forward. Use your thumb to make sure the disc snaps onto the hub. 3. Press the DISC button and “LOAdIng” will appear in the display. -
Page 14: Music Disc Operation
Music Disc Operation Pausing the Disc: Press the ll button on the remote control to � pause the disc, press it again to resume play. Stopping the Disc: Press the button to stop the disc. To resume play, press the ll button. -
Page 15: Mp3 Disc Operation
MP3 Disc Operation General Operations: 1. Push the door access the disc player. 2. Insert the disc onto the hub with the label facing forward. Use your thumb to make sure the disc snaps onto the hub. 3. Press the DISC button and “LOAdIng” will appear in the display. -
Page 16: Mp3 Disc Operation
MP3 Disc Operation Pausing the Disc: Press the ll button on the remote control to � pause the disc, press it again to resume play. Stopping the Disc: Press the button to stop the disc. To resume play, press the ll button. -
Page 17: Movie Disc Operation
Movie Disc Operation General Operations: 1. Push the door access the disc player. 2. Insert the disc onto the hub with the label facing forward. Use your thumb to make sure the disc snaps onto the hub. 3. Press the DISC button and “LOAdIng” will appear in the display. - Page 18 Movie Disc Operation Pausing the Movie Press the ll button on the remote control to � pause the movie, press it again to resume play. Stopping a Movie: Press the button on the remote control to stop the movie. To resume play, press the Pressing the button 2 times.
-
Page 19: Movie Disc Operation
Movie Disc Operation Slow Motion: Continue to press the SLOW button to play the movie is slow motion in the following order: SF 1/2, SF 1/3, SF 1/4, SF 1/5, SF 1/6, SF 1/7, SB 1/2, SB 1/3, SB 1/4, SB 1/5, SB 1/6, SB 1/7 To resume normal play, press the button. -
Page 20: Setup Menu
Setup Menu Accessing the Movie Disc Setup Menu: Press the SETUP button on the remote control to display the Setup Menu. Language Setup System Setup Page TV SYSTEM TV TYPE PASSWORD RATING DEFAULT System Setup Page: Use the navigation buttons to scroll between the menu items. -
Page 21: Audio/Video Input
Audio/Video Input Selecting the Audio/Video Play Source: Note: The RV4500 does not control the device, it just allows the audio/video to be played through the system. Front Audio/Video Input: Insert the 3.5mm jack from the audio/video device into the AV input socket on the front of the housing. -
Page 22: Reset Button
• The vehicle battery is removed and replaced. Should any of these conditions occur, simply press and release the RESET button on the radio front panel using the tip of a ball point pen. This will reset the radio microprocessor to the origi- nal factory settings. -
Page 23: Installation
Installation Wall Panel Chassis Opening Structural Stud Caution: Do not install radio without rear cover installed: No user-serviceable parts inside. Rear cover provides protection against potential fire hazard. Trim Ring ”... -
Page 24: Speaker Connections
Speaker Connections Left Right Speaker B Speaker B White/Black Wire (Common -) Gray Wire Gray/Black Wire Left Right Speaker A Speaker A Brown Wire Brown/Black Wire White Wire (Common -) -
Page 25: Wiring And Auxiliary Connections
Wiring and Auxiliary Connections External Automotive Type Antenna (Optional) Red Wire (+) to 12 Volt DC Power Black Wire Ground AV In AV Out 10A Fuse Movie Disc Player (Optional) Monitor (Optional) -
Page 26: Safety Instructions
C. Mount antenna discharge unit as close as possible to where lead-in enters house. Antenna Lead-In Wire (B) Ground Clamp Grounding Clamps Grounding Electrode Driven 8’ Into the Earth Example of Antenna Grounding as per National Electrical Code. Instructions Contained in Article 810-"Radio and Television Equipment" Antenna Discharge Unit (C) To Receiver... -
Page 27: Warranty
“NOTE: The manufacturer is not responsible for any radio or TV interference caused by unauthorized modifications to this equipment. Such modifications could void the User’s authority to operate the equipment.”... - Page 28 © Copyright 2011 RV4500-UM Magnadyne Corporation Rev. A 4-27-11...
Need help?
Do you have a question about the RV4500 and is the answer not in the manual?
Questions and answers
Why the dvd doesn’t work. Put disc in and nothing happens. Docs doesn’t spin
The DVD may not be working in the Magnadyne RV4500 due to one or more of the following reasons:
1. The disc is dirty, scratched, warped, or has a sticker or label that interferes with playback.
2. The disc is inserted upside down (label side should be up).
3. The disc was exposed to direct sunlight, heat, moisture, or stored improperly.
4. The player was not paused, stopped, or resumed correctly using the remote control buttons.
5. The disc was not fully stopped before opening the door or removing it.
Check the condition and placement of the disc and follow the correct operation steps.
This answer is automatically generated